Dude! Take Your Turn!
A Gaming Life
Combat Commander – After Action Report – Scenario #23 – No-Man’s Land
After taking the month of June off for personal reasons, I was eager to play the July scenario for the Combat Commander: Europe ladder (run by the illustrious Patrick Pence).
After winning the May game (my first official win!), I had already moved up the ladder to #35. My opponent this time was Sean Burns and the contest arena was scenario #23 from the Combat Commander: Mediterranean expansion, pitting the Italians (me) against the British (Sean) in the desert of North Africa.
First, I want to thank Sean for bearing with me as I had microphone problems, so we ended up having to use the VASSAL chat function rather than actually talking. That really sucked.
Basically, both the Italians (greenish-blue?) and British (tan) have dug in on their side of the board (a line of trenches on both sides), but the British have snuck a “sniper” into position to harass the Italian lines (in the game, this is a leader with a heavy machine-gun in an advance foxhole).
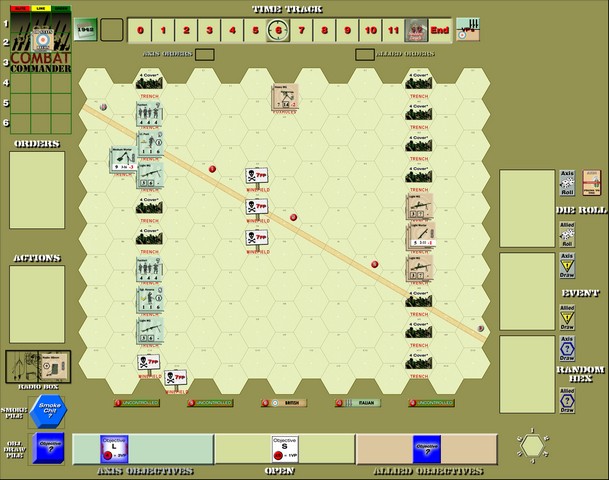
Sean set the sniper (Corporal Singh) up in hex H1 (the only other choice was H10) and then had the rest of the troops positioned centrally in the British trench line. He also has a radio that can lay down some heavy fire or (most probably) a lot of smoke.
I split my forces a little bit, with the mortar up north to harass Singh and see if I could do something about him early. The Italian weapons are kind of brittle, so I hoped I would get some use out of it and the light machine guns before they went away.
You can also see that I drew Objective L, which gave me 3 victory points for Objective 4, which was behind my lines so Sean wouldn’t be able to get it unless he smashed through my line.
The game started like a herd of turtles with some discarding, but the Italian mortar finally opened fire!
The mortar fired at Singh first, followed by Lt. Pani’s squad and then the LMG.
On the first Italian card draw, targeting the mortar, what happened?
Yep, a Time event.
I decided to keep it, so time advanced.
However, luck was with Sean as Singh survived and when the LMG opened up, it jammed!
That was the extent of the first fire round, though.
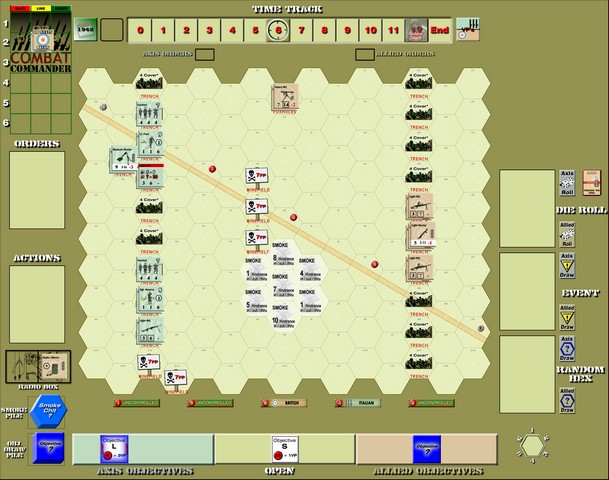
Sean fired his artillery to lay a smokescreen down. However, when he tried to use his mortar to extend that smoke screen, he missed. Twice.
A couple of turns later, I drew another Fire card and opened up on Singh again. The mortar hit and when I rolled the fire total, I rolled another Time!
Not only is the game advancing way too fast for Sean, but Singh took a 21 firepower hit. Not even those foxholes could stop that.
The British mortar finally hits with some smoke so they can move out.
After the Move order, Sean tried to recover Singh…and rolled another Time! Not only did Singh not rally but time kept moving on. At this rate, it was going to be a short scenario.
I got another Fire card and opened up on Singh one more time. The mortar hit, rolling a sniper which ended up killing my broken LMG. However, with 18 firepower and Singh with just 11 morale, things weren’t looking good.
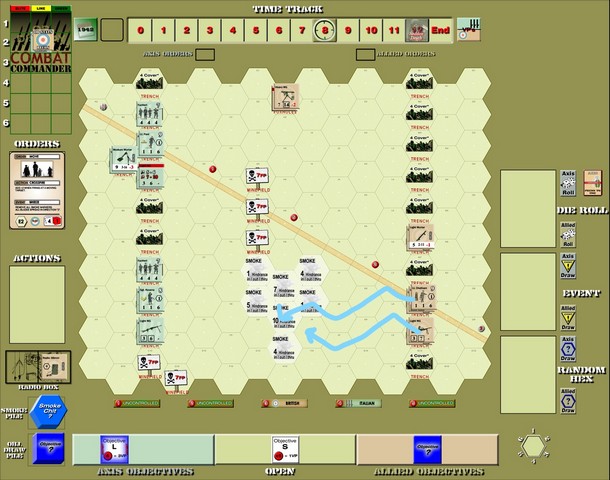
With Singh gone, the north was completely open. I quickly darted a squad out to take Objective #1, giving me another point.

I then sent Lt. Pani on a multi-turn trip to try and exit, with all the Brits behind smoke except the mortar that can’t Opportunity Fire.
With a little more smoke out, the Brits made their move.
And it all went to Hell.

The southern Italian squads opened up under the command of Sgt. Rovena and just decimated everybody. Everybody broke. It didn’t help that the first morale check Sean made resulted in a Shell Shock event that broke Lt. Chatham before he could even move.
But Sean had a Recover! Chatham and one squad recovered, but the third one not only was Suppressed, but then drew a KIA event, where one broken unit has to be eliminated.
Following that sequence, there was a back and forth of me breaking Sean’s radio and him repairing it, until I was finally able to get a double-break and ended that threat.
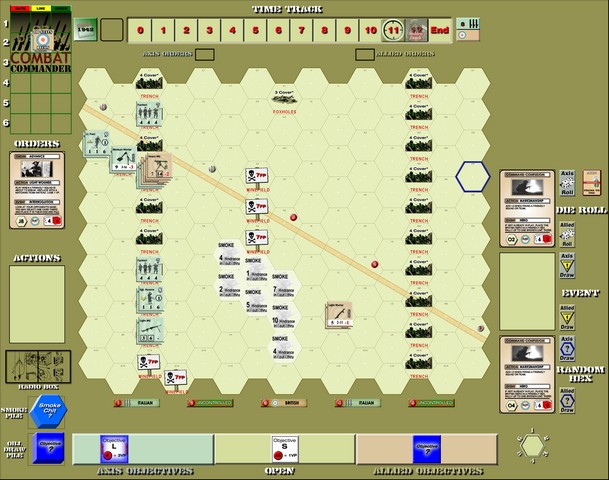
Sean brilliantly used his mortar to extend his smoke screen almost to my lines, including a 10-hindrance smoke right at the tip.

Chatham and his remaining squad moved forward. They were close enough to smell the wine in the Italian trenches!
The Italian mortar tried to do something about them, but the smoke protected them and they weren’t hit. When they were hit, they recovered easily. Not only that, but Chatham was able to scrounge Singh’s heavy machine gun!
Lots of discarding ensued.

Finally, Chatham made his move! Opportunity fire resulted in the Italian hero emerging but no actual effects on the British.
Unfortunately for Sean, during the firing, his deck ran out, and then I drew another Time event (my deck was running out shortly anyway).
We were at 11 on the Time Track, but the British were close.
What were they going to do?
Of course, they were going to Advance into melee.
With 3 Ambushes!
Unfortunately for Sean, I had been saving Ambushes and also had 3.
It was my broken squad (the Hero died) against Sean’s broken squad (Chatham died). If I won the melee, I’d win due to his Surrender level and his eliminated units.
Two against two.
Whoever rolls highest wins.
The Italians roll a 7. Not bad enough to do a re-roll with the Initiative.
Can the British win?
Well, yes and no.
Sean drew a 12 Time event!
The Italian squad dies so he won the melee but we’ve reached Sudden Death. Anything other than a 12 ends the game.
The game ended.
After totaling all of the VPs for objectives, the Italians win with 14!
Sean was a great sport with all of those Time events happening early, and his inability to draw Movement cards at the right time. He did the best he could with what he had.
Looking forward to maybe playing him again at some point in the Ladder.
Combat Commander Ladder – After Action Reports
To see all of my Ladder After Action Reports since May 2021, go here!

Pingback: Combat Commander – After Action Report – Scenario #112 – Sonnenwende – Dude! Take Your Turn!
Congratulations! You’re climbing that ladder 🙂
LikeLiked by 2 people
One of these days, I’ll be knocked down a few pegs. 🙂
LikeLiked by 1 person
Pingback: Combat Commander – After Action Report – Scenario #34 – Encircled at Hill 30 – Dude! Take Your Turn!
Pingback: Combat Commander Pacific – After Action Report – Scenario A – Grassy Knoll – Dude! Take Your Turn!
Pingback: Combat Commander Pacific – After Action Report – Scenario M6 – Breakout – Dude! Take Your Turn!
Pingback: Combat Commander Europe – After Action Report – Scenario 35 – Spartakovka Salient – Dude! Take Your Turn!
Pingback: Combat Commander Europe – After Action Report – Scenario 51 – The Uneasy Wait – Dude! Take Your Turn!
Pingback: Combat Commander Europe – After Action Report – Scenario 65 – Road Trip – Dude! Take Your Turn!
Pingback: Combat Commander Europe – After Action Report – Scenario 75 – Sturmgruppe Beton – Dude! Take Your Turn!
Pingback: Combat Commander Europe – After Action Report – Scenario 90 – The Man Who Would Be King – Dude! Take Your Turn!
Pingback: Combat Commander Europe – After Action Report – Scenario LoM9 – Operation Mercury – Dude! Take Your Turn!
Pingback: Combat Commander Europe – After Action Report – Scenario #119 – Sky Fall – Dude! Take Your Turn!
Pingback: Combat Commander Europe – After Action Report – Scenario #9 – Rush to Contact – Dude! Take Your Turn!
Pingback: Combat Commander Europe – After Action Report – Scenario #14 – At the Crossroads – Dude! Take Your Turn!
Pingback: Combat Commander Europe – After Action Report – Scenario #30 – Red Skies at Night – Dude! Take Your Turn!
Pingback: Combat Commander Pacific – After Action Report – Scenario E – West Tank Barrier – Dude! Take Your Turn!
Pingback: COMBAT COMMANDER PACIFIC – AFTER ACTION REPORT – SCENARIO M4 – TEMPLETON’S CROSSING – Dude! Take Your Turn!
Pingback: Combat Commander Europe – After Action Report – Scenario #41 – The Commissar House – Dude! Take Your Turn!
Pingback: Combat Commander After Action Report – Scenario #53 – Deeds Not Words – Dude! Take Your Turn!
Pingback: Combat Commander After Action Report – Scenario #67 – The Orient Express – Dude! Take Your Turn!
Pingback: Combat Commander After Action Report – Scenario #82 – Hidden Guns Lash Out – Dude! Take Your Turn!
Pingback: Combat Commander After Action Report – Scenario #91 – The Battle of Trafalgar – Dude! Take Your Turn!
Pingback: Combat Commander After Action Report – Scenario LoM #8 – Codes in the Sunrise – Dude! Take Your Turn!
Pingback: Combat Commander After Action Report – Scenario #105 – La Fiere Counterattack – Dude! Take Your Turn!
Pingback: Combat Commander After Action Report Supplemental – Scenario #28 – No Ingouf Around – Dude! Take Your Turn!
Pingback: Combat Commander After Action Report – Scenario #10 – Commando School – Dude! Take Your Turn!
Pingback: Combat Commander After Action Report Supplemental No. 2 – Scenario #92 – Let England Shake – Dude! Take Your Turn!
Pingback: Combat Commander After Action Report – Scenario #20 – A March in December – Dude! Take Your Turn!
Pingback: Combat Commander After Action Report – Scenario #33 – We Go! – Dude! Take Your Turn!
Pingback: Combat Commander – After Action Report – Scenario L – Slopes of Hell – Dude! Take Your Turn!
Pingback: Combat Commander – After Action Report – Scenario M10 – Bulolo River Bridge – Dude! Take Your Turn!
Pingback: Combat Commander – After Action Report – Scenario 44 – Stalingrad of the North – Dude! Take Your Turn!