Dude! Take Your Turn!
A Gaming Life
Combat Commander – After Action Report – Scenario 65 – Road Trip
It’s time for another After Action Report for Combat Commander ladder run by the incomparable Patrick Pence (he of Patrick’s Tactics & Tutorials Youtube channel)!
December’s loss was disheartening but I was hoping to come back with a win in January.
I needed to get back near the top!
Did that happen?
You’ll have to keep reading to find out.
January’s scenario was taken from the Combat Commander: Resistance expansion and has a cadre of French Partisans facing off against a contingent of German soldiers who are trying to get to Normandy to fight of the Allied invasion.
This month’s opponent was Stan M and he was playing the Germans. I had the task of playing the Partisans and learning all of their new rules!
(As usual, you can click on a picture to see it larger)
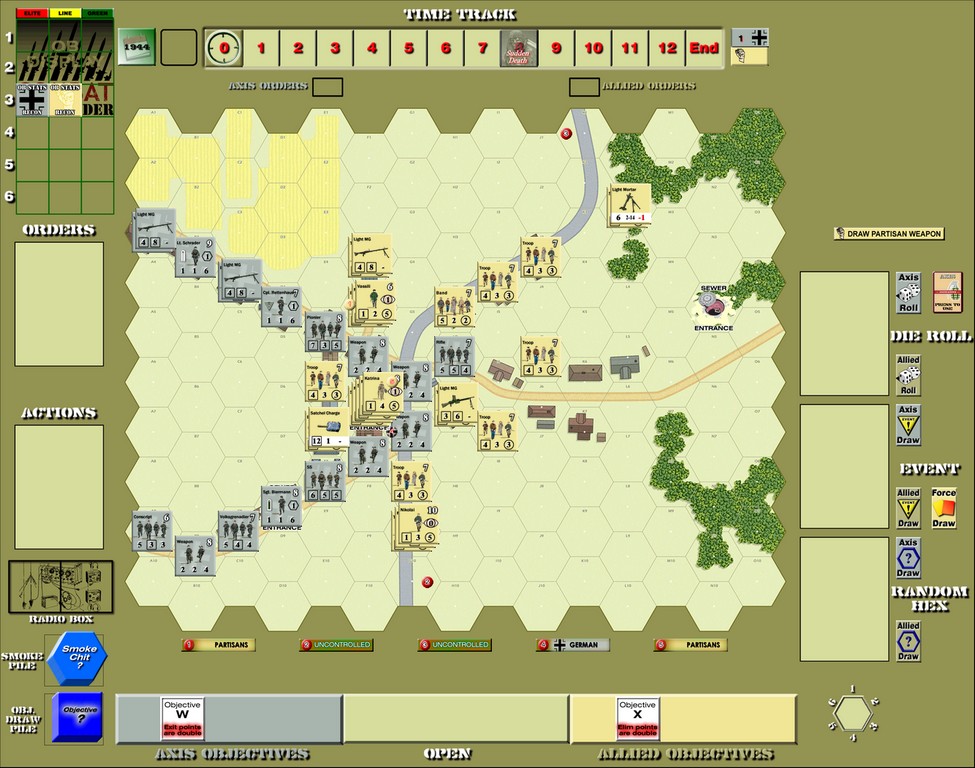
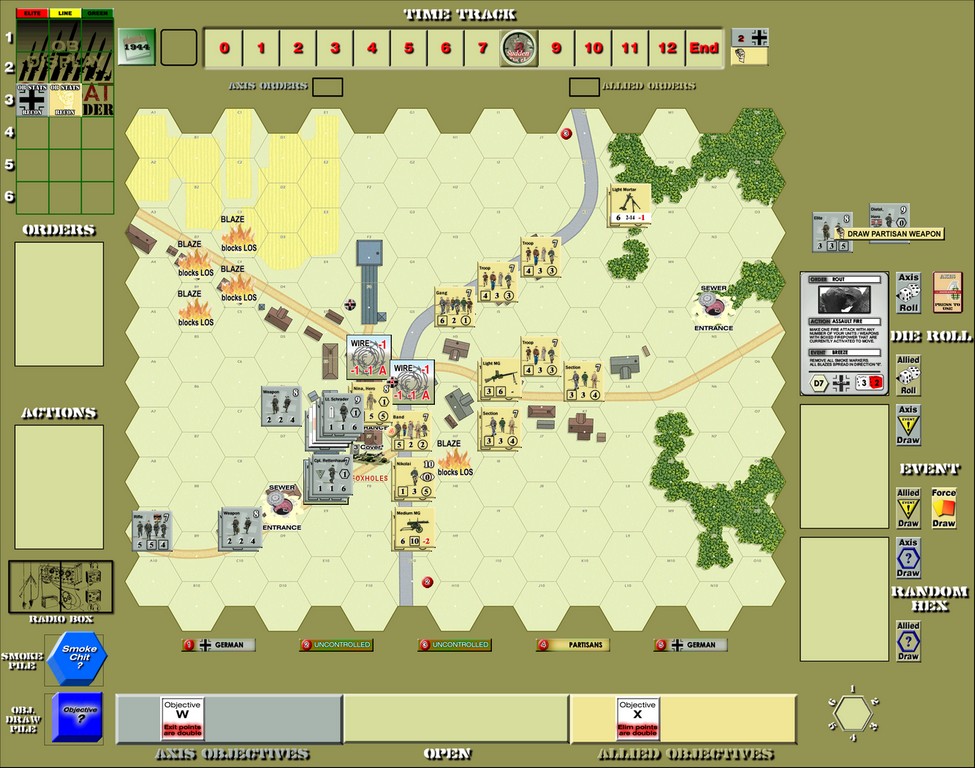
This was the setup, but I should mention a few things first.
The Partisans are different than all of the other Combat Commander factions for a number of reasons.
First, they only have 36 cards in their deck instead of 72 (but they don’t have any Time triggers).
Secondly, their leaders don’t have Leadership value for their units but just for weapons (since Leadership is for Squads and Teams and Partisans don’t have those) and they don’t have a Command radius.
Instead, when a leader is activated, they can activate any Partisan unit in line of sight of that leader.
That can be a lot! Or maybe not so much if they are isolated.
Thirdly, Partisans aren’t assigned weapons by the scenario. Instead, they are assigned a certain number of random weapons that are drawn at the beginning of the game. You don’t know what you’re getting!
Finally, when a broken Partisan unit (except a leader) breaks again, you draw a “Force Draw” card. It’s very possible that the unit will just be reduced rather than eliminated.
(There are a couple more oddities, like circled movement ratings making it so each hex only costs 1 movement point regardless of terrain).
With that in mind, can my Partisans hold the line and eliminate a bunch of Germans?
Let’s see, shall we?
For this scenario, the Germans have to set up each unit individually in a dirt road hex and they all have to be in a continuous line. No stacking!
Once they’ve done that, the Partisans draw 10 random hexes and can place a Sewer Entrance in three of them. Partisans can’t set up in a hex with Germans unless it’s a Sewer Entrance hex, which means the Germans are going to keep their leaders out of the Partisan setup area.
My Sewer Entrance draws weren’t that great, with only one of them showing up under a German, though it was a leader!
What’s important to keep in mind in Road Trip is that, for the Partisans, eliminating German units gives them double VP. For the Germans, exiting German units off the edge of the board gives them double VP.
That will become important.
The Partisans move first, and the first turn revealed another new thing for the Partisans (though it’s not new if you’ve played Combat Commander: Pacific or the Stalingrad battle pack): melee hexes that don’t resolve right away!
Melee isn’t resolved until the beginning of the German turn, so if Germans move into Partisan hexes, Partisans can get out of there before melee happens. If Partisans move in, though, the Germans don’t get the same possibility.
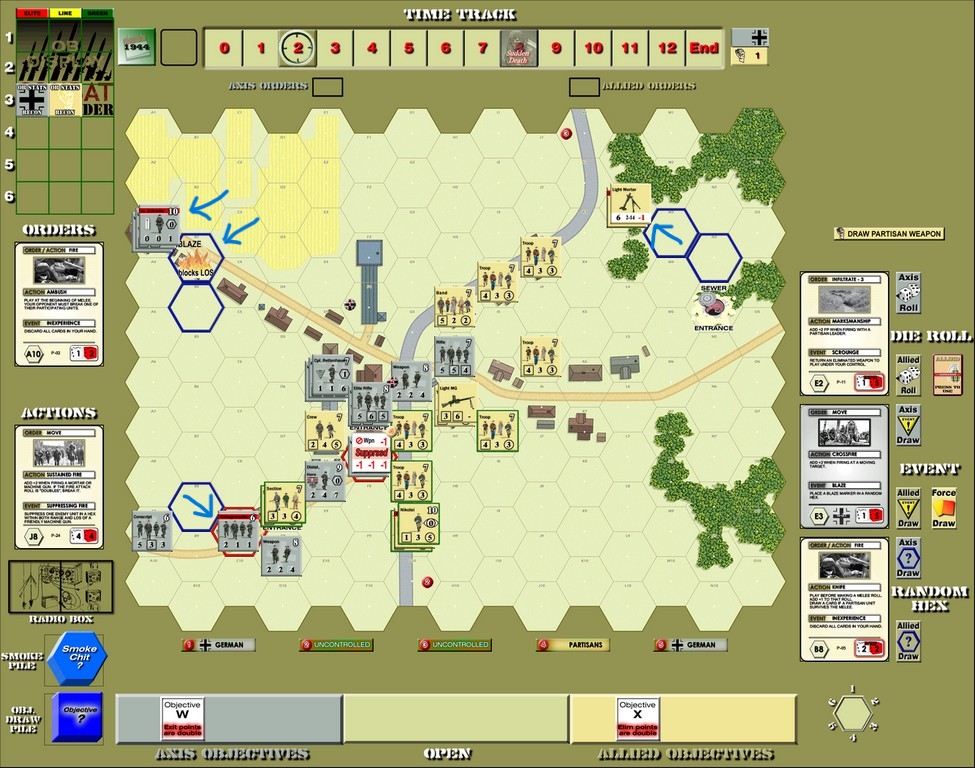
Since I move first in the scenario and I happen to draw an Advance card (the requirement to move through the Sewers), it’s time to go German leader hunting!

Katrina and her two Sections advance through the sewers to surprise Sgt Biermann!
Neither side has an Ambush card, so the Partisans outmatch Biermann 10-1 in strength.
He doesn’t last long.
One of the three German leaders is dead before they can even do anything.
The German’s first move is to consolidate some of the troops in the north, with Corporal Rettenhaus joining up with the elite Pioneer Squad. They will be the bane of the Partisan existence.
In the ensuring Opportunity Fire by the Partisans, the German Hero appears! He comes out of the SS Squad that is along the southern road.

Rettenhaus and the Pioneer Squad break but that doesn’t last too long. In fact, they immediately rally (always pays to have a Recover card ready when you move).
After a couple of discard turns, Rettenhaus and his men let loose a blistering fire that breaks Vasili and the Band with him.
The Partisans also get one of the worst events you can get and only the Partisan deck has it: Inexperience! This forces you to discard every card in your hand. Of course, you don’t draw back up, which means your next turn is only drawing, giving the opponent another turn to keep going.
The Band breaks again, but is reduced to a Crew instead of dying.
One of the bad things about the Partisans is that their broken morale, especially their smaller units, really sucks. I finally play one of the very few Recover cards I will get this game and the Crew is Suppressed rather than rallying. Vasili, of course, rallies which means his morale changes from 11 to 7. He likes being broken!
The Partisans do draw a “Stealth” event which enables another melee, this time against a German Weapons Team.
But Rettenhaus has more in him. Seriously, this fire group was a pain in my ass the entire game.
They kill the crew and break Vasili again, along with the Troop in F3.
Since I can’t find another Recover card, next turn Rettenhaus finishes the job as well as killing the Troop next to him with a timely Spray Fire attack.

That clears the building.
To try and get some of this back, Katrina activates a bunch of units (love that Partisan leader activation rule!) to see if they can take care of the SS Squad and Hero.
Of course, on the first German morale check, they draw a sniper that breaks Katrina!

Thankfully, the attack was powerful enough to break both Germans as well.
The subsequent satchel charge attack not only eliminates the SS Squad, but the first roll is so good that Stan gives me the Initiative. But Katrina gets another sniper hit against her and suddenly the Partisans are down to one leader.

There is some back and forth and then Rettenhaus and the Pioneers move in for even more kills.
The Germans play a Recover card and also get another Hero event. Stan actually got three Hero events during the game but since I never killed him, he never actually had to come back onto the board.
More Partisans die through subsequent turns, though one fire attack results in a sniper that breaks Schrader all the way in the back. That’s what you get for hanging out in the rear and letting others fight for you!
Then a blaze shows up near him and there are more sniper hits!
Seriously, I’ve never seen so many sniper hits as occurred in this game. I guess maybe because the units are spread out more.

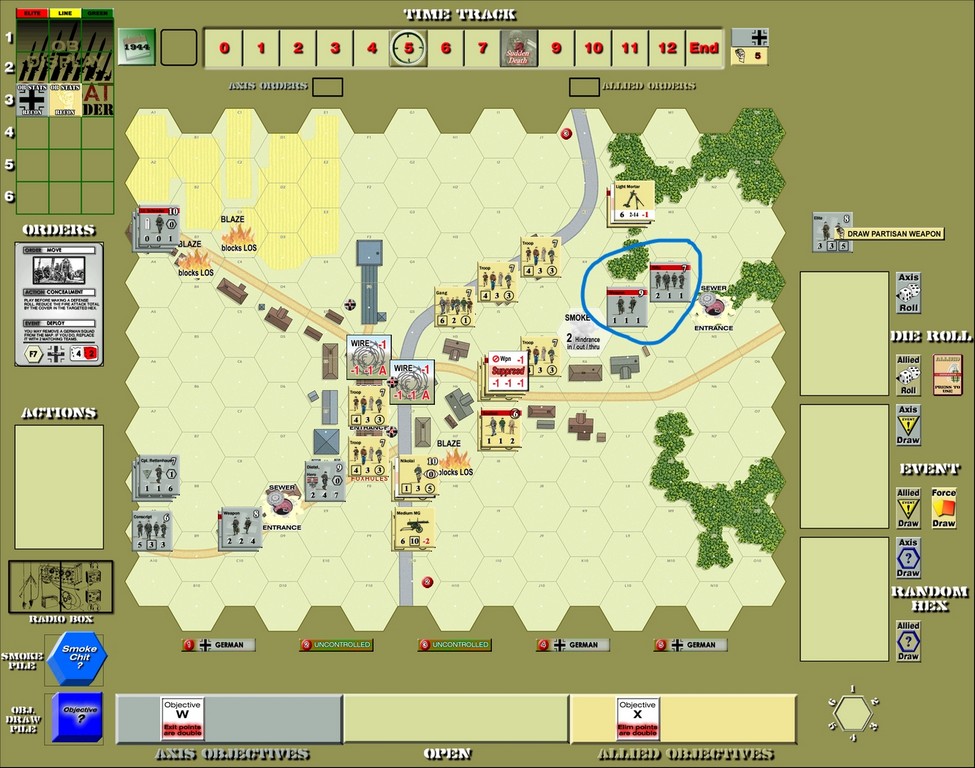
The Partisans, getting tired of this huge fire group, decide to Advance the units that Katrina formerly led back through the sewers to their original hex, where the Elite Rifle Squad sits with a light machine gun.
The Partisans ambush the Squad, breaking it and reducing its firepower but the Germans play “Light Wounds” and reduce to a Team rather than breaking. It doesn’t help, though, and they die too. The Germans also have an Ambush, so one of the Sections breaks.
A No Quarter action gives the Partisans 4 VP instead of 2 for the successful melee.
Sadly, this is where my inability to draw a Recover card hurt me. A few broken units and no way to rally them.
Some ineffective fire and Routing happens (though one Partisan crew ends up Routing out of harm’s way).
Then the Partisans advance in and kill another German Weapons Team.
Rettenhaus tries to reposition and runs into Wire! Poor guy.

Some more ineffective fire happens and we’re slowly going through the clock. The Partisans have 10 VP but there are still five rounds before Sudden Death even has a chance of ending things.
Rettenhaus advances out of the Wire and finds more Wire! He’s just got no luck.
But he and his Pioneers do still have a lot of bullets.
Rettenhaus decides he’s had enough of these pesky partisans and Advances his stack and another stack into two different Partisan hexes for an attempted melee.

Thankfully, I have an Advance card and am able to Advance out of it since those Pioneers are deadly in melee. And me with no Ambush cards.

Instead, the Germans try to make a dash for the board edge!

And me with no Fire cards.
The next turn, Rettenhaus and the Pioneers exit for double victory points! That moves it from 15 Partisan VP to 5.
However, when the Team and the Rifle Squad try to do the same thing, they get broken by Opportunity Fire (Stan forgot that the first stack was out of line of sight and so he assumed I didn’t have a Fire card).
Time’s been moving on. We’re at Round 5 now and the Partisans are barely hanging on. Rettenhaus and the Pioneers come back into the game.
Lots of discarding ensues as both sides wait to see if the other Squad and Team can move off the board.
The Partisans do manage to get a Recover card that rallies most of the broken units, including the Section that is manning the mortar in the top right of the board.
The Germans also get a Recover card but only the Team rallies. Not the Squad!
During the Partisans trying to rout the Germans (especially the Squad in danger of running off the board), Nina (the Partisan Hero) appears!
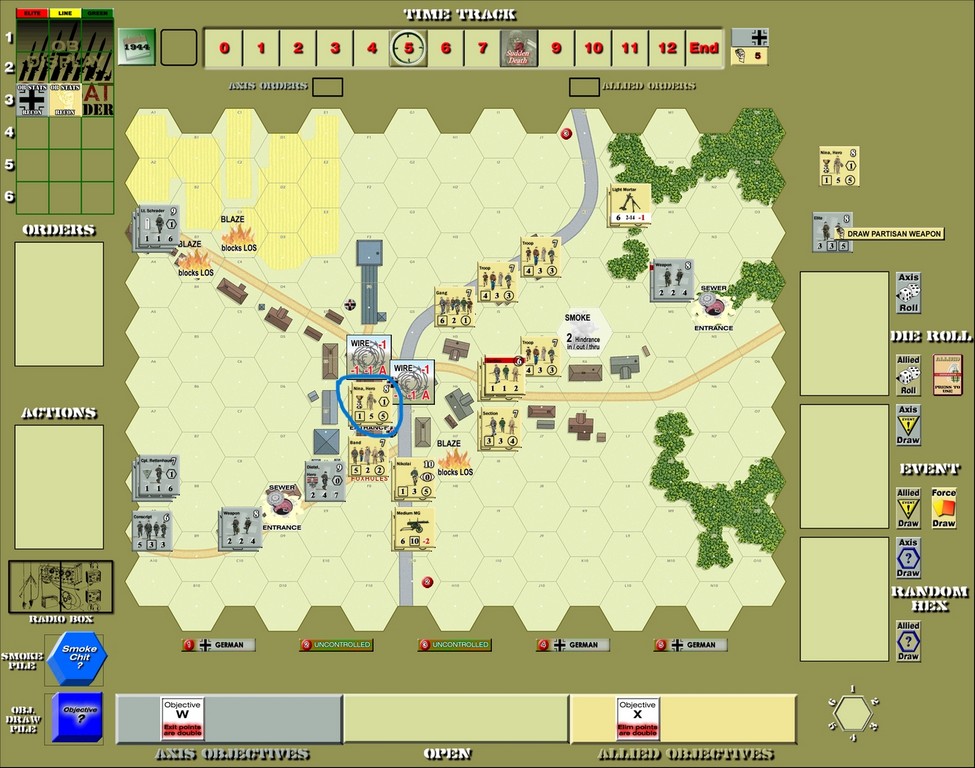
Could this be the change that solves everything?
The Germans play a Move card and move the Team off the board. Two more VP! We’re down to 3 for the Partisans now.

Rettenhaus moves into position to bring more deadly firepower onto the suffering Partisans.
The Germans try yet again to rally the Squad, but suppress it instead! What will it take to get these guys moving?
The mortar and its Section try to end the Squad’s run for the border, firing separately.
First attack, the Squad needs a 9 to just stay Suppressed instead of eliminated. They roll a 10!
Next attack, they need to roll and 8. They roll a 9!
Once again, the Germans fail to rally the Squad, but they become a Veteran (which adds 1 to all of its stats).

Sadly, Nina dies in a big fire attack. One more point for the Germans.
Even broken, the Squad makes a run for the border with their enhanced movement. The Section desperately fires at them, but it’s all ineffective. They reach the edge but can’t exit.
Since the Partisans don’t have another Fire card, the Germans are able to exit the Squad on the next turn. Four more VP! And the Partisans are in trouble.
The Germans reorganize, getting Schrader into the battle and protecting their lone units. But Rettenhaus falls into more Wire! (he really needs to start watching where he’s going)

There is an unsuccessful Rout attempt by the Partisans to make the broken Conscript leave the building, but it doesn’t work (and probably was a bad play to begin with).
Another sniper breaks the mortar Section (they really kind of sucked back there and the mortar is pretty useless in this scenario with bad sightlines)
Time advances. Just one more until Sudden Death! But Nina returns (she was only mostly dead).
When attempting to Recover the Conscript, the Germans draw a Time! The Partisans, being behind, give up Initiative to have the Germans reroll, even though the Germans only have 15 cards left in their deck.
Time is coming anyway.
But the game continues.

The last desperate hope the Partisans have is to Advance into the Conscript hex to kill it in melee. However, the Partisans can’t find an Advance card and subsequently the Germans move Schrader and his Weapons Team into the hex.
The Germans run out the card clock and deplete their deck. Will Sudden Death happen? Or will the Partisans still have a chance?
The Initiative passes back and forth a couple of times, but finally the Germans draw a 5 to end the game with a 2-point victory.
This was a fun scenario, back and forth action and the outcome was in doubt until almost the end. Once Schrader formed up with the Conscript, though, I knew I had no chance.
The only very slim chance was for us to continue to Round 9, and then for me to draw an Advance and 2-3 Ambush cards (in a 4-card hand).
Not likely!
Stan was a great opponent and I really enjoyed our game.
It’s also the longest game I’ve played, clocking in at around 3 hours.
The Partisans are very interesting to play, but they’re a bit constricted in this scenario just because the lines of sight can be so difficult.
I thought I did a master stroke by killing one of Stan’s leaders on Turn 1 and things were looking pretty good. When I killed the SS Squad (the other elite Squad the Germans have), I was very happy.
But those damned Pioneers with Rettenhaus just were a pain in my ass. I was happy to disrupt the fire group though by killing off the second stack he kept firing with.
The game turned on a couple of lucky bounces, but you have to be good to take advantage of those bounces.
If I had a Fire card when Rettenhaus made his run, I might have stopped them.
His broken Rifle Squad that ultimately decided the game by exiting came this close to dying instead. Miraculous 9 and 8 rolls when he desperately needed them saved the day. That would have been an 8-point swing (he got 4 VP for exiting them and I would have earned 4 VP for killing them).
All in all, a great game but that’s two losses in a row.
I need to get back on the winning track in February, as we head back to France but in an earlier year in a Fall of the West battle pack scenario.
Come back next month and see how I did!
Combat Commander Ladder – After Action Reports
To see all of my Ladder After Action Reports since May 2021, go here!

Pingback: Combat Commander Europe – After Action Report – Scenario 51 – The Uneasy Wait – Dude! Take Your Turn!
Pingback: Combat Commander Europe – After Action Report – Scenario 35 – Spartakovka Salient – Dude! Take Your Turn!
Pingback: Combat Commander Pacific – After Action Report – Scenario M6 – Breakout – Dude! Take Your Turn!
Pingback: Combat Commander Pacific – After Action Report – Scenario A – Grassy Knoll – Dude! Take Your Turn!
Pingback: Combat Commander – After Action Report – Scenario #34 – Encircled at Hill 30 – Dude! Take Your Turn!
Pingback: Combat Commander – After Action Report – Scenario #23 – No-Man’s Land – Dude! Take Your Turn!
Pingback: Combat Commander – After Action Report – Scenario #112 – Sonnenwende – Dude! Take Your Turn!
Really great report and the session. Thanks!
LikeLiked by 1 person
Sadly not a great result. 🙂 But thank you!
LikeLiked by 1 person
Pingback: Storm Above the Reich – After Action Report – Mission #13 – Dude! Take Your Turn!
Pingback: Combat Commander Europe – After Action Report – Scenario 75 – Sturmgruppe Beton – Dude! Take Your Turn!
Pingback: Combat Commander Europe – After Action Report – Scenario 90 – The Man Who Would Be King – Dude! Take Your Turn!
Pingback: Combat Commander Europe – After Action Report – Scenario LoM9 – Operation Mercury – Dude! Take Your Turn!
Wow, this was a nailbiter!
LikeLiked by 1 person
Pingback: Combat Commander Europe – After Action Report – Scenario #119 – Sky Fall – Dude! Take Your Turn!
Pingback: Combat Commander Europe – After Action Report – Scenario #9 – Rush to Contact – Dude! Take Your Turn!
Pingback: Combat Commander Europe – After Action Report – Scenario #14 – At the Crossroads – Dude! Take Your Turn!
Pingback: Combat Commander Europe – After Action Report – Scenario #30 – Red Skies at Night – Dude! Take Your Turn!
Pingback: Combat Commander Pacific – After Action Report – Scenario E – West Tank Barrier – Dude! Take Your Turn!
Pingback: COMBAT COMMANDER PACIFIC – AFTER ACTION REPORT – SCENARIO M4 – TEMPLETON’S CROSSING – Dude! Take Your Turn!
Pingback: Combat Commander Europe – After Action Report – Scenario #41 – The Commissar House – Dude! Take Your Turn!
Pingback: Combat Commander After Action Report – Scenario #53 – Deeds Not Words – Dude! Take Your Turn!
Pingback: Combat Commander After Action Report – Scenario #67 – The Orient Express – Dude! Take Your Turn!
Pingback: Combat Commander After Action Report – Scenario #82 – Hidden Guns Lash Out – Dude! Take Your Turn!
Pingback: Combat Commander After Action Report – Scenario #91 – The Battle of Trafalgar – Dude! Take Your Turn!
Pingback: Combat Commander After Action Report – Scenario LoM #8 – Codes in the Sunrise – Dude! Take Your Turn!
Pingback: Combat Commander After Action Report – Scenario #105 – La Fiere Counterattack – Dude! Take Your Turn!
Pingback: Combat Commander After Action Report Supplemental – Scenario #28 – No Ingouf Around – Dude! Take Your Turn!
Pingback: Combat Commander After Action Report – Scenario #10 – Commando School – Dude! Take Your Turn!
Pingback: Combat Commander After Action Report Supplemental No. 2 – Scenario #92 – Let England Shake – Dude! Take Your Turn!
Pingback: Combat Commander After Action Report – Scenario #20 – A March in December – Dude! Take Your Turn!
Pingback: Combat Commander After Action Report – Scenario #33 – We Go! – Dude! Take Your Turn!
Pingback: Combat Commander – After Action Report – Scenario L – Slopes of Hell – Dude! Take Your Turn!
Pingback: Combat Commander – After Action Report – Scenario M10 – Bulolo River Bridge – Dude! Take Your Turn!
Pingback: Combat Commander – After Action Report – Scenario 44 – Stalingrad of the North – Dude! Take Your Turn!
Pingback: Combat Commander – After Action Report – Scenario 74 – Sturmgruppe Granit – Dude! Take Your Turn!