Dude! Take Your Turn!
A Gaming Life
Combat Commander – After Action Report – Scenario M4 – Templeton’s Crossing
Two months in a row my Combat Commander ladder post about this month’s scenario is going to go out on the last day of the month.
Though this time it’s partially because we didn’t play it until the 25th.
This is another tale from the Combat Commander ladder run by the irreplaceable Patrick Pence of Youtube’s Patrick’s Tactics & Tutorials (if you haven’t checked the channel out, you should).
This is my monthly Combat Commander fix and it’s one I greatly enjoy, even though I’m on a terrible losing streak!
October’s game was yet another rematch, this time from last October (so we played another game from the Combat Commander: Pacific New Guinea battle pack). My opponent was Vlad M and this month’s scenario was a wild one, Templeton’s Crossing. This has a meeting between the Australian forces (me – Tan) attacking while the Japanese (Vlad – White) were retreating to concentrate on Guadalcanal.
This is a tale of courage and perseverance, fortitude and grit…and outright stupidity, but hell, you can’t have everything!
(Don’t forget that you can click on an image to blow it up)
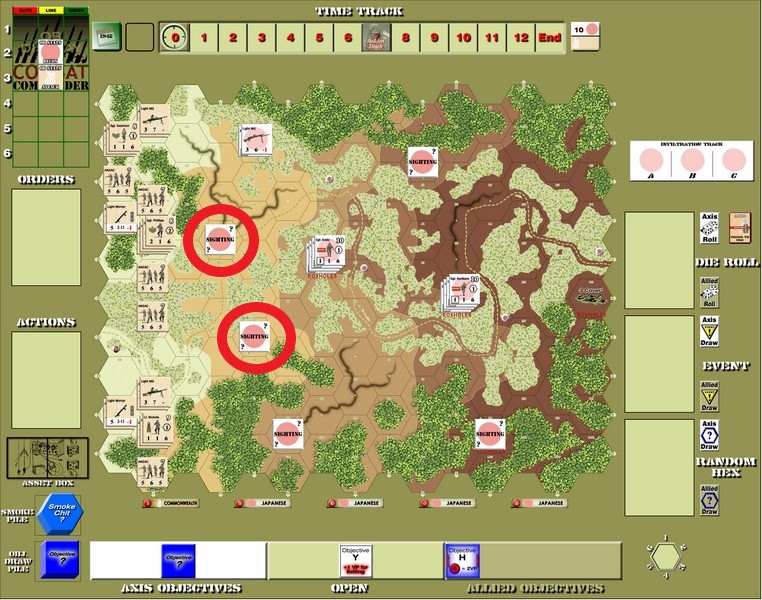
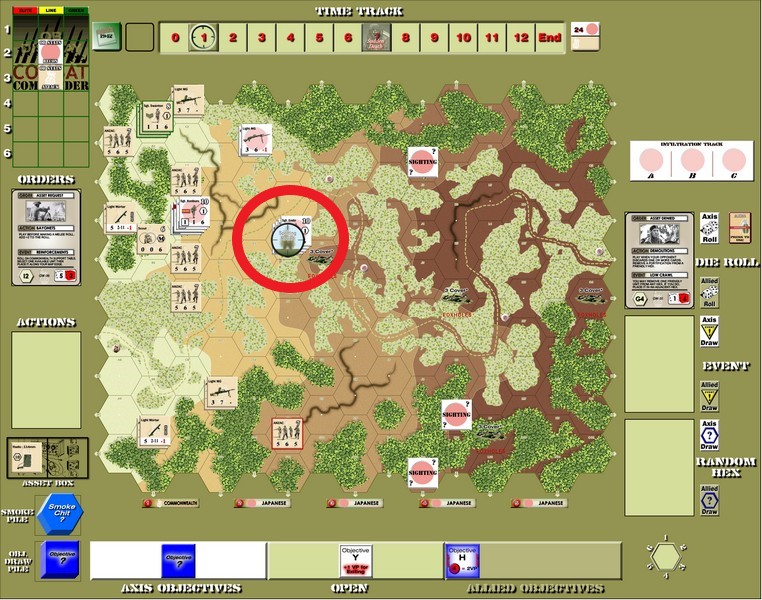
Here’s our setup. The circled Sighting markers became very important. By scenario special rule, the Japanese cannot bring any more units into the game using Infiltration orders.
However, they can “teleport” any stack of Japanese units on the board onto one of the Sighting markers (removing the Sighting marker so it’s no longer available). Since that order does not activate them, they can then do other bad things.
You will see what I mean…
Also, all of that light green stuff littering the map?
That’s actually all Jungle (just like the dark green stuff), which blocks line of sight for units on the same level and creates blind hexes behind for those units that are up higher.
Sight lines are terrible in this scenario!
Thankfully the Australians have a Scout, so the mortars don’t have to be in line of sight.
How’d we do?
Let’s take a look.
Vlad started by moving Sgt. Endo out of the foxholes and actually onto the crest of the hill below. I fired on them with Sgt. Philips and while it ended up breaking a Japanese unit, Vlad drew a Time trigger! That was very fast. Vlad decided he wanted the Time trigger more than the reroll so broke the unit.
Of course, that’s because he had a Revive card and so it didn’t cost him anything but an Order.

The Australians started moving in the south, hacking their way through dense jungle.
Some ineffective mortar fire and Japanese fire happened, then the Australians moved out again!
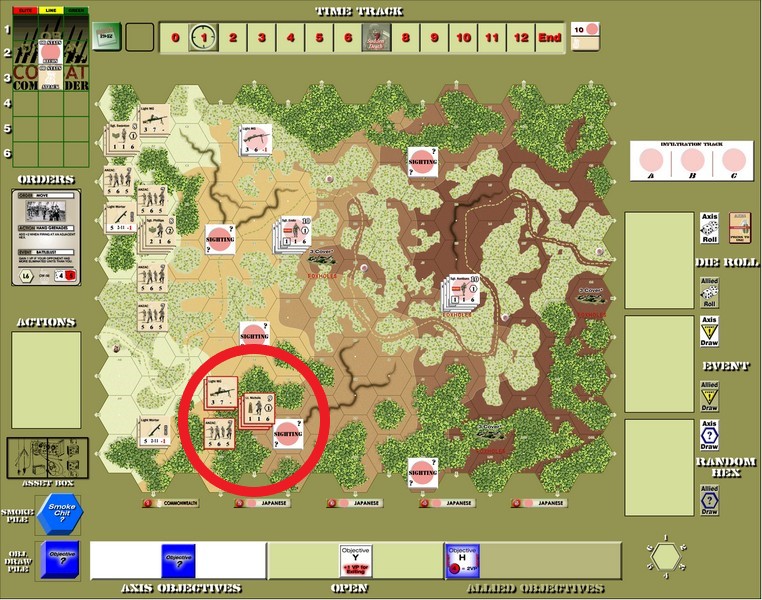
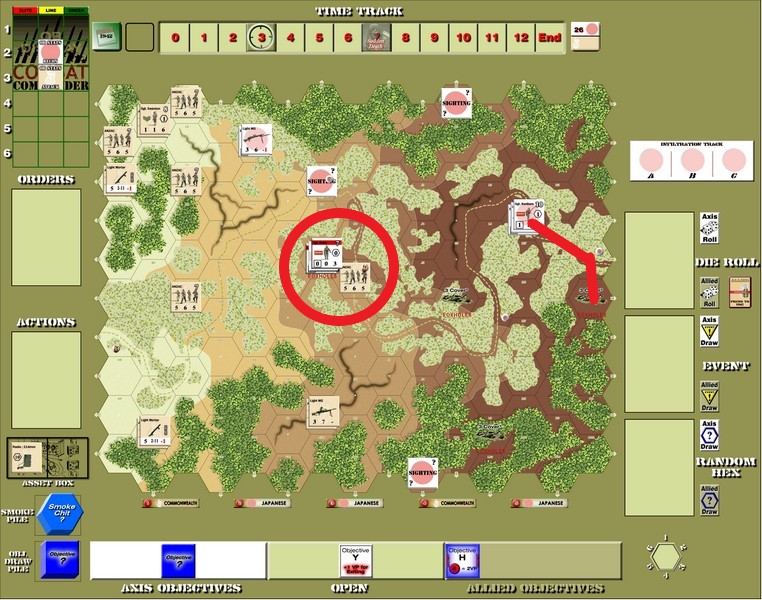
Notice that it’s not just my units circled…
Vlad made a move I had completely missed that he could do.

He infiltrated Sgt. Konburo and his men next to Nichols and then Advanced into melee!
The Japanese are killers in melee, especially against smaller stacks and leaders.
Of course, melee happens at the beginning of the Allied turn, so I had no way to retreat out of it.
Vlad also happened to have an Ambush card, making it worse since I didn’t have any.
Even though Vlad rolled low and I rolled very high, the strength differential was just too much.
One Australian leader and squad gone already.
In attempted revenge, Nichols’ other squad and MG got pissed off and fired point blank with two Marksmanship actions and two Hand Grenades actions, resulting in 14 firepower and I drew a 12 for a total of 24!
Due to another scenario special rule, any roll of doubles breaks the machine guns that were firing, so my gun broke. But all of the Japanese units broke too!
Sadly, Vlad had a Revive card ready and it was all for naught.
But it was very satisfying.
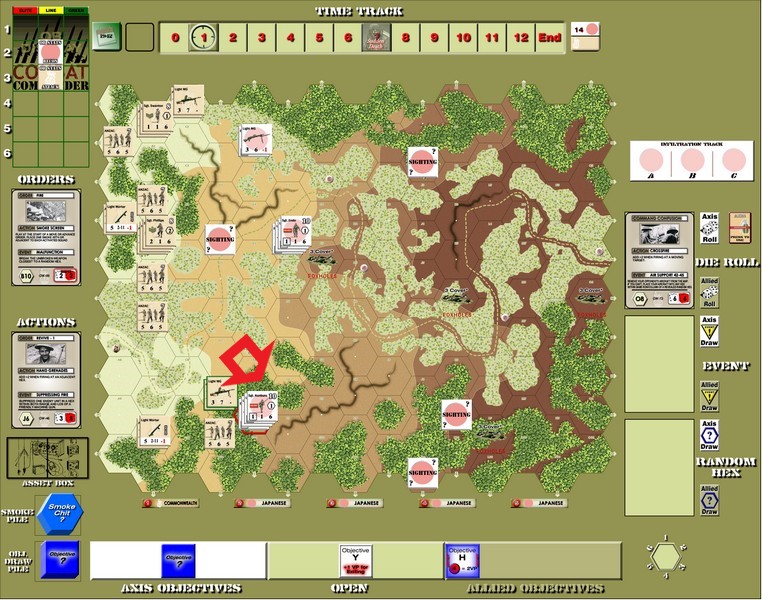
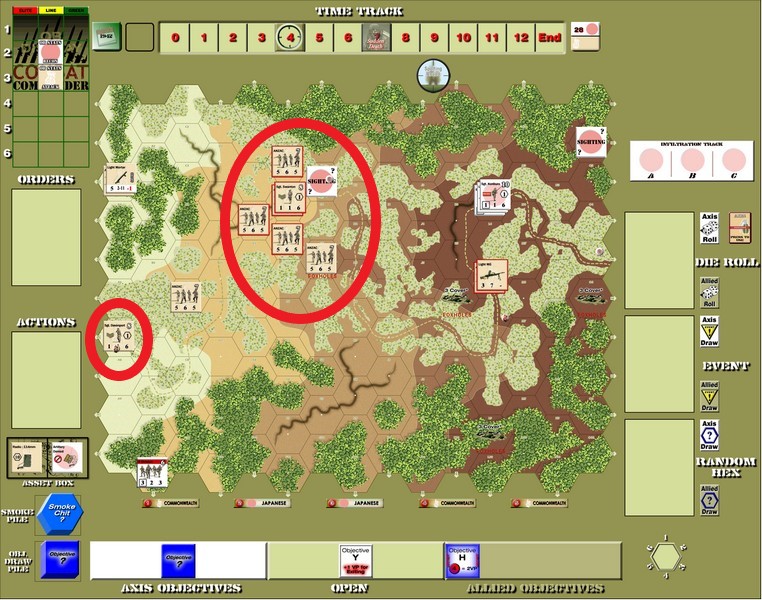
After fixing and breaking some guns, Philips and his men in the center started to move.
Do you see the problem?
You’d think I would have learned by now, but how likely was it that he had such a great combination of cards in his hand? Again?
It turns out very likely!

Yep, he did the exact same thing…
This time he didn’t have any Ambushes but he did have a bunch of bayonets!
Philips and his squad went down hard.
Two Australian leaders and squads dead.
At this point, Vlad offered me the chance to concede since it would be hard to do a whole lot with only one leader (and a Scout), but I decided to persevere. (It was close, though).
Or maybe that was after my Scout was eliminated.
Oops! Spoilers.
Either way, I declined and we continued.
The first thing I did, after moving one of the now-leaderless squads in the south forward (there’s nobody blocking them now!), was a desperation check to see if I could get a radio.
And I did! I received some 114 mm artillery (10 firepower but with all of this jungle, there would be air bursts making things dicey for the defenders). The radio cost me VP, but at this point I knew that VP were not going to win this game for me.
Maybe my luck was changing a bit.
I got the artillery, might as well use it!
Sgt. Swinton called in the artillery and got a perfect minor drift so it landed right back onto the target.
KABOOM!!!!!!!!!
A final firepower of 19 (would have destroyed the foxholes if they’d been in that hex!) wasn’t a certainty to do anything.
And sure enough, it didn’t except suppressing one team.
Vlad quickly denied me the artillery, but he could never get that second Asset Denied card in time before I recovered it.
Konboro continued his merciless melee assaults, jumping onto the ANZAC squad next to him. Little did he know that they were ready for him though, with two Ambush cards!

The squad still died, but two Japanese units were broken in the process.
More ANZAC movement in the south, but each one now took two Advance/Move cards, so that was slow going.
Being right next to Konboro, the Scout decided to call in some mortar fire. Both hit from fairly close range.

And the team died! On the 2nd mortar attack, Vlad rolled a 2 (Time trigger) so gave up the initiative to keep his squad alive.
Konboro said “Fuck that” (or the Japanese equivalent) and made sure that it didn’t happen again, advancing onto the Scout to kill him.

Just to make sure, Vlad used Bayonets (it was only an 8-point differential after all) in the attack.
The Scout died.
At that point, after a failed ANZAC artillery barrage, Konboro decided to get out while the getting was good.

Sure, it was a 0-point exit space, but the scenario has +1 point for each unit that exits, so Vlad did get some points for it.
More importantly, it got Konboro onto the Time Track for reentry and didn’t use up a Sighting marker to get him out of harm’s way.
That’s when my luck started to change, at least a little bit.

A 17-firepower attack (after roll) against Sgt. Endo up on the hill resulted in both units breaking! Not Endo himself, but still…
Then the little squad in the jungle by the gully fired up at Endo’s stack (Japanese broken morale actually really sucks). The squad died!
And the Japanese got air support, but you can’t have everything.
The dive bomber attacked Swinton’s hex and my first roll was a Time trigger, so I had to give up the initiative.
All was good, though.
Swinton and his boys decided to fire again and see if they could make things worse!
I played Sustained Fire to increase the firepower, making an 18 attack (rolled a 3-5).
Vlad wanted none of that, so gave up the initiative…and I promptly rolled a 5-5 (20 firepower).
Even worse for the Japanese.
But the doubles with Sustained Fire and the scenario special rule about rolling doubles meant that both of my machine guns were just gone.
To add insult to injury, my deck ran out so there was another Time Trigger anyway (I probably should have checked my deck and not given up initiative when I did, but oh well).
The team and Endo both broke, though!
Endo decided it was time to get out of Dodge and retreated back to the foxholes…though right next to one of the ANZAC squads from the south!
The newly-reentered Konboro also moved up the jungle trail from the Japanese board edge.
The ANZACs quickly jumped into the foxholes with the battered Japanese units and made quick work of them (one of the few times Vlad didn’t have the card he needed, with no Advance cards to get back out of the foxholes).
While he did have an Ambush card, breaking my squad, he rolled another Time trigger and swiftly died (though time was marching on too fast for my taste).
I quickly revived the squad and moved the other squad with the LMG towards the trail to perhaps intercept Konboro at some point.
Swinton called in some more artillery, hoping for favorable drift as nobody was in sight anymore.

And it worked! Shells started landing on Konboro’s head.
He stayed unbroken but the squad with him wasn’t so lucky.
Vlad broke my radio again and there was some fire exchanged back and forth, and in one of them I got a Walking Wounded event!
Sgt. Philips was only wounded by Konboro’s earlier treachery!
Sadly, the Walking Wounded event has the unit appear in a random hex, broken. That means a Sighting marker goes there as well.

You can guess what happened…
The Japanese squad in the north with the broken machine gun teleported onto his hex and made short work of him.
My fire on that squad brought on another Japanese bomber!
And Vlad had a handy Asset Request to use it. He attacked Swinton with it but missed! A quick giveaway of the initiative card gave him the hit (barely), breaking everybody in the stack.
Thankfully I had been holding onto a Revive card so it didn’t cost me anything but an order.
The Japanese squad in the south moved to nullify one of my mortars and were attacked by the squad manning it.
That fire attack (in addition to costing me the initiative) gave me some reinforcements!

Another much-needed leader.
Didn’t matter, though, as the Japanese jumped into the mortar’s hex and made quick work of the squad there with two Ambush cards, though not before getting ambushed themselves. Davenport was on his own.
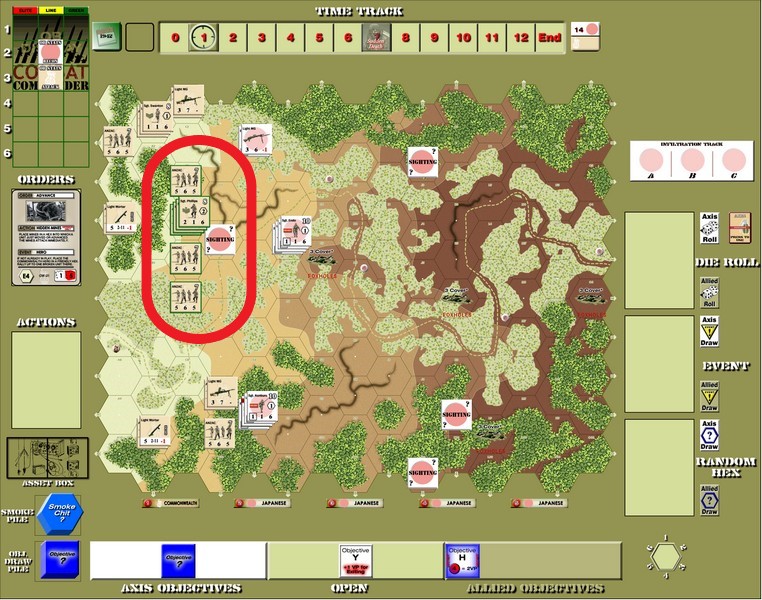
Time passed with maneuvering and the like, Davenport getting out of danger and the northern Anzacs moving forward.
It wasn’t looking good for the Australians, but if the final Japanese units are eliminated from the board, the ANZACs win even with all of those Japanese points!
So there was that to aim for.
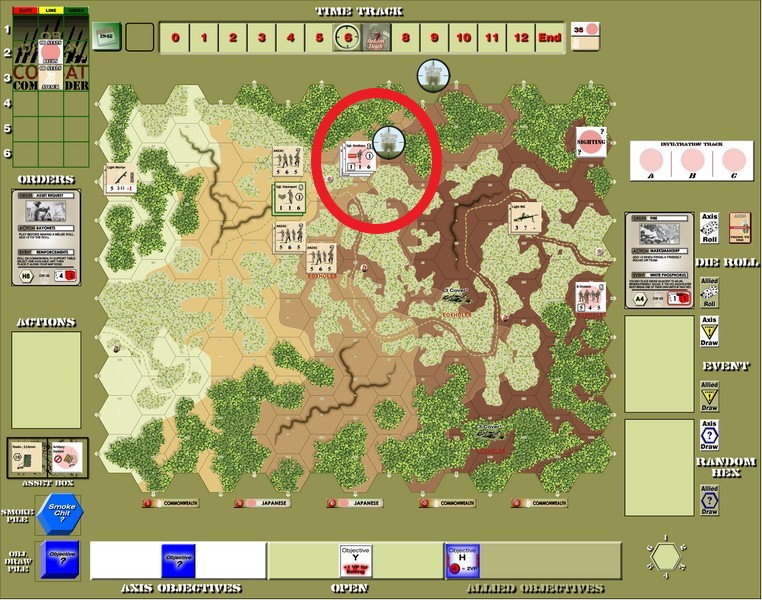
Of course…you can probably guess what happened after looking at that picture.
Surely Vlad couldn’t have that combination of cards in his hand a third time…could he?

Yep, he did.
I’m not sure why I didn’t protect against that. In fact, overstacking is permitted in Pacific (you just get cover penalties) so I’m not sure why I didn’t keep two squads stacked with him!
Hence the “stupidity” comment at the beginning of this post.
Anyway, Swanton died along with his squad.
I quickly Advanced one squad into another squad’s hex to help keep them safer.
They got fired on from point-blank range but I had another Revive card to bring them back.
Vlad had exited the southern Japanese squad for a point and a Time trigger brought him back to the Japanese side of the board in time to intercept one of my squads from leaving.
Konboro had retreated to get out of the line of fire.
So it was time for another desperate artillery attempt!
And I drew a Time trigger on the targeting roll, causing Sudden Death.
Which I subsequently lost, ending the game.
This was such a game of ups and downs. My personal morale level did almost break (like a lot of Allied players’ has this month, it seems) but I decided as long as I had one leader (and then artillery!) I was still going to keep going.
And I almost pulled it out!
Vlad showed me his hand afterward and if the artillery had broken them, he was going to be teleporting out of the way, so I probably wouldn’t have succeeded, but I may have eventually with enough time. If I didn’t have Davenport, Swinton’s death may have caused me to concede.
Vlad was as gracious in victory as he was in defeat last year at this time and I hope to play him again sometime.
My losing streak continues and I have to hope that moving to Stalingrad in November will benefit me (name one other person who has ever said that…)
If you find these AARs interesting, consider joining the Ladder! It’s a great group of guys and one of the most fun games I play.
Stay tuned next month (it’s almost next month already!) for another exciting tale from the Combat Commander ladder.
Combat Commander Ladder – After Action Reports
To see all of my Ladder After Action Reports since May 2021, go here!

Pingback: Combat Commander Pacific – After Action Report – Scenario E – West Tank Barrier – Dude! Take Your Turn!
Pingback: Combat Commander Europe – After Action Report – Scenario #30 – Red Skies at Night – Dude! Take Your Turn!
Pingback: Combat Commander Europe – After Action Report – Scenario #14 – At the Crossroads – Dude! Take Your Turn!
Pingback: Combat Commander Europe – After Action Report – Scenario #9 – Rush to Contact – Dude! Take Your Turn!
Pingback: Combat Commander Europe – After Action Report – Scenario #119 – Sky Fall – Dude! Take Your Turn!
Pingback: Combat Commander Europe – After Action Report – Scenario LoM9 – Operation Mercury – Dude! Take Your Turn!
Pingback: Combat Commander Europe – After Action Report – Scenario 90 – The Man Who Would Be King – Dude! Take Your Turn!
Pingback: Combat Commander Europe – After Action Report – Scenario 75 – Sturmgruppe Beton – Dude! Take Your Turn!
Pingback: Combat Commander Europe – After Action Report – Scenario 65 – Road Trip – Dude! Take Your Turn!
Pingback: Combat Commander Europe – After Action Report – Scenario 51 – The Uneasy Wait – Dude! Take Your Turn!
Pingback: Combat Commander Europe – After Action Report – Scenario 35 – Spartakovka Salient – Dude! Take Your Turn!
Pingback: Combat Commander Pacific – After Action Report – Scenario M6 – Breakout – Dude! Take Your Turn!
Pingback: Combat Commander Pacific – After Action Report – Scenario A – Grassy Knoll – Dude! Take Your Turn!
Pingback: Combat Commander – After Action Report – Scenario #23 – No-Man’s Land – Dude! Take Your Turn!
Pingback: Combat Commander – After Action Report – Scenario #112 – Sonnenwende – Dude! Take Your Turn!
That was very exciting game and fantastic report!
LikeLiked by 1 person
Thank you! I’m glad you liked.
LikeLike
I applaud your determination and perseverance! Clawed your way back and almost pushed the Japanese over the edge! Stalingrad in November is going to be better – after all, you might play the Soviets!
LikeLiked by 1 person
I am the Russians! Not sure if that will be good in this one…
LikeLiked by 1 person
Pingback: Combat Commander Europe – After Action Report – Scenario #41 – The Commissar House – Dude! Take Your Turn!
Pingback: Combat Commander – After Action Report – Scenario #34 – Encircled at Hill 30 – Dude! Take Your Turn!
Pingback: Combat Commander After Action Report – Scenario #53 – Deeds Not Words – Dude! Take Your Turn!
Pingback: Combat Commander After Action Report – Scenario #67 – The Orient Express – Dude! Take Your Turn!
Pingback: Combat Commander After Action Report – Scenario #82 – Hidden Guns Lash Out – Dude! Take Your Turn!
Pingback: Combat Commander After Action Report – Scenario #91 – The Battle of Trafalgar – Dude! Take Your Turn!
Pingback: Combat Commander After Action Report – Scenario LoM #8 – Codes in the Sunrise – Dude! Take Your Turn!
Pingback: Combat Commander After Action Report – Scenario #105 – La Fiere Counterattack – Dude! Take Your Turn!
Pingback: Combat Commander After Action Report Supplemental – Scenario #28 – No Ingouf Around – Dude! Take Your Turn!
Pingback: Combat Commander After Action Report – Scenario #10 – Commando School – Dude! Take Your Turn!
Pingback: Combat Commander After Action Report Supplemental No. 2 – Scenario #92 – Let England Shake – Dude! Take Your Turn!
Pingback: Combat Commander After Action Report – Scenario #20 – A March in December – Dude! Take Your Turn!
Pingback: Combat Commander After Action Report – Scenario #33 – We Go! – Dude! Take Your Turn!
Pingback: Combat Commander – After Action Report – Scenario L – Slopes of Hell – Dude! Take Your Turn!
Pingback: Combat Commander – After Action Report – Scenario M10 – Bulolo River Bridge – Dude! Take Your Turn!
Pingback: Combat Commander – After Action Report – Scenario 44 – Stalingrad of the North – Dude! Take Your Turn!