Dude! Take Your Turn!
A Gaming Life
New to Me – September 2019
It had been a quiet September at Dude Central. There was a birthday party that nobody came to (it’s not my fault I accidentally put September 9, 2018 on the invitations. How was I supposed to know that everybody would actually look at the year and think the party had already happened?)
My birthday post did get some traffic, though, so that was nice.
There was almost an insurrection (yet again) because the only three new to me games had been from 2018 and 2019.
The Cult of the New to Me was not happy.
There was a lot of yelling!

But then, just as the month was about to end, I played a 2016 game and a classic from 2009.
Everybody was happy (or at least appeased) and we could all go down to the bar and drink our mineral waters.
Until next month, at least.
So, without further adieu (I had to use all of my adieu to turn the power back on anyway), let’s begin!
Blackout: Hong Kong (2018 – Eggertspiele) – 1 play

Designer: Alexander Pfister
Artist: Chris Quilliams
Players: 1-4
Blackout: Hong Kong got a lot of hype when it first came out in 2018 (because it’s by Alexander Pfister. Duh). However, distribution issues really harmed how much this game could catch on. There are also some complaints about the artistic design (it’s way too dark) and some of the mechanisms, so it never became popular.
It’s still not even available in Canada!
The premise of the game is that Hong Kong has gone dark. (Hey! I just figured out that’s why it’s called “Blackout!”)
Each player is an organization that is trying to not only help the stranded people of the city get basic things like food, water, education, medical aid, cell phone coverage (ok, maybe not the last), but also trying to be the best organization at doing that.
Because the government’s no help.
How do you determine who’s best at it?
This is a game, you know the answer.
Yes, victory points!
This is a bit complicated to explain, so I’m going to mainly do an overview without going into huge detail.

You start with a map of Hong Kong. It’s divided into dots of different colours, and you’re going to be starting with one of your cubes on a dot. This is where you’re going to be expanding from. While more than one player’s cube can be on a dot, they have to be different at the start.

You also get a player board, which is where your objective cards are going to go and from where your buildings are coming from. You also start with some current volunteer starter cards, as well as a couple of them in your sick bay/hospital.
At the beginning of the turn, the first player rolls the three resource dice. These dice will be placed in the resource sector that corresponds with the dice face.
At the bottom of your player board, there are three areas to play cards (and a fourth if you unlock it during the game).

Each player will then play one card face down to each play area (you can skip an area if you want, but there’s really no reason to).
Everybody reveals their cards, and then starts doing the actions of the cards in any order. It could be a yellow cube card like above, which lets you put a cube in whichever resource sector the yellow die is in. Or a blue, which lets you use the blue die.
Don’t like where the blue die is? You can use a truck to put a cube in an adjacent sector to where the blue die is. Or two trucks to put a cube in a sector two away from the blue die.
These cubes represent resources that you have. With the exception of food and water, they’ll stay there until you use them, which is a nice change from gathering resources in front of you. Instead, your resources are where your cubes are.
Some of the cards may have an action instead that you can do.

Once everybody has used their cards, they can turn in resources to get cards in their Objective Row. The blue card on the left, for example, would require a water and fuel resource. If you get the card, you put it in your hand (or some cards may go next to your player board) as well as doing anything else that it says.
Usually, the secondary result is to put one of your cubes on a dot of that colour on the map that’s adjacent to one of your already-placed cubes. If you can’t do that, you can spend one truck per location that you’re skipping to get to the closest dot of that colour.

Next, players can scout locations. Each area will have up to three face-down tokens in it.
In player order, you can choose one area that you have a cube adjacent to and look at them. If you like, you can claim one of them by having enough GPS points available.

You can either do the first one for fewer GPS points or the bottom one for even better stuff. You get these GPS points on cards from your hand as well as other possible ways. You always have to choose at least one card in your hand for scouting, though.
One of those cards you choose is going to your sick bay (maybe their scout car hit a bad pothole in the dark or something). If you chose more than one card to scout with, it’s randomly chosen.
Don’t worry, you have a doctor card that you can play in the first phase to bring one of your injured cards back.

Next, you can buy one more more new objectives if you have room on your board for it.
The price can vary depending on how many cards are still in the row.
Remember, though, you are just buying these so you can have a chance to get them in later turns. They aren’t automatically yours.
At the end of the turn, the right-most card is discarded and when a row is empty, it immediately fills. This is the timer of the game, as you play until the cards run out.
This is done in the next phase, when you will also sell/use all of your food/water as they don’t last from turn to turn.
Next, you secure districts. Any district that is completely surrounded by at least one player’s cubes is secured. The scout tokens are discarded and whoever has the district surrounded by their cubes gets to put one of their houses in it.
Each player with a cube next to that district will get points based on how many cubes they have there.

The house comes off of your player board and will reveal a check mark action that you may or may not be able to take in the future.
Finally, you can refresh cards and perhaps take check mark actions. If you have 0-4 cards left in your hand, you can collect all of the cards in the play area column with the most cards in it. (You can unlock something that will let you do that with 0-6 cards in your hand).
If you collect cards, then you can do any check mark actions that you have available (like above, you can turn in one tool for three money).
Lather, rinse, repeat until all of the cards are gone.
Endgame scoring consists of selling resources and then getting 1 point per 5 money, along with the victory points for your cards in hand and in play (but not in your Objective Row or in your hospital) along with a set collection of face-up scout tokens.
Whoever has the most points is the winner!
There are a lot of details I skipped in there, of course.
I really enjoyed this game, and would have enjoyed it more if we had been taught it correctly! We were doing our check mark actions each turn regardless of whether we refreshed our hand, and there were one or two other things that we got wrong.
Even with that, though, it was a really fun game with some interesting mechanics. I love having cubes in the various resource areas rather than you having to have a pile of resources in front of you. I really enjoyed how there were various things on your player board that you could unlock for points and a more potent ability (like the 0-6 refresh thing, though in our game that obviously didn’t matter as much since we were doing it wrong!)
You can also unlock a fourth column in your play area which will both give you more flexibility during your turn and also get you to the refresh level faster.
The board and cards are really dark, though. The art design (I’m not saying the artwork itself, but more the design of the colours and everything) is really off-putting.
I really need to play this one again with the proper rules. It does seem like a fantastic game, though we’ll see how that holds up when we’re playing it correctly.
A medium thumbs up from me on this first impression.
Hadara (2019 – Z-Man Games/Hans im Glück ) – 1 play

Designer: Benjamin Schwer
Artist: Dominik Mayer
Players: 2-5
Hadara is a light civilization-building game where you are using cards to increase your resources and ultimately to foray out into other colonies along with improving your home territory as well.
It comes with a really neat modular card board (as opposed to cardboard, though I guess it probably is made of cardboard, so there is that…what was my point again?)

The colours on the board correspond to the colour and types of cards that are being collected. The order on the board matters because you will be choosing and buying cards in that same order.

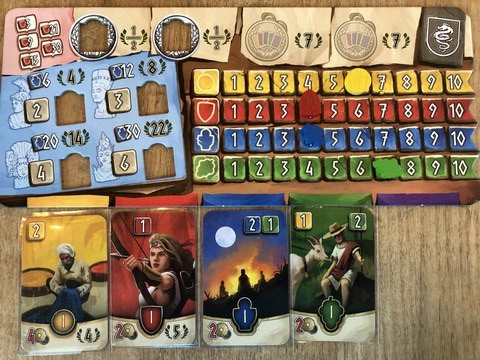
Each player will also get a player board with four resource tracks on it, as well as some places to put medals and other cool stuff that you accumulate over time (because civilizations are always about who gets the coolest stuff first, right?)
The game plays over three Epochs, and over that time you’ll be getting lots of cards added to your tableau.
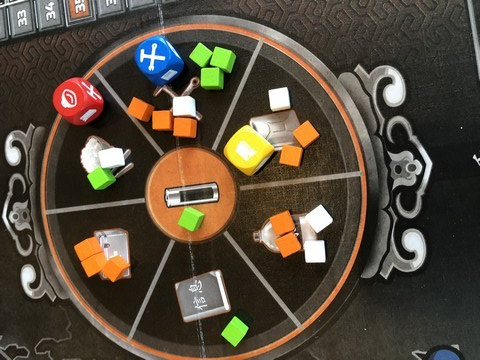
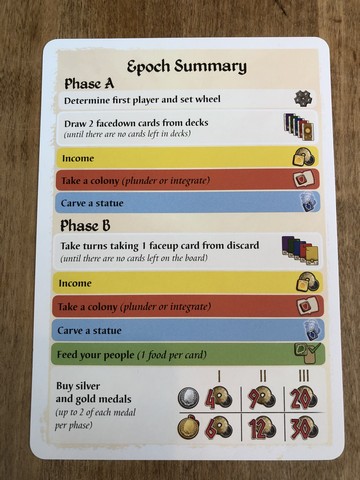
As you can see from the summary, the first thing you’ll be doing is getting cards.

The first player chooses which colour cards they’re going to start with, moving the wheel so that their symbol is pointing at that colour. The other players will begin with the decks that their symbols are pointing to.
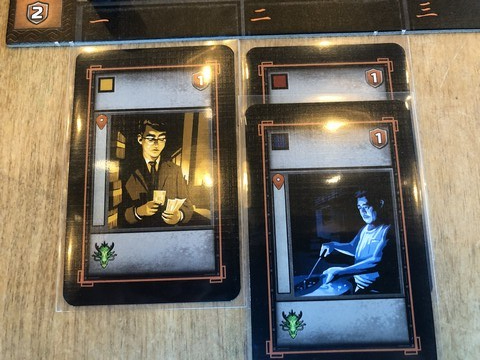
Simultaneously, take the top two cards of your deck. Choose which one you want to discard. For the other card, decide whether you want to buy it or not.
If you buy it, pay the cost in the bottom left corner and add it to your tableau in the appropriate column. However, you get a 1 coin discount for every card of that colour you already have in your tableau. You could get it for free!
If you can’t afford it, or don’t want it, you can sell it for an increasing amount of gold depending on which epoch you’re in. The card is out of the game.
If you buy it, move the appropriate tracks up the amount shown on the card. The card may also give you victory points at the end of the game (because what you bought is just that cool).
The wheel then turns and each player does the same thing for the next stack of cards. This happens until a full revolution has happened and there are no more cards left in the draw pile.
After that, players get gold income (the yellow track).

They can now take a colony if they have enough military strength. You can either plunder it (get the amount of gold on the front of the colony tile that’s in green in the top left corner) or you can spend a gold to integrate it (turn it over).
If you integrate the colony, you’ll get a certain amount of additions to various resource tracks as well as potentially more victory points. You’ll always get the amount of victory points shown on the front, but some of them have more points when they are integrated.

Finally, you can carve a statue if you are high enough on the Culture track. You can put a resource marker in there, which means you get a bump on that particular resource based on the number to the left (the red statue above would get 2 more on the Military track).
What about all of those discarded cards? The next round is going through the discard stacks. In player order, take one card off of the top of one of the discard piles. You can then either buy it or sell it in the same manner as you did before. Players can choose any discard pile, but they must take the top card of the pile.
No digging.
Players then repeat the income, colony, and statue step.
Now is when you have to feed your people (of course you do). You have to have enough on your green Food track to feed all of the cards you added to your tableau, one food for each card.
Finally, players can buy medals.
Medals have an increasing cost depending on what epoch you are in (as shown on the summary card). For silver medals, you put one of your resource tiles into one of the spaces on the top left of your player board (next to the “1/2” VP symbol). At the end of the game, you will get VP equal to half of your level on that resource track.
Gold medals are more expensive than silver and are a kind of set collection mechanism.
For each gold medal (maximum of 2), you get 7 points per set of cards with all five colours.

Once this is done, you move on to the next epoch (or end the game if you’re completing the third one). You do the same procedure for each epoch, though the cards will have higher benefits, higher costs, and are potentially much neater.
For endgame scoring, you total up the points on cards, the points for your colonies, your statues, and medals as well as remaining coins (5 coins for a point).
Whoever has the most points has the best civilization and all others are also-rans who should die of shame (Editor – Wow, that’s a harsh game!).
Hadara is pretty cool for a non-complicated Civ game. It’s really easy to play, though you do have to specialize somewhat to really do well. I found myself building a couple of statues, one silver and one gold medal, and tried to get my tracks fairly high.
When you look at my statues, for instance, I left 36 points on the table by not completing them all. I also only got three colonies. so missed out on 27 points. I think I diversified too much.
It’s a fun little game, and once you know what you’re doing it probably should just take an hour or so. Everything is simultaneous, so you’re not waiting for Joe to take his turn before you can take yours (though you do still have to wait for his sorry ass because he can’t figure out which card he wants to take). It took us 53 minutes to play, with two newbies.
Not bad at all!
I’d like to try it again. It didn’t really wow me, but there’s really nothing in the game that I would say is bad. The card-buying mechanic is very cool and I like the ability to “hate sell” a card that you don’t want anybody else to get (since sold cards are out of the game).
It’s not a “must play” but it fills a niche. Some people have called it “7 Wonders without the interaction,” which is a bit harsh but also kind of fair. There is no interaction in this game whatsoever other than the aforementioned hate-selling or taking a card from the discard pile that somebody else wants.
Not a bad game at all!
Nocturion (2019 – Vesuvius Media) – 1 play

Designer: George Skourtis
Artist: Damien Mammoliti
Players: 2-4
Nocturion is a dark, dark game. And I don’t mean in content (not like Abomination: Heir of Frankenstein). I mean in graphic design. It’s dark! Just look at that box.
What are you trying to do in Nocturion?
The blurb says it all:
“The Evergreen Empire stands on the brink of annihilation. After thwarting the deadly elemental invasion, the young Emperor Alexius IV tries to recover for his people their lost wealth and dignity, but he cannot protect the realm alone. The Noble Houses of Evergreen hold power and resources but due to their interests they never work together. Alexius must find out which of the noble houses is worthiest and most loyal to him and put it in charge in the Capital as first among “equals”.”
If that sounds a little strange, that’s an understatement.
What it boils down to is that you are placing dice in certain areas in order to get resources, which will then help you restore your family’s glory and complete quests to get the Emperor to choose your family to run the Capital (in my view, if an Emperor says that he can’t do it alone, he needs to be replaced by somebody who can).
I guess if somebody gets 67 prestige points and somebody else gets 66, you have to go with the 67 family.
Numbers don’t lie.
Anyway, here’s a bit of how the game works.

The board is set up and the 12 locations are randomly put into the four different districts. This adds a nice bit of variety to the game. Each location will grant a specific resource and allow you to do a specific action when you place a die there.

Here’s a closer look at a district. Notice the dice on the left side?
Each district will only allow placement of those dice on any building in the district. So the above can only have a four and a two placed there.
Thankfully, there is a way to mitigate dice rolls a bit.
Once everything is put out, the first player rolls one die per player. In subsequent turns, some players may have the ability to draft another die. If that’s the case, that die is added to the roll.
Players take turn drafting a die. Once everybody has, if there are extra dice, those who have the ability to draft another die can then do so in player order.
Then, also in turn order, each player does all of their actions before the next player goes.
They can do a number of things:
- Reserve a die for use in a future turn (can only be done once, no matter how many dice you have).
- Activate a location, using the above restriction
- Use a Beast’s ability (more on that later).
- Restore one of your family heirlooms if you have the right resources
- Complete a quest if you have the resources and have restored enough heirlooms.

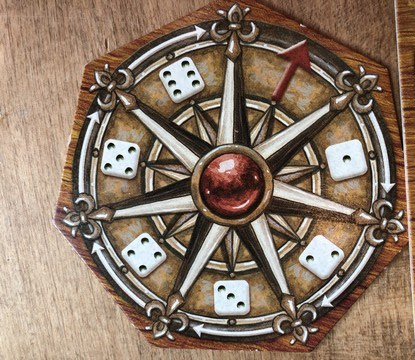
Activating a location has an interesting mechanism and is kind of the timekeeper of the game.
First, you move the double-arrowed marker clockwise around the clock until you get to the resource of the location you’re activating. So if you are activating a Archer location (the bow and arrow), you’d move the marker one space. However, if you are activating a Stone (the rock, duh) space, then you move the marker all the way around the corner to the next Stone location.
You then replenish any locations that are missing resources in the district that the wagon is pointing to (the district on the opposite side from where the marker is).
Collect the resource (getting another one from the supply if the “x2” arrow is pointing to the district where you are activating).
You can then do the action of the location if you wish. Depending on the location, this will allow you to summon a beast, remove a curse if you activated the Monastery, take the first player marker if you activate the Lumber Mill, etc.

Beasts are a really cool aspect to the game. You can hold up to 4 beasts in your menagerie.
Each beast has a die and an up or down arrow on it. You can exhaust the beast to use its ability to manipulate one of the dice you are placing.
They also have special abilities that can be activated at certain times based on what type of beast they are (shown right under the name of the beast) as long as they’re not already exhausted.
“Summon” beasts only use that ability when they are summoned. If you don’t, then it can’t be used any more (though you can still use the dice manipulation).
“Reaction” beasts can be exhausted and used in reaction to whatever it says on the card (the Giant Owl can curse an opponent when they’re harvesting a resource during the Spring season, or the right side of the time track).
“Discard” beasts are powerful, but you have to discard it in order to use it.
To summon a beast, you must have activated a building with a portal on it. You can then summon one beast to your menagerie by discarding the affiliated resource (top right corner). However, if you activated a portal with the same resource on it, you don’t have to discard the resource.
Pretty cool, eh?

The other main thing in Nocturion are the quests.
Quests come in three levels. To do a Level 1 quest, you must have restored one of your family heirlooms. Level 2 quests require 2 heirlooms, and you can guess what Level 3 requires. (Editor – Sacrificing your first-born?)
This is what will get you the majority of your prestige points (though beasts and heirlooms do too).
You just discard the required resources to complete the request, and then you can do the quest’s action if you want.
Here’s what a full player board looks like, with all four beasts and all three heirlooms equipped.

The game continues in this manner for a certain amount of revolutions on the time track (which equals a number of years). A 2-player game just requires 4 years, a 3-player game 6 years and a 4-player game 8 years.
There are a few more details, like curses, that I won’t get into because I don’t want this to get too long, but overall that’s how the game works. Whoever has the most prestige at the end of the game is the winner!

First, I have to say that I love the dice placement concept used in this game, where the districts limit you to what dice you can place there. Since you will have beasts to manipulate dice, this isn’t a crippling thing, and I like how this forces you to make choices on what die (or dice) to draft at the beginning of the turn.
First player can matter because you get first choice of all the dice available (and you also get a Wood resource when you go the Lumber Mill to take first player for next round).
The beasts themselves are also really cool (though be careful if you have a fear of spiders, like one of my players did). I like the concept of them being able to manipulate the dice, but then you can’t use it that turn for its actual special ability if you do that, etc.
The clock mechanism is also pretty neat.

All of that being said, I worry about the replay value of it, as well as the length. The box says 45-60 minutes on it. I know there were outside reasons for this that don’t apply to the game itself, our first play took almost 3 hours!
A subsequent 2-player playthrough took a lot shorter, thankfully, but I still worry about this game being too long for what it is.
It all is pretty much the same.
Get your heirlooms out, then start completing quests. Lather, rinse, repeat.
Sure, the locations are randomized to change up things, but that can be its own negative at times. What happens if you randomly get all of the sword locations in one district for example?
Having the same locations giving the same resources can get a bit repetitive as well.
Overall, I think I enjoyed this game, certainly enough to get some more plays in.
I’m just not sure how long it will last.
Chariot Race (2016 – Pegasus Spiel / Eagle-Gryphon Games) – 1 play

Designer: Matt Leacock
Artist: Jarek Nocoń
Players: 2-6 (though in reality, 3-6 to make it interesting)
Chariot Race is a very simple, very fast game about….uh….wait a minute. It will come to me.
Oh, right! Chariot racing!

You start with a double-sided board. This is the base side that we played with. It doesn’t have any obstructions. The race consists of two laps around the track.
The other side has rocks in the lanes! Running into those will cause elimination!
Somebody should call OSHA.

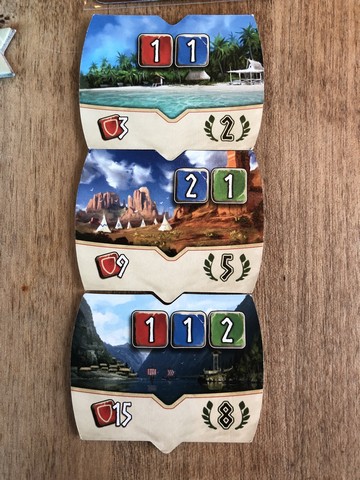
Anyway, each player gets a paper thin sheet to keep track of chariot health (Left), speed (Right), and Minerva points (Top). The above picture is the starting values.
One your turn, you will first decide whether you want to spend exactly 3 Minerva points to repair your chariot up to three points (it’s 3 Minerva points no matter whether you choose to repair 1-3 points, so there’s really no reason to do it unless you’re repairing 3, but you know those ancient Romans. Who knows what those kooky kritters will do?
Then, if you have fewer health points than your speed, you reduce your speed to that level.

Finally, you roll the number of dice shown in the center column of your player card corresponding with your current speed (so a speed of 4 as shown above would have you roll all 5 dice, but a speed of 12 would only have one die rolled).
You are allowed one free reroll of as many dice as you want.
You can then spend 2 Minerva points to either change one die face to be whatever you decide, or to get another reroll of whatever dice you want.
The dice can give you the following results:
- Minerva: get 1 Minerva point
- Increase speed 2 spaces and take one damage.
- Increase or decrease your speed by 1 space
- Change one lane (either direction)
- Attack: Either drop a caltrop in one of the spaces you entered this turn or throw a javelin at a chariot up to 2 spaces away.
Once you have used all of your dice and have adjusted your speed accordingly, you have to move a number of spaces equal to your speed.

You cannot change lanes unless you rolled a change lane die. If you happen to run into another chariot, too bad! You both take 2 points of damage and you keep going.
There are other ways to take damage too.

If you hit corners at too high of a speed, you could take a lot of damage.
When you land on one of the numbered squares, you check what your speed is. You take one damage for each speed point above that number. So if you’re going at a 12 speed on the inside lane, you’ll take a whopping 9 damage!
If your chariot health marker ever reaches 0, then you’re wrecked. Put a caltrop (grey cube) in your space and remove your chariot.

That’s another way to take damage. If somebody dropped a caltrop (a 3-pronged spike which will always land with one of the prongs sticking up) in a space that you enter, you take one damage. A javelin thrown at you also does one damage.
This continues for 2 laps, and whoever crosses the finish line first is the winner!
This is a fun game for what it is: a quick filler with basic stuff, some dice rolling and some “Ha! Take That!” involved. It’s nothing too meaty, but makes a fun lunchtime romp with your co-workers, or a nice way to start/end a game day/night.
The components, however, are not very good. The chariots are fine, the board seems kind of flimsy but is otherwise ok.
But the player tracks are basically hard paper. That wouldn’t be so bad if the plastic markers weren’t so tight on them. Of course, they have to be tight or they’ll move, but they also wrinkle it very easily.
Still, it’s a fun game if you don’t mind some mindlessness.
Macao (2009 – Alea/Ravensburger) – 1 play
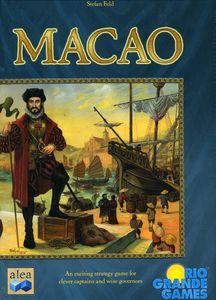
Designer: Stefan Feld
Artists: Julien Delval, Harald Lieske
Players: 2-4
It’s not exactly trading in the Mediterranean, but it is trading! Kind of.
Macao is yet another Stefan Feld dice game that uses these dice in fairly unique ways.
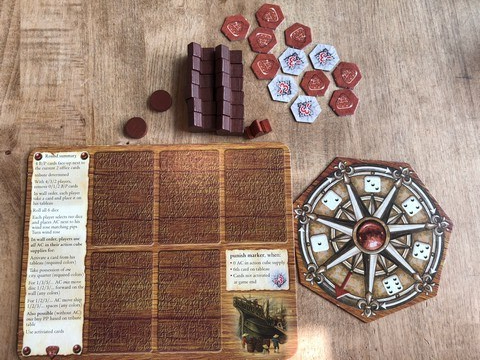
Even the player pieces are unusual! (Except the houses, of course)
The board depicts the city of Macao (the famous port city in Southern China) along with sea routes to a bunch of different trading ports.

The city is divided into Quarters that you can spend action cubes on to take control of.
When you do that, you put your little houses in the quarter and collect the good from that quarter.

As with other games from the Feldian Mythos (I can trademark that name, right?), Macao also has a variable turn order track. In this case, it’s the wall (see the discs at the bottom of the map right next to the water?)
Just like Castles of Burgundy, turn order is based on where those discs are. If any are in the same space, then the one on top goes before the ones below. When you move on the wall and enter a space where somebody already is, you put yours on top and will go ahead of them next time.
What are you trying to do?
You’re trying to become the most prestigious trader out of Macao by transporting goods, taking control of quarters in the city, and using your cards to the best effect.
There are a total of 12 turns in the game, each one beginning with the drafting of cards.
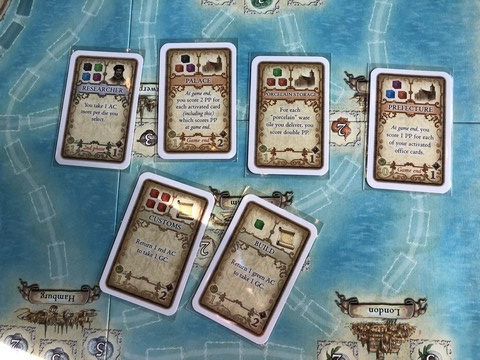
Two of these (the Office cards with the scroll on them) are known ahead of time while four (buildings and people) are drawn from the deck.
In player order, players choose which card they want to put on their player board in order to try and complete. If you don’t complete them by the end of the game, you will lose 3 points for each one you don’t.

The cost to build the card is in coloured action cubes at the top left of the card. The Noble, for example, costs 3 red action cubes.
Once everyone has put them on their boards, then the dice are rolled.

This is where Macao gets interesting.
Each player has a windrose where they will be placing action cubes.
After the dice are rolled, you can choose two dice and take the rolled number of action cubes and put them next to your windrose.
But you have to put them in the sector of the number that was rolled.
So in the picture above, if I took four green cubes, I would have to put them in the four section. I could then take two purple cubes and put them in the two section.
After cubes are taken, you twist the windrose counterclockwise, so the cubes that were in the two section are now in the one section, and any that were in the one section now are where the arrow is.
This turn, you will only be able to use the cubes in the arrow section!

After a few turns of doing this, you may end up with a windrose like this.
Thus, you have to really plan your actions ahead of time, or at least be open to them. You’re dependent on the dice rolls, but if you need a lot of cubes, you may need to take some “six” dice rolls, which means you won’t be using them for six turns.
It’s a really brilliant mechanic, though it can be difficult to comprehend until you play it once.
On your turn, you will spend all of the action cubes in the “arrow” section of the windrose. You can use these to build cards, or you can use actions from those cards.

You can also spend the cubes to move on the Wall for turn order, to take over a quarter in the city (only one per turn!), or just to move your ship to deliver those goods that you obtained from taking over quarters.

Or you can pay tribute to buy prestige.
Each turn, the cost and the number of victory points you can get for that cost is determined by adding the values on available cards (cost is in bottom left, points in bottom right).
In the above picture, you can spend 3 gold coins to get 6 prestige points.
Not a bad exchange!
If you have the money.
Once the twelve turns are up, you proceed to end game scoring, which can be scoring cards (if you have any) as well as points for linking controlled quarters in the city.

You get two prestige points for each house in your largest collection of adjacent quarters.
White received a whopping 14 points there!
Brown…did not. (Editor – “you’re brown, right?”)
You also get “penalty tokens” for three things: taking a card when you already have five unbuilt cards on your player board (get those things built!), not having any action cubes in your arrow slot on your windrose (plan better!), and one penalty for each of your unbuilt cards at the end of the game (are you listening to me? Build!)
Each token costs you 3 points.
It is possible to win (or come close) even with a lot of penalty tokens. In our game, white had five or six penalty tokens, and still ended up only losing by 6 points. If you have something to concentrate on, it may be worth taking the penalty to not build a card or something.
I lost by 29, so don’t look to me for strategy advice, though.
Macao is an amazing game. Right now, I only ranked it 7.5 on BGG and it’s not in my Top 25, but I think with some more plays, this could easily knock Castles of Burgundy out as my favourite Feld (not that I’ve played many, but still…).
I love the dice mechanics, the windrose and action cube management is exquisite (even though I sucked at it) and the choices you have for how to use the dice are very difficult.
The only knock I would have against it right now is that it’s very hard to mitigate the luck factor. Other than a few cards, there is no way to adjust the dice and how you take the cubes. If you need a purple, red, and black cube to build a card, you have to try and get those cubes to show up in the same space before they reach the arrow.
Yes, some cards let you exchange cubes for gold coins, and others let you exchange coins for cubes, but it can still be difficult to manage.
As I get used to that, I’m sure my rating will go higher.
As it is now, though, I really enjoyed this game and want to play it again.
That’s a hefty load of new games this month!
What new games did you play? What do you think of these? Have you played them?
Let me know in the comments!

Thanks for sharing. Hadara seems like a game I might be interested in.
LikeLiked by 1 person
It is pretty cool. I’d like to try it again and see if my opinion improves, but it’s certainly solid.
LikeLiked by 1 person