Dude! Take Your Turn!
A Gaming Life
Combat Commander – After Action Report – Scenario 86 – Keep Calm and Carry On
Never has a scenario title been so apt!
As you shall see.
The subtitle for this post is The Ballad of Sergeant Hawes.
Welcome to another tale from the Combat Commander ladder, that monthly tournament of one of the greatest games out there. Administered by the honourable Patrick Pence (he of Patrick’s Tactics & Tutorials fame), the ladder allows you to play in a monthly tournament against great and friendly players.
And what could be better than playing Combat Commander at least 12 times a year?
After a win last month, I was hoping to continue my winning ways and stay above .500 in my ladder career, but this scenario looked a bit tough for my side.
This month’s scenario is from the Sea Lion battle pack, scenarios that take place during the alternate history German invasion of Great Britain.
Scenario 86, Keep Calm and Carry On, takes place during the initial invasion when a sleepy British village wakes up to find German paratroopers landing. The Germans are trying to cut off the supply route for the main British force south of the village.
The local defense force consists of old World War I veterans and 19-year-old Ian Peasley, who takes it upon himself to run up to the very high church tower and see if he could pick off some Germans.
My opponent was Bob D, from out east so we had a 3-hour time difference. Thankfully, we were able to get organized to play Saturday morning (my time).

(Don’t forget that you can click on a picture to make it larger)
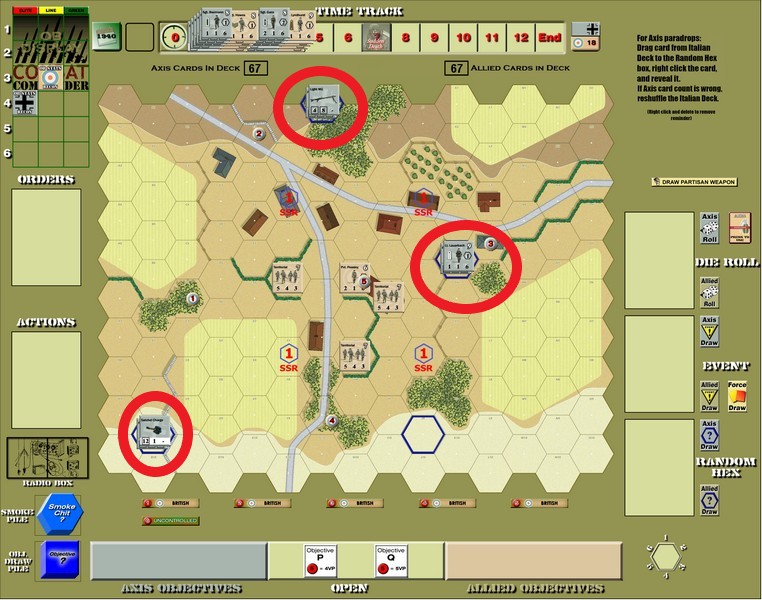
Here’s the beginning setup, with the Germans not yet doing their random card draw for where they land.
See all of those SSR1 markers? The British (tan – me) have to set up within that box, with Peasley having to set up in that one specific hex.
The Germans (grey – Rob) then land their first three units, satchel charge, and one leader, in random hexes around the map. The leader gets to join up with the closest German to his own random hex, so he won’t be by himself (unlike some of these random setup scenarios). But noone can land inside the box.
You can see from the Time Track that multiple reinforcements will be coming for both sides during the next four Time triggers
The Germans have to do the random hex draw for all of their reinforcements, though the arriving German leaders go to the nearest German unit, even if they are in the box (the new German squads can’t do that).
The first British reinforcements enter from the bottom of the map, the second from the top of the map.
No units can leave the map voluntarily.
Oh, and don’t let me forget Private Peasley!

The hex he’s in is the Church Tower. It’s a Level 3 hex (the only hex of that height) and it can only hold three men (so basically a leader and a team). Peasley himself cannot leave the hex for any reason (Rout, Advance, Move).
Also, he has an unbroken firepower of zero (though he’s higher than everybody, so he will always get +1 firepower for height).
Doesn’t sound like much, but the British player gets to choose one unit in the target hex and that unit’s morale is zero as well.
That can be devastating!
The unit still gets any cover bonus, but still…
That’s all of the special rules, so let’s see where the Germans ended up.
It wasn’t actually too bad for Rob.
I mean, his leader was right in Peasley’s sights and the British go first.
Sadly, I drew nothing but crap for my first hand!
After a discard, Bob tried to move them out of the way, but unluckily for him, I had drawn a Fire card.
Luckily for him, we discovered that Peasley had brought his blanks with him, the ones that he used when teasing his little brother with his rifle, and not his real ammunition.
Two shots, making Lauerbach’s morale zero each time, and I drew a 5 and a 4.
Needless to say, there was much cursing and me wondering whether this was how the day was going to go.
More discarding ensued with me unable to draw another Fire card. So annoyed was I, and confident that I wouldn’t need one this early, I even included two Recover cards in one of the discards!

Yeah…I figured that out.
While Lauerbach and his men were out of the line of Peasley’s sight, the British squad next to him wasn’t.
Making a juicy target.

But still, it’s a 6-firepower attack and I’m in a building.
What could go wrong?
Actually, nothing! They survived.
Until the Germans fired again.
While the German fire didn’t do anything, a German sniper broke them!
Yeah…I probably shouldn’t have discarded those two Recover cards.
It would be a while before I saw another one.
Lauerbach poured fire into the British mangled squad, and while they only needed a 6 to survive, I of course pulled a 5.
One squad down already.
And Peasley had lost his direct support.
Thankfully, I subsequently (but not always, sadly) very often had a Fire card ready, and multiple ones at that! With Peasley’s ability, you have to save a Fire for if the Germans move, if you can help it at all.

While the best Peasley could do was suppress his target, another British squad actually managed to break a German!
One of the few good Fire rolls I had early on.
Though Peasley did have another good roll, breaking his original target with his second shot.
Sadly, he couldn’t kill him before Bob drew a Recover card.
That meant that it had been almost 3 months since I had actually killed a German unit directly (rather than routing them off the board).
Lauerbach tried to move into Peasley’s line of sight, and I definitely had a Fire card…along with three Crossfire cards that I had been holding.
He could do some damage!
However, another poor roll made it so that only Lauerbach actually broke (I personally think it was another blank but the gunshot sound startled Lauerbach so badly that he tripped over a tree root in the orchard and panicked).
I didn’t have another Fire card, unfortunately, so couldn’t take advantage of his broken state on my turn.
But I did finally draw a Recover card!
Unfortunately, so had Rob, so Lauerbach survived.
I have to take a moment to call out one of my other starting units.

They took withering fire this whole scenario, broke a few times, but they stood their ground and never moved from their building.
Even causing some problems for the Germans as well!

Your homeland salutes you.
Lauerbach continued moving around the perimeter, taking Peasley’s fire and not having anything happen (except some British Air Support, which broke the guys in the south, though on the next German morale check, the German Hero Dietel emerged, rallying them immediately).
I was beginning to think that Peasley was overrated.
Then Peasley found a real bullet!
And Lauerbach was broken again.
That brought the first Time event (the German deck ran out) and the first of the German reinforcements landed.
Let’s see where that was.
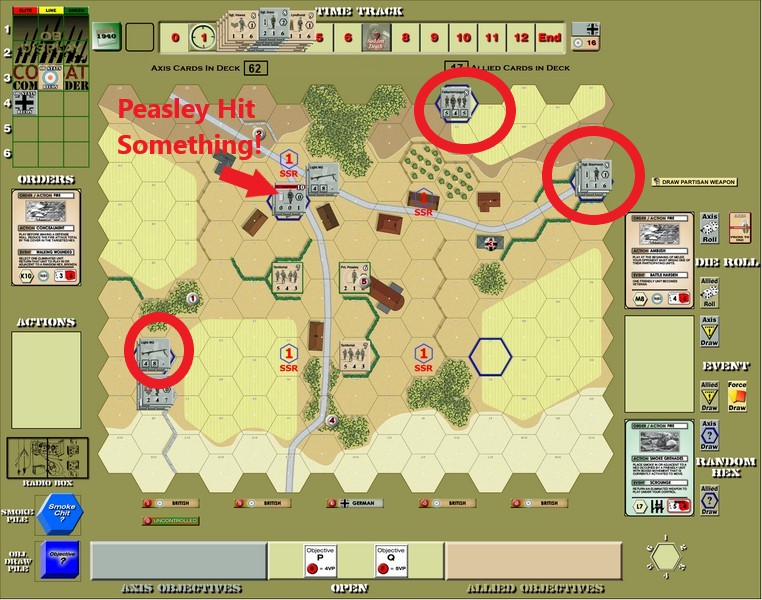
Another squad in the south, along with Sgt. Biermann and a squad with a satchel charge on the edge of the map.
They wouldn’t be significant at all.

But overall, not too bad.
Since Bob couldn’t draw a Recover card, he decided to move Lauerbach behind his building so that Peasley didn’t have another shot at him.
Bob decided to move Biermann and his men up the hill, right into Peasley’s line of sight, and he actually had another real bullet!
Biermann panicked, but the squad was fine.
The British deck ran out and it was time for the first British reinforcements.
Sgt. Hawes had entered the arena!
With a Heavy Machine Gun, though he had those lesser men than him actually carry it and fire it.
Unfortunately, before I could draw another Fire card, Bob had a Recover card and both leaders rallied.
Some discarding ensued (though I didn’t discard either of the two Recover cards I had drawn. I had learned!) and Hawes and his men moved up into the village.
A lot of inconsequential stuff happened (including Peasley once again loading his rifle with a blank), then Biermann made his move.
He got right into Peasley’s face only two hexes away…and I didn’t have a Fire card.
He also had an Assault Fire card, but nothing happened. Since Peasley hadn’t fired, though, it was time to bring the war to this young man.
Biermann and his men ran across the open ground and into the church.

Peasley was shaking in his boots a little bit.
I discarded, desperate to draw a Fire card before Biermann could advance into Peasley’s hex.
And I did!

First, I fired the HMG into his hex, hoping to break him and the squad with him.
Biermann broke.
But Bob drew an Interrogation event, which let him look at my hand and discard one of the cards. He of course chose my one remaining Recover card.
Peasley then fired, throwing a bunch of hand grenades down from the steeple as well as his rifle, and Biermann died.
The first German death directly at my hand in 3 months!
But the squad survived, with the satchel charge.
They threw it up the stairs of the steeple, and Peasley was concussed. They then fired up the stairwell, but thankfully it’s a curved one and the bullets flew by harmlessly.
Wow, I wish I had a Recover card right about now.
Hawes tried to break the German squad before they could advance up the stairs, but nothing worked.
Then they came storming up the stairs, with Peasley cowering in the corner.
But he had his trusty rifle and it actually had some bullets in it! (I drew an 11, making a final firepower of 12).
The squad only had a 6 firepower. Would Peasley turn into the hero?
Bob drew a 10, but I gave him the Initiative to reroll.
He drew a 7, giving him 13 firepower, and poor Peasley died fighting.
A moment of silence, please.
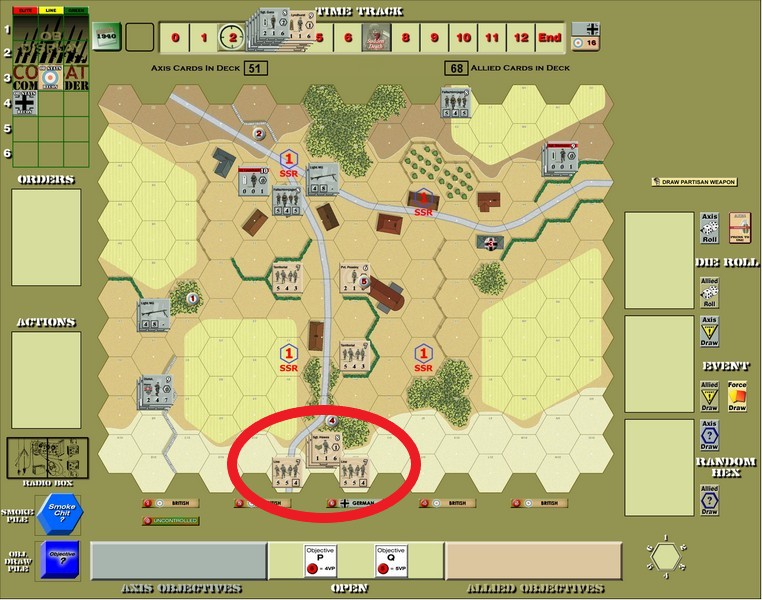
Due to stacking limits, Bob did have to deploy and kill a Team off, but getting that objective netted him 20 points, putting him in the lead!

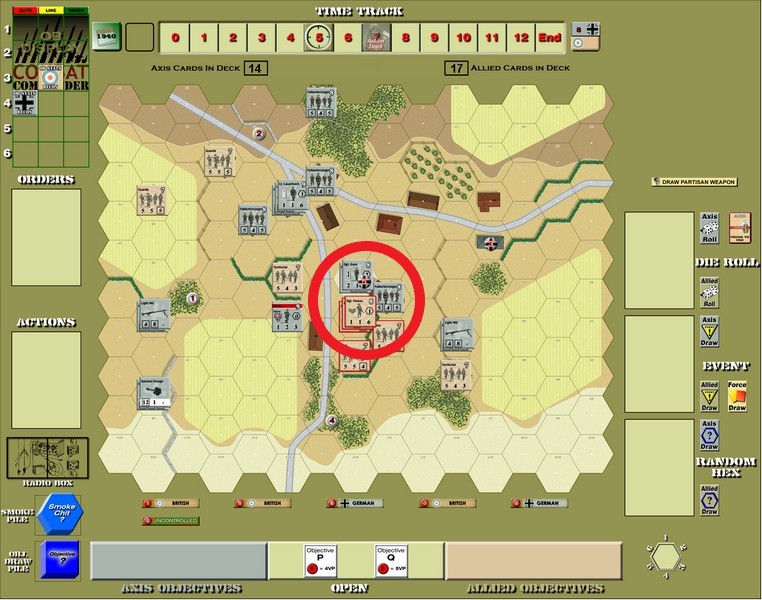
Here’s the situation at that point.
I still had a good shot. That only gave the Germans a 3-point lead. Kill two Germans and we were back at it.
Or I could try and retake the objective.
But then the German deck ran out and it was time for the second round of German reinforcements.
Ganz, the most excellent leader, just happened to land on top of the steeple, ducking inside and suddenly making that team there a whole lot stronger.
My road was suddenly an uphill battle.
Even moreso when Bob moved the new squad with a satchel charge into the church (not the steeple hex) as well!

I was starting to wonder if this wasn’t going to end badly.
I had no good cards so was discarding frantically (also wanting to run my deck out so my second set of reinforcements could come out).
I finally got a Fire card and let loose on the German squad in the building, but nothing happened.
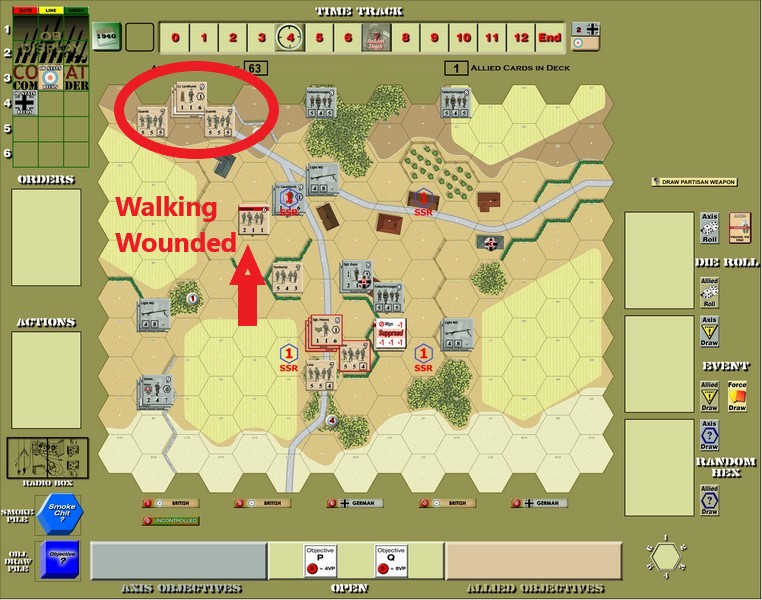
The Germans opened up on the Territorial unit next to the church, but caused a British Walking Wounded event bringing out the lone dead British squad…and happening to put it right next to Lauerbach’s men.
The attacked British squad was only Suppressed, but the satchel charge exploding broke it.
Thankfully Bob was never able to actually Rout it off the board before I was finally able to move it into the Woods and Recover it (way in the future).
A German Time trigger brought the British northern reinforcements out.
It was time to do this.
Of course, my deck ran out almost immediately, so we only had two more rounds until Sudden Death.
It was time to do this…much faster.
Lauerbach and his men finally Advanced onto the Walking Wounded squad, killing them instantly (it didn’t seem worth it using an Ambush).
The new guys, led by Lyndhurst, had a mortar with them and I was able to Smoke the church steeple!
That would help me approach it.
Sadly, that was all they did, before the mortar squad died…and then Lyndhurst died.
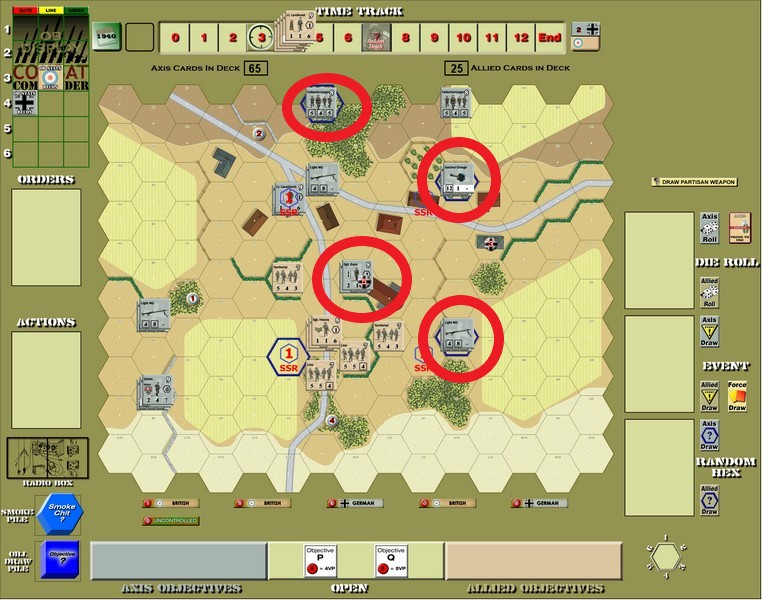
Here’s the situation after all of that.
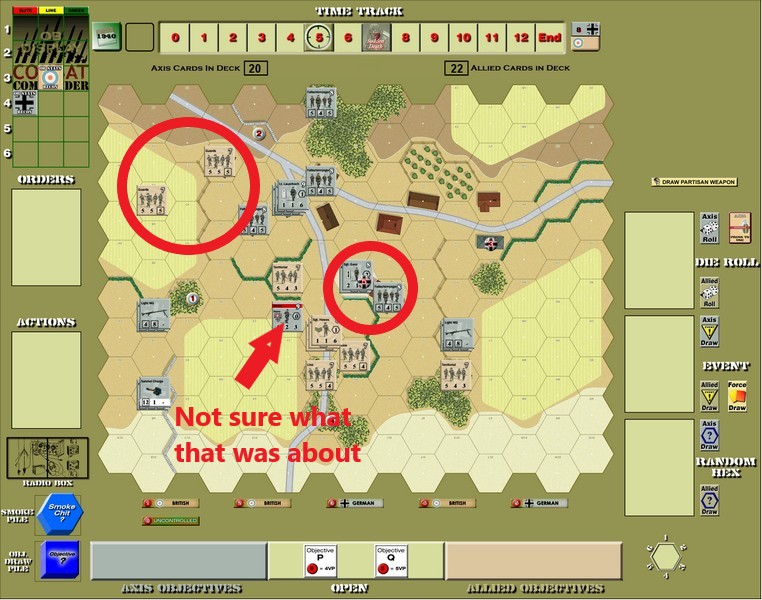
Both decks were getting low, and I only had one leader left. The church seemed impregnable.
I almost conceded.
I considered it!
But I decided to just see what would happen.
It was do or die time.
That’s when Hawes took it upon himself to do something.
I drew two Advance cards!
First, he Advanced in front of the church (thank God for that smoke on the steeple)
He took some fire, but I had a Recover card handy if necessary.
During the German fire, I drew a Time trigger!
Not only did that make it one round closer to Sudden Death, but it eliminated the smoke on Ganz.
So he fired.
Hawes was suppressed. His squad broke.
But the Recover worked.
For my second Advance, I thought about going directly into Ganz’s hex, but realized that it wouldn’t take the objective (I’d need to eliminate the squad too) and that it would basically be a toss-up without an Ambush (and I was worried Bob had one).
So overstacked into the squad’s hex I went!
It was a 13-6 British advantage without Ambushes, and thankfully Bob didn’t have one (or didn’t play it, anyway).
Even more thankfully, he drew a 3 for his roll.
He thought about giving me the Initiative, but ultimately it was too great a chance for me to win anyway.
I had to eliminate a team of my own due to overstacking, but it was worth it.
On my draw, I drew another Advance!
Bob fired his machine gun on my guys, Sustaining it, but drew a Jammed result. That would have eliminated the gun (not to mention a really low firepower result) so he gave me the Initiative for that.
The fire still didn’t do anything, thankfully.
It was the moment of truth.
If I Advanced into the steeple, I would have a 11-7 advantage, but he may have an Ambush. I didn’t have one.
There were 4 cards left in the German deck.
Should I discard to try to get an Ambush, knowing that Sudden Death would likely happen next turn and the game could end?
Not to mention the fact that Bob could have done something with the cards in his hand.
Or did I go for broke and Advance.
Hawes, of course, voted to Advance, and his was the only vote that mattered.
“Keep Calm and Carry On,” he said in his deep voice.

Into the breach! (or up the stairs, anyway)
Miraculously, Bob didn’t have any Ambush cards.
Even more miraculously, he drew a 5!
I was guaranteed the win on this one, as it was now 12-11 German.
Good thing it was a guaranteed win, because I drew a 2, making it 13-12 British.
I had to eliminate an entire squad, but Objective 5 was mine!
Along with 20 points.
Bob didn’t have anything good in his hand, so discarded to run out the clock on the round.
To add insult to injury, Bob’s Sudden Death roll was a 2, ending the game.
Somehow, out of the jaws of defeat, I had grabbed a victory.

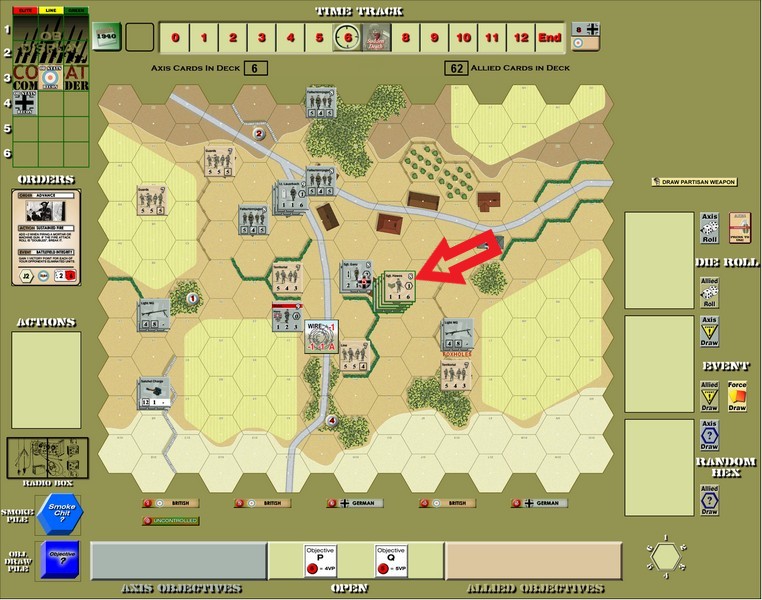
Here’s the final map.
I was being serious up above. I was thinking about ending the game.
If this doesn’t teach you that anything can happen in Combat Commander so stay the course, nothing will.
Bob was a wonderful opponent, friendly and fun to play with. It was a really nice way to spend the morning (though I was getting a little despondent at times).
I hope he has better luck next month!
That puts me at 24-22 in my ladder career.
I have a buffer!
And I finally killed a unit directly.
That was a load off my mind.
Next month’s scenario is from the Leader of Men battle pack, tournament scenarios that are supposed to be pretty well balanced.
If you enjoyed this, why not join us on the ladder?
A chance to play a great game at least once a month, and maybe get some more games in otherwise?
You can almost always get a pickup game in too, if you want.
I should do that more often.
Until next month, my advice is this: Keep Calm and Carry On.
Sgt Hawes has got your back.
Unless you’re not the British, of course.
See you next month!
Combat Commander Ladder – After Action Reports
To see all of my Ladder After Action Reports since May 2021, go here!

That was an exciting game; and very interesting, non-standard scenario.
LikeLiked by 1 person
Yeah, I thought it was pretty cool. We never got to the battle packs 🙂
LikeLiked by 1 person
I wish we could have it on RTT 🙂
LikeLiked by 1 person
That would be so great!
LikeLiked by 1 person
What a heroic comeback! Peasley has not died in vain.
LikeLiked by 1 person
I’m not sure how often he’s died but the Brits still won
LikeLiked by 1 person