Dude! Take Your Turn!
A Gaming Life
Combat Commander – After Action Report – Scenario LoM #11 – La Villa Strangiato

Combat Commander can be a game of wild swings of luck, back and forth so much that it might make you dizzy (and make bad decisions).
Sometimes, though, there is just one swing.
You know how, when you were a kid, sometimes your dad was swinging you on the swing on the playground, and you were laughing away, totally enjoying it.
Until he started swinging you higher and higher, and you were so far off the ground that you thought you would fall off and break your neck?
And then you did fall and broke your arm!
Yeah, this game was like that.
(This was all a joke, my dad was awesome so I have no actual experience at that)
Anyway, welcome to the latest tale from the Combat Commander ladder, that monthly tournament of one of the finest games around, administered by the striking Patrick Pence, he of Patrick’s Tactics & Tutorials fame.
He’s getting his star on the Walk of Fame in May!
What year in May? Who knows? But it will be in May!
This month’s scenario is from the Leader of Men battle pack, a set of tournament scenarios that are actually very good.
My opponent was Greg M, somebody who I had never faced before in my 4-year ladder career.
The scenario has the US (Green – me) face off against some tough Italians (Teal – Greg) in Sicily after the Allied invasion.

(You can click on a picture to blow it up)
Let’s talk about the very few special rules to this scenario.
There are only two, and they both have to do with reinforcements from the Time Track (both the ones already there and also any that come back after exiting the board).
The one that was really frustrating for me was that the Italian reinforcements can set up in any Italian setup hex, rather than appearing on the map edge.
They’re in the thick of the fighting immediately!
For the Americans, they have to draw a die roll, and the white die determines which map edge hexes they can set up on.
If it’s a 1-3, they come in basically on the right map edge. If it’s a 4-5, then basically on the left map edge. Both of these only go down to the 5th hex, so it’s not like they can appear behind the Italian lines.
A 6 will bring them in at the top.
That’s it!
The Americans have one medium machine gun and a few squads, along with two leaders. I set up the MMG in the top left along with a squad and a team and a leader, just to keep the Italians honest about not running off the map on that side. The MMG could also reach all the way across the map in case they moved up the right side.
The rest of the forces were concentrated on the right to try to move in on the bulk of the Italians.
The Italians start with only a couple of light machine guns and a bunch of squads, though they do have a heavy machine gun coming on Time 2 (and remember, they can set up in an Italian setup hex rather than the edge of the board, so they’ll be in position immediately).
So it was time for the American to unleash the hounds of hell before that happened!
And they did…for a little while.

Both sides moved on the right side of the map, getting ready to engage.
One thing to be said about the Americans is they have a ton of firepower, both in guns and in melee.
They also have a bunch of Fire cards, which can be both good and bad (not that I had any right now, of course), even with a 6-card hand)
Blankenship moved his men even closer to the advancing Italians and came under withering fire, breaking everybody.
Thankfully I had a Recover card.
Keep all of the above (the Fire cards and the Recover cards) in mind for later…
In the process of Recovering, Blankenship drew a White Phosphorous event, which lets the Americans throw smoke into a hex adjacent to an American squad. Both sides then have to break a unit in that hex.
And they were right next to the main Italian stack with the -2 leader!

Yep, you knew where that smoke was going.
It only broke an Italian team, but still.
Greg didn’t have a Recover card, so it was time for him to Fire again!
Which did nothing except cause an American sniper to break an Italian squad on the left that was just sitting their sipping chianti and playing cards.
It did break an American squad, but not the important American squad.
It was time to be bold…the Americans had an Advance card and they knew how to use it!
Remember that American firepower.

I Advanced Blankenship and two squads into Visconti’s hex, just to ensure I had enough firepower. I knew I’d have to deploy a squad and lose a team even if I did win, but you have to make sure!
The US advantage was 17-11, and I didn’t have an Ambush.
This could have gone very badly.
Thankfully, Greg didn’t have one either. The Italian roll matched the American strength before my roll, so it was a done deal.
It was a net 5 VP for me, and the Italian leader on the right side was gone!
Things were looking up…I had reached near the top of the swing!
Now if I could only draw another Advance card, there were some single Italian squads that looked ripe for the picking.
Not much happened for a little while. Some discarding, some ineffective firing, the Americans in the top left moving into better position (and cover!). One Italian squad retreating (due to lack of a leader, two of them couldn’t).

Until I finally drew an Advance card, and it was time to do it again.
This time Greg had one Ambush card, but it only broke my team.
The American advantage was 12-4, so not nearly so risky.
But Greg drew a 10! Making it 14-12.
I had this in the bag…until I drew a 2.
Mutual annihilation can’t happen!
So I gave up the Initiative and quickly won the melee.
In my moving on that flank, I left the middle open for an Italian mad dash for the exit.
So I had to use one of my Movement cards to move a squad back to cover that.
And another to move the MMG back because I realized they couldn’t cover the open terrain up there from where I had moved them.
What a waste of two Movement cards.
Right now my hand was looking decent. A Movement card if I needed it, three Fire cards (including two Ambushes).
I was set to continue my mowing down of the Italian opposition on the right side!
At this point, I had reached the highest point of the swing and it was exhilerating!
Then something happened (I forget what) that made me go check on something in the house, and my wife asked my how it was going.
I said it was going great! And that this might be a shorter game than I had expected.
Yes, yes, I had greatly offended the Combat Commander gods.

I don’t know what I was thinking.
HUBRIS, THY NAME IS DAVE!
First, I used my last remaining Move card to move Blankenship forward to get into better position for more melee.
And a weak-ass Italian fire attack (which I didn’t realize he had LOS for until after I moved) broke the other squad in his hex. He now was shepherding two broken units.
I was out of Recover cards, which would become as rare as a smart idea by Donald Trump.
Instead, I had four Fire cards and an Artillery Request (you remember that I don’t have any artillery, right?)
It was time to start discarding (or do some firing if I could).
My first discard brought out an Italian hidden unit!
Which produced a new Italian leader to help on the right side.
Damn it!
He moved quickly to join up with the other Italian units in his building…and brought down some devastating American firepower on all of them.

He broke and some of the men who were just sitting there also did!
I tried to finish them off and rolled high, but Greg gave me Initiative and I rolled a little lower.
Those broken Americans still had some bite!
Not to mention a sniper that ended up killing the Italian squad that had been broken by the first sniper.
Poor guys.
The Italian squad under fire actually died, so obviously I was dodging Zeus’ lightning bolts pretty handily so far.
It was not to last.
As part of an attempted rout, I drew a Walking Wounded event that brought back my only eliminated unit, a Line team that appeared right on my board edge.
That’s not good!

Throughout the game, I made a few Recover attempts, and they never did until Greg successfully routed them off the board, giving him another point.
After that sequence, I now had five Fire cards (3 Ambushes) and a Command Confusion.
Sadly, Farinato recovered before I could try to kill him.
Replacing that Fire card was an Artillery Request.
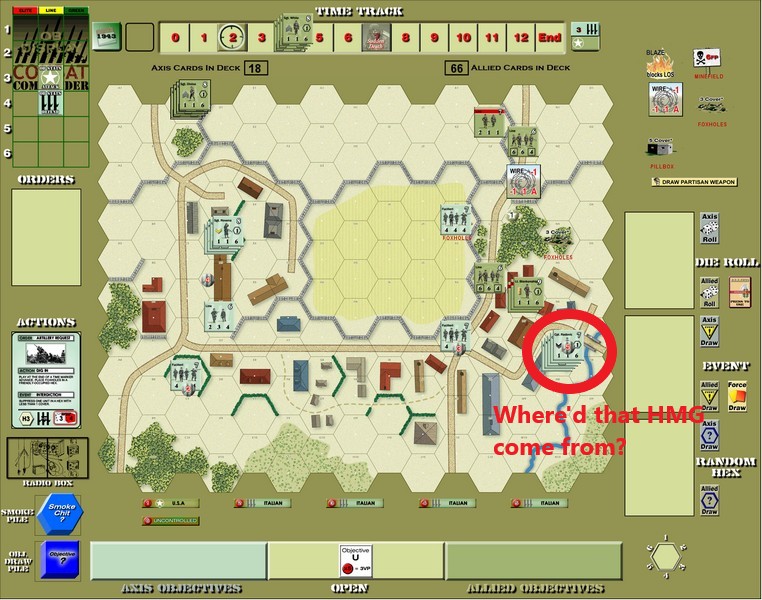
Another American discard ran my deck out, so the Italian reinforcements were coming out.
Remember how the Italian reinforcements can set up in an original setup hex rather than coming in from off-board?

Yep…right in Farinato’s hex with an HMG (helps that he only had two Line teams along with two leaders, keeping under the stacking limit).
(note to self…next time you do a search for “fuck gif”, make sure you modify that with “somebody saying” or the results are… not pleasant)
Good news is, I had finally drawn an Advance card!
And I had some Smoke Grenades too!
But sadly no Recover card to actually recover my guys first, and no Move card to move if I did (you have to move, not advance, to throw smoke grenades).
My guys were sitting ducks for that new HMG.
First fire, my Line team was eliminated even though I just needed a 6 (drew a 5).
It was time to use my Advance to withdraw rather than Advance.
And I now had four Fire cards (3 Ambushes), a Command Confusion and an Artillery Denied.
Discarding three (including an Ambush, because I wanted to keep the Smoke) brought me two more Fire cards and a Move.
Feeling it now, Greg advanced the HMG so that he now had a shot at Blankenship again.
Blankenship moved out of harm’s way, but right into Wire (and in sight of the lone Italian squad in the centre, but that shouldn’t amount to much).
Another American squad moved in front of the HMG, hoping that Greg wouldn’t play two Fire cards on the same American move…but he did and they broke.
But I had finally drawn a Recover!
Which rallied everybody but the lone Team in the north.
Since I had to use a card, I decided to Fire even though it was low odds, in order to use one of the five (!) Fire cards I had.

Here’s the situation after all that.
I did draw another Recover! But also yet another Fire card and Artillery Denied.
After the Italian deck ran out, I tried to rally the team again…and failed.
Some more American fire actually broke the entire Italian HMG stack, with only a 6 firepower!
Maybe this swing wouldn’t be so bad after all…
They quickly recovered, though.
And fired again.
An American Time trigger saved the squad and brought out the American reinforcements.
They came in on that side too, hoping to overwhelm the Italians with firepower and melee.

Would it work?
Discarding two brought me another Recover card! And another Fire.
But the team failed to rally yet again.
In the meantime, my discard brought out another Italian hidden unit!
A weapons team and LMG came out to bolster that right side.
More American fire did panic Radovic again, but Greg had yet another Recover card.
After recovering, he opened up on the squad, breaking it heavily.
And here’s where I started falling off the swing.
I only needed a 7 to be suppressed, but drew a 5 and broke.
On the second attack, nothing would happen unless I drew a 2, suppressing me.

I promptly drew a 2!
The Recover cards had dried up.
Discard three crap cards…and draw two Fire cards and an Artillery Denied.
I now had 5 Fire cards and nobody in LOS except my broken squad.
Greg fired on him again.
All I need is a 6 to remain suppressed…and I draw another 2.
Bye bye!
Things were starting to look bleak, but I did have some heavy firepower. If I could bring it to bear.
Discarding brought me a Move…and a Recover! One turn too late.
It was time to try and move my reinforcements forward, in the smoke, to maybe take out that HMG stack with melee.
I promptly drew a 1 smoke…barely a fizzle.
Since Greg had moved his other guys up to make the smoke hex untenable (it would have been fine with some good smoke!) I decided to skirt the building instead.

And promptly walked into a minefield.
Which panicked everybody but White!
Thankfully, I had a Recover card, but the team failed.
US teams were not very good this game.
I drew 3 cards to fill my hand: a Rout, an Artillery Request, and a Command Confusion.
Greg finally was able to rout the team up north off the board.
I discarded 4, desperate for a Recover and maybe an Advance. I still had two Ambushes!
This is what I drew.

THIS HAPPENED TWICE IN THIS GAME!
Discarding again got me two more Fire cards, a Rout and a Command Confusion.
Greg discarded again, letting me play my newly-acquired Demolitions card to remove the Minefield, thank Zeus.
White laid down some fire, suppressing the HMG team, but they quickly recovered and opened up again.
Timely US concealment kept the broken team alive but everybody else still broke.
Greg couldn’t finish them off and an American sniper broke another Italian squad that was just sitting on the left side of the board minding its own business.
Actually, my snipers were very good in this game, which is rare.
Then more fun came for the Americans!
No, my guys were still alive.
But an Italian Infiltration event brought a new HMG out onto the board.

And right into position to exit!
Which they promptly did.
I discarded the two Routs and a Command Confusion I had, and promptly drew two more Fire cards (including another Ambush!), a Rout, and an Artillery Request.
The Italian deck then ran out, bringing that HMG…right into the thick of things on the right side.

Here’s an update with two Times left before Sudden Death.
The Italians were 5 dead units away from surrendering and suddenly they outnumbered me on the right.
Even more so after the fire attack that triggered Time killed the two American units and suppressed White.
It was time to consider attacking on the left with the MMG guys.
I had 3 Ambushes, remember!
If I could get close…but I still had nothing but Fire cards in my hand.
Discarding once more brought three Artillery Requests and a Command Confusion, and a deck depletion that brought us one Time from Sudden Death.
Discarding again brought me a Move card!
However, I hadn’t quite figured out the “attack on the left” thing yet, and I moved Blankenship and his squad to maybe help White and his remaining squad.
This left Objective 1 open for Greg to move onto, and then he quickly left.
For some strange reason, I thought those 3 VP were important so I moved to take it back.
I have no idea what I was thinking at this point.
I blame the despair.
After some more discarding, I now had 5 Fire cards (3 Ambushes, 2 Smoke Grenades) and an Advance.
I used the Advance to get White out of harm’s way, as I was only 4 losses away from Surrender.
Now I had 5 Fire cards and a Rout card in my hand (I had used the Advance and one of the Fire cards).
After more maneuvering, it was time to start the attack on the left!
But with only an Advance card, it didn’t go far.

Here’s an updated map.
I finally had two Recover cards!
But no movement.
I finally drew a Move card with only 32 cards left in my deck, but Greg dropped some Wire on them in the first hex they entered.
More discarding and another Move!
Of course, moving off of Wire takes all of your movement, so they didn’t get far.
And they stumbled into a boobytrapped building. And took some fire too.
While everybody broke, they quickly recovered.
And another US sniper broke an Italian squad minding its own business!
You know, I love that my snipers were actually effective this game, but other than killing one unit with two sniper shots, they never actually hit where it would make a difference.
Like in the front line.
They always hit the ones who were loitering in the back not doing anything.
Anyway, here’s the situation after all of that.

And yes, I had 5 Fire cards in my hand.
Firing with Sustained Fire to try and take those guys down a peg while I looked for an Advance card, I managed to draw doubles for the first time in I don’t know how long. If you draw doubles with Sustained Fire, then an MG breaks down.
I can’t remember the last time I had a gun break due to rolling doubles.
It did break everybody though!
Too bad I didn’t have an Advance card.
Because in a rare occurrence, Greg didn’t have a Recover card!
I fired again, but to no avail.
And my card draw was crap.
I had 9 cards left in my deck. I knew I needed to pass sudden death or it was over.
I needed more time!
I did manage to kill one of the broken Italians with firepower.
Sadly, my deck ran out before I could do anything else.
I said “I’m sure I’ll draw low, given how this game has gone” and promptly drew low.
The game was over, and Greg had won with 19 VP.
One more Time and I may have been able to do something, if I was lucky.
Greg later said he had 2 Ambushes waiting for me, but with my 3, I think I still had a pretty good shot. Especially since he couldn’t rally his remaining squad.
It would have taken a lot of luck for me to get two more guys, though.
Here’s the final situation.

Greg was a great opponent. He took advantage of every break he got, and he held in there at the beginning when it looked really dark for him.
I had some really bad luck in the middle of the game, but I think another part of why I lost was getting distracted in the middle when I should have pivoted to the left a lot sooner.
Of course, I didn’t really have the cards for that, but I wasted a couple of Move cards doing stupid things.
Those Move cards I wasted could have gotten things started.
Anyway, that leaves me at 24-23 in my ladder career.
Next month is my 4-year anniversary, so let’s hope it’s a win!
The scenario will be from the C3I series of scenarios, and those are usually pretty good.
If you enjoyed this (and liked watching me lose, or even if you didn’t like watching me lose), why not join us on the ladder?
We’re a great group of people playing a great game, at least once a month.
And many more if you want!
Tony can give you as much CC time as you want.
Until next month, my advice to you is to not brag before it’s warranted.
It will bite you in the ass.
See you next month!
Combat Commander Ladder – After Action Reports
To see all of my Ladder After Action Reports since May 2021, go here!
