Dude! Take Your Turn!
A Gaming Life
Combat Commander – After Action Report – Scenario M8 – Closing Outer Camp

Some months the luck gods strike you down, and some months the luck gods…well, don’t.
They still needle you some, but maybe they decide to strike somebody else down instead?
That’s Combat Commander in a nutshell!
Yes, it’s time for another adventure from the Combat Commander ladder (trademark: Patrick), that monthly tournament of one of the greatest games out there.
Or maybe that’s just my mood right now.
Administered by the stunning Patrick Pence (he of Patrick’s Tactics & Tutorials fame), this tournament lets you play a monthly game of Combat Commander, and sometimes even more!
In fact, in a rare occurrence, I actually played twice this month!
I did a practice run of this scenario, and thank God I did.
That one did not go well, though it was fun!
This time I was much more prepared.
For this month’s scenario, I was paired up with Ben T, another second-time opponent, last seen in May 2024 (I mean last faced by me, not that he’s been missing since then).
This scenario is taken from the New Guinea battle pack and has a Japanese force (white – me) defending one of the well-entrenched camps outside of Buna against an Australian force (tan – Ben) hell-bent on breaking through and disrupting even more of the defenses.

(Don’t forget that you can click on a picture to blow it up)
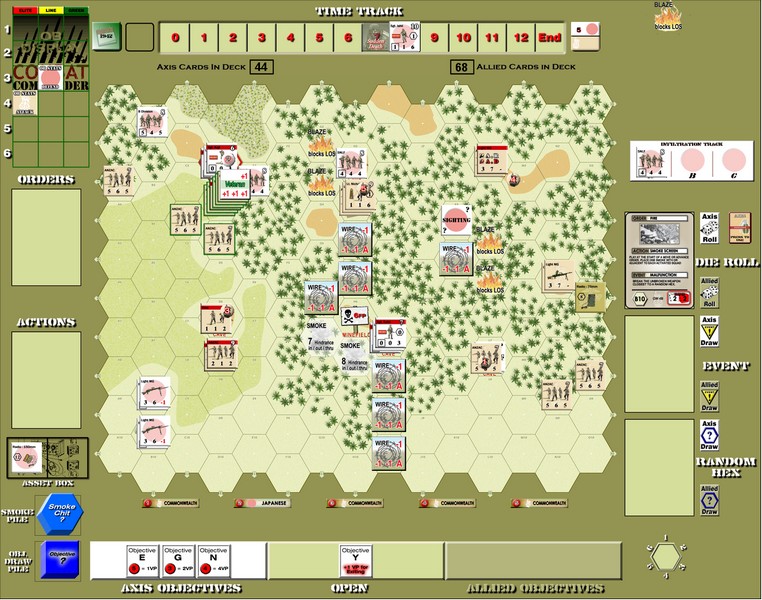
Here’s the initial setup map.
Notice a few things?
Like broken Japanese units and already a couple of fires?
That’s the special rules, baby!
The Japanese set up first, up to 12 columns from the left side of the board.
They also have a bunch of Wire and five Caves which gives the Japanese in them a lot of protection.
In my practice play of this game, I set up in caves very well forward and my opponent tore me apart with his massive squad and heavy machine gun firepower, then waltzed off the board at least once.
This time, other than a couple of sacrificial squads to fire at the Australians advancing through the palms, I set up in the back where at least only the HMGs could reach and not the squads.
Anyway, there was a massive air raid just prior to this scenario, so after setup the Japanese player draws 6 random hexes and breaks any Japanese units in hexes adjacent to those.
Then, after the Australian setup, the Australian player draws two random hexes and puts blazes in those.
Having a blaze right in the middle of the palm trees in front of all of Ben’s heavy machine guns was not pleasant for him, though it wasn’t game-killing.
Yet.
Finally, two “radios” are set up in the final column on the right side of the board (Ben placed both of them under units so you can’t see them in the picture) representing two tanks that can be fired twice at the same target with an Asset Request.
Only 6 firepower (5 assuming it’s going through the palm trees), but it’s something at least.
Let’s see how this one went!
Thankfully one of my first cards was a Revive 5! Though Ben got the first turn and I was dreading those broken guys being under fire.
First, though, a tank tried to take out my sniper (the Sogeki Hei) but failed.
The HMGs opened up on my broken guys and thankfully Ben drew low.
I still needed an 8 and a 7 to survive, but thankfully drew two 10s.
And then a subsequent shot broke the sniper. (He actually outright killed somebody in my practice game, but was useless in this one before dying).
Now it was time for Ben to move out his massive force.

And it was time for my SNLF piddly little 4-power (5 for firing downhill) squad to see if they could actually inhibit the advance.
They did!
Kind of. Lots of broken Austrlians in the palms.
Though one of the Australian events was a KIA event (eliminate one broken unit) and I thought my broken leader was toast, but Ben killed the sniper instead.
It was finally my turn and all of those broken Japanese units rallied.
My hand now consisted of a Fire card (thankfully), an Advance (useful for moving from Cave to Cave but not necessary yet) and two Asset Requests.
Given the huge grouping of Australians clustered, a radio would be really nice, but you only have a 1/3 chance of gaining one, which is why it’s good to Reconnoiter first to see what the next card on your deck is.
Sadly, I couldn’t draw one to save my life.
Finally, later, I just went ahead and tried it. And it worked! I got a 150mm heavy duty artillery barrage.
And promptly missed on my first attempt, had both leaders broken the next time I had one, and then Ben used an Asset Denied order to break my radio just in case.
Not good (and saying all this now so I don’t have to say it later).
Anyway, back to the action.
Ben couldn’t have this little squad stopping his guys, so opened up on them with both HMGs…and promptly drew a Time (2) trigger, making a really small 16 attack.
Shades of my Time luck last month!
The squad still drew badly enough to be suppressed, but didn’t break.

Ben moved the northern guys this time and they were fired on by another SNLF squad with small firepower.
While they had nowhere near the success of the first guys, I did manage to break a squad.
Further HMG fire ended up killing the previous SNLF squad, but they had already made their mark.
Then things got really hot and sticky for the Australians.
More movement in the north, fired on by me, brought a Breeze!

The fire spread south, and with the southern SNLF squad dead, the HMGs now had no targets.
I actually managed to break Lt. Nichols and his squad as well, though they were much too close to me now.
And they rallied immediately.
Instead of advancing into melee with the Japanese, Nichols instead advanced into Objective 5.
With Nichols so close, he opened fire on the caves above to see if he could break the Japanese hiding there…and promptly drew a Time (2) trigger.
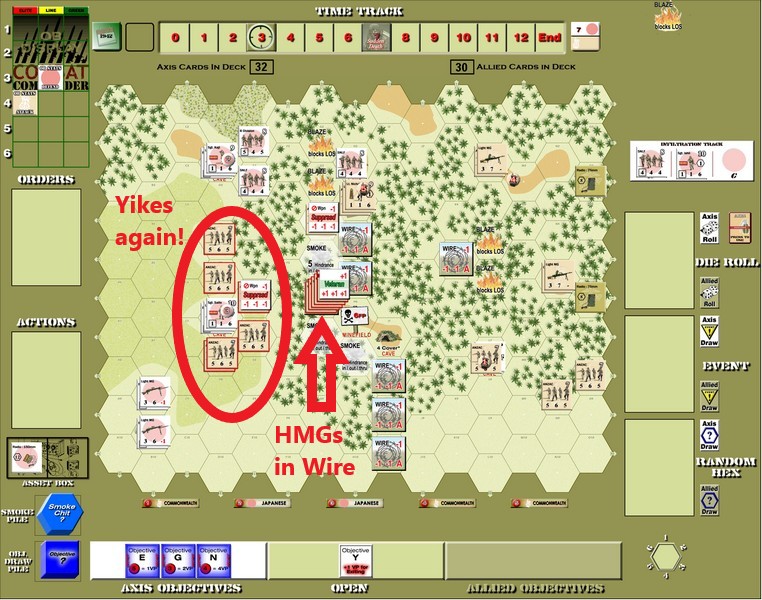
All of those Australians in the palms now had to Advance out and around the fire, including the guys with the HMGs since they couldn’t see shit.
My deck ran out shortly after that, putting us on Time 3 (Sudden Death is at 7), so here’s a board update.

Things were moving quickly, thankfully for me.
This is when I got the radio finally.
Juicy targets!
That’s also when Ben started Moving instead of Advancing, and me without a Fire card to shoot at him.
Fire cards were becoming rarer.
Though one squad did stumble into some mines on the hill (in hindsight, I should have put Wire there, since that would keep the HMGs off of it and the mines ended up not doing anything anyway).
They fired on Saito and his men in the cave and broke them easily, but thankfully I had a Revive card and they weren’t broken long.
And I drew the first two of four (!) Reconnoiter cards that I would have loved to have before trying to get a radio.
Thank God I got one anyway.
More HMG fire and Saito’s squad broke. I had to waste a Revive 5 card to bring them back because Japanese broken morale is so low that I knew they wouldn’t survive if I didn’t.
Sadly, that’s the last Revive card I saw for a while.
I did make the mistake of using my one Fire card to break the two overstacked squads in the Wire (which was admittedly very satisfying), mainly because that left me without one when I knew Ben would be moving!

And he did (and quickly rallied those two squads anyway).
First Advancing into a huge smokescreen that is what made my one artillery attempt go awry (actually, it would have missed even without the smoke)
Sure enough, after a second Advance, they started actually moving and I still couldn’t draw a Fire card.
I did drop Wire on the HMG stack, making the weapons useless until Ben moved off of them, but still…that’s a lot of Australians on our doorstep!

Things were getting tight and Sudden Death was still 4 Times away!
It was no longer moving quickly.
I was still desperately looking for a Fire card and I drew two, though. That was nice.
I used one of them to fire on the overstacked Australians below Saito, and believe it or not, Ben drew a Time (2) trigger, getting us closer.
It was time for them to start moving again, even with the broken squads, and I had another Fire card.
Yay me.
Sadly my light machine gun broke, on the first fire attempt, but I still had a bit of firepower, and I drew a Time trigger!
Even with that making the attack itself useless, I had to keep that.
Only two away now!
The HMGs stack moved off of the Wire and were fired on…and promptly drew another Time!
Holy shit…I was in despair, now I thought I had a chance.
Not letting that stand, the HMGs and all of the other Australians let loose on Saito and company.
A massive 22 firepower attack was definitely going to break them, and if he drew a high card outright kill them…instead he drew a Time!
Holy fucking shit!!!!

Sadly, Sudden Death didn’t happen so we continued and both of my units were broken.
I had an Advance but no Revive card at all, and we were at 10 Japanese points.
My secret objectives would give Ben 7 points.
Eliminating my guys would give him 3 more points (though I did get another point by eliminating one of Ben’s broken squads with Ben playing a Light Wounds card to only give me 1 point)

So off to another cave they went! Where the only firepower that would hit them would be a 4-firepower attack.
The HMGs and guys found a new target, though, with Kaji in the north. A massive 34-firepower attack!
One guy was almost killed outright but thankfully just made it, while Kaji himself broke as well.
Here was a fun bit.
Earlier, thinking I really needed a leader for those Japanese guys in the southwest corner of the board, I had infiltrated Sgt. Ishi into a an infiltration box (you can see those above the card draws in the picture above).
I finally had the opportunity to bring him out, and a Sighting marker was right on one of Ben’s tanks.

I quickly brought him out (killing the tank which had never actually fired), then moved him off the board to get 1 point.
Cost me 4 points to get him, but it was worth it just for the story (and to have another leader if Sudden Death didn’t happen).
Ben was gearing up for a massive move off the board, along with another massive attack against Kaji.

I felt impending doom coming.
Here it came…a massive enfilade attack for 22 plus Ben’s roll.
And a Time!!!!!
Holy freaking fucking shit!!!!
This time for Sudden Death, Ben drew a 4, bringing the game to a merciful end.
Seriously, I would not have survived another round unless another Time trigger happened immediately (which it could have!)
With the final reveal of my hidden objectives, I won the game with 5 VP.
Wow.
I had some bad luck with Revive cards, but Ben’s Time luck was straight out of last month’s scenario for me.
Even worse was that twice they happened on huge firepower attacks for him.
The game was moving at a very sedate pace, which favoured Ben.
And then it wasn’t.
Thanks to Greg G for the practice game earlier this month that taught me to set up more in the rear, and also reminded me about Cave advancing too.
I think I put those lessons to good use here.
Ben played a great game, but the initial blaze draws were bad for him, especially when they spread, and his Time luck was just dreadful late in the game.
Not much you can do about that.
I remember enjoying playing against Ben last year and it was a great time this year as well.
Wishing him all the best in his future games (except our inevitable third matchup).
The win puts me at 28-25 in my ladder career, giving me a cushion for the upcoming months.
Next month’s scenario is back to Europe and the ruins of Stalingrad.
I’m not sure the last time I played a Stalingrad scenario that actually used Stalingrad rules (rather than being on the outskirts or something), so I’m guessing this time we will get to use those.
If you enjoyed this write-up, why not join us on the ladder?
It’s a great way to get a regular play in of a great game, and there are almost always pickup games available.
Right, Ted?
Until next time, my advice to you is don’t sit there right in the face of two heavy machine guns and think you’ll survive. Even with a cave.
Instead hide in the rear and drink saki before they finally show up and you have to deal with them!
Combat Commander Ladder – After Action Reports
To see all of my Ladder After Action Reports since May 2021, go here!

Seems like Lady Luck thought she had amends to make! Although I feel like one always feels lucky winning scenarios in which one is hoping for the game to end soon… so there must have been the skill to match it on your side!
LikeLiked by 1 person
I was doing a decent job slowing him down some.
I’m not saying I won completely by luck.
Just that I was hanging on by a thread. LOL
LikeLiked by 1 person