Dude! Take Your Turn!
A Gaming Life
Combat Commander – After Action Report – Scenario 02 – Hedgerows & Hand Grenades

One of the great things about Combat Commander is that you’re almost never truly out of the running to win the scenario.
There are times, of course, where there’s really no point in going on, but those times are much fewer than in some other war games.
Anything can happen in Combat Commander! The luck swings can be drastic within the scenario.
Allow me to use my June outing in the Combat Commander ladder to prove that point.
It’s time for another adventure!
The ladder, run by the phenomenal Patrick Pence, creator of Patrick’s Tactics & Tutorials on Youtube, is the chance to play your favourite game at least once a month.
It is your favourite game, right?
I’m going to call this month’s scenario recap “The Ballad of Lieutenant Blankenship,” for reasons that will soon become apparent.
This month’s scenario is from the Combat Commander: Europe base game.
It’s also the second scenario I ever played when learning the game, with my good friend Michael from the Boardgame Chronicle.
I won that one (I thought I had lost it until I just now reread it), but could I repeat history?
I had played my opponent, Greg L, once before on the ladder, back in 2022 in a Stalingrad scenario. Would he be able to get revenge?

(Don’t forget that you can click on a picture to blow it up)
The scenario pits the Americans (me – green) against the Germans (Greg – grey) in a fight among the bocage hedges just past the Normandy beaches in 1944.
The Americans are the attacker and the Germans the defender, and there are only a couple of special rules.
The Americans set up first on the left side of the board, in the first three columns. Then the Germans set up anywhere on the rest of the board.
However, Lt. Blankenship is a forward observer and can set up anywhere on the board after the Germans set up. You could, of course, end up putting him with your units, but he can also be valuable in the German rear.
Since Greg hadn’t covered Objective 1, I figured that would be a good place to start him. He could maybe then move to rain down some artillery fire from behind the lines.
Unfortunately (or fortunately?) he seemed to have replaced his radio with some other stuff instead.
The other special rule is that all of the hedgerows (those green lines that go along the hex sides) are considered bocage, meaning they are +2 to cover and +2 to move instead of the normal +1.
Would the Americans prevail?
Why don’t you come along for the ride with me and find out?
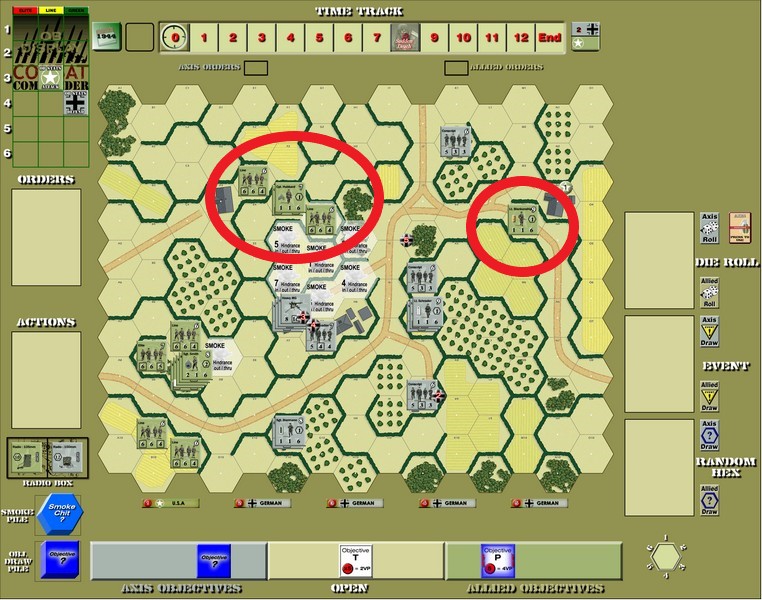
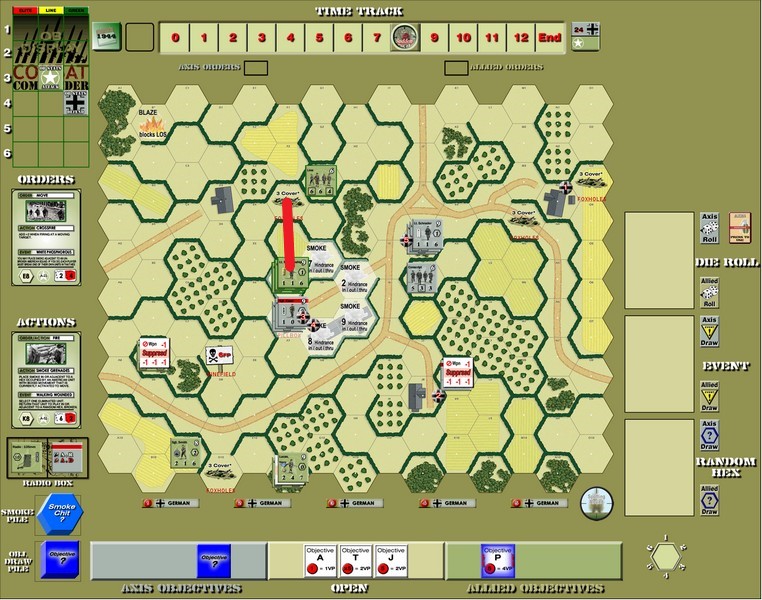
The Americans move first in this scenario, and I opened up the game to try and lay some smoke on that central German building, one where Greg had stuffed both heavy machine guns (Sgt. Esser was manning his own as well as leading a squad with the other one).
That would be horrible fire on my guys, so I needed to snuff that out quick.
Sadly, the artillery drifted a little off target, but I did get a White Phosphorous event that let me put a smoke counter next to an American squad, which let me still give cover to my guys.

That was helpful.
I also moved Lt. Hubbard and his men in the north to try and take advantage of where the smoke did land.
Greg decided to send Rettenhaus and a squad to take care of Blankenship and take the objective back.
Should be easy, right?

No!
Seems that Blankenship had replaced his radio with a big machine gun!

A hail of bullets came out of the building, breaking the conscript squad in the road, but unfortunately also giving Greg a Reinforcement event that brought his own artillery into play.
Conscript morale really sucks, and in the road it’s even worse, at a 4.
So naturally I played a Rout order on my next turn, and routed the squad and its LMG off the board for 2 points!
Then, since I had 2 Ambush cards in my hand, Blankenship took his menagerie of pistols and automatic weapons, and jumped out into the street to kill off Rettenhaus too.
Two more points.
Who’s the American Hero?
Not Lucas, that’s for sure.
Anyway, Hubbard and his men moved across more bocage to get to the north of the Germans.
Things were looking good for the Americans.
Some discarding happened, a bit of movement, the Germans called down a heavy artillery barrage on the Americans in the southeast (breaking everybody), but I had a Recover card handy, thankfully.
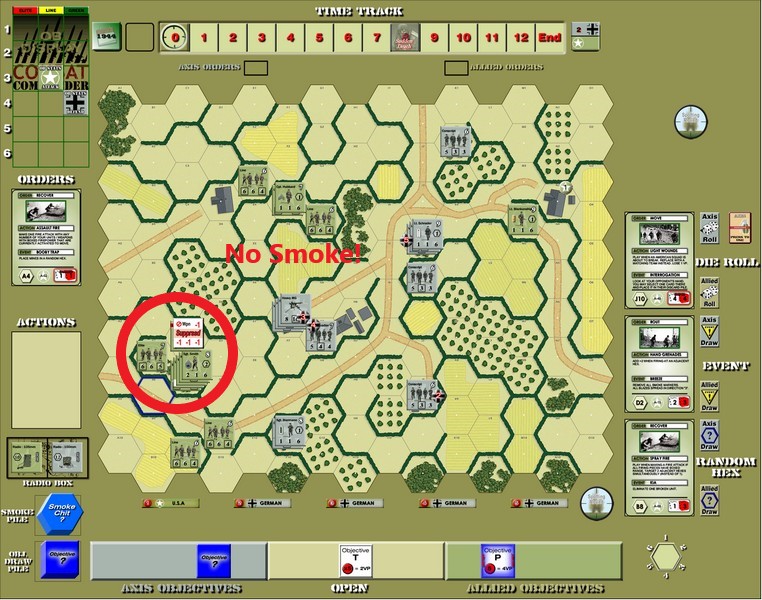
Unfortunately, an Event during that Recover caused a Breeze that blew away all the smoke.
That wasn’t good.
Since there was no more smoke, though, Sgt Smith and his men (along with their mortar and MMG) opened fire on Esser and the HMG nest in the building.
A German morale check on the mortar shot caused our first Time trigger (Greg had 53 cards left in his deck).
While the mortar didn’t do anything except make Time move forward and suppress Esser, the MMG fire ended up breaking the squad manning one of the HMGs.
On the second attack, a White Phosphorus event let me put more smoke out in front of me to prevent a retaliation (assuming Greg had a Recover card).
That’s when I found out that he didn’t!
He did have a Move card that would let another conscript squad try to take back Objective 1 and maybe deal with Blankenship.
A German morale check on his second move (it took 2 Move cards to get there) resulted in another German Time trigger! (Greg had 60 cards left in his deck).
Time was moving faster than I liked, though it did allow me to give Blankenship some foxholes. In addition to all of the weaponry he had, he had also packed a backhoe or something, he dug so fast.
Hubbard laid some more smoke down onto Esser in the middle, thinking that surely Greg would be drawing a Recover card soon and he didn’t want to be facing those HMGs.
But no! No Recover card.
The conscript squad fired on Blankenship in his hole, but unbeknownst to them, he had snuck in and replaced all of their bullets with blanks.
Then they decided, since they had no bullets, they’d just jump into the middle of the road and knife him!
But Blankenship had not only snuck into their building and dulled all of their bayonets, he had also set a few traps at the lip of his hole, ambushing them and making it a 2-1 fight (instead of 5-1)!

After drawing an 8 and Greg drawing a 4, Blankenship was once again victorious.
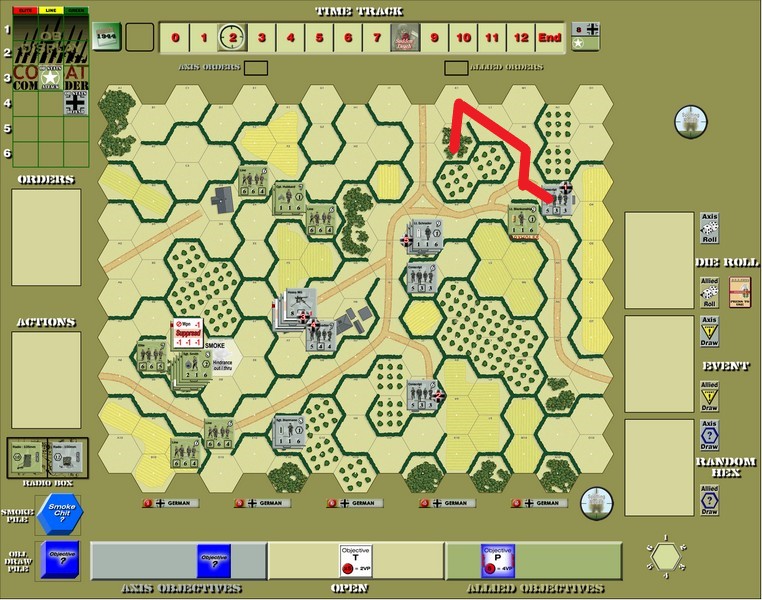
When Greg tried to rout Blankenship (are you kidding? Blankenship doesn’t run away!) and the already broken American squad, Hubbard in the north had his first of too many sniper attacks, breaking him.
He quickly rallied (unlike the squad that still refused to actually come together) as did Blankenship (he just needed a couple of shots of whiskey, which he had also carried along with his weaponry and backhoe, and he was right as rain).
But another Breeze happened during that Recovery, blowing away all the smoke again!
Which just opened the way for Smith, the mortar and MMG to start firing on Esser again, since Greg still refused to draw a Recover card.
The fire didn’t do anything…except cause another Sniper that broke Hubbard.
Poor guy!
My deck ran out on that attack, so it was another Time trigger. I wasn’t making any headway unfortunately, as fun as Blankenship’s heroics were.
More American fire finally broke Esser but the squad remained hiding in the basement.
Meanwhile, Blankenship went back into the objective building for 4 more American points (and a nice bed for him have a lie-down in).
Smith called down some artillery on Esser and finally the squad (and its HMG) died! Esser was all alone in the hex, nursing his HMG and trying not to panic.
Next turn, Smith decided to take advantage of Esser being broken and move toward the objective, forgetting that even though there was nobody that could fire on them, other things could happen!
Like a hidden minefield.

Not having a Recover card, I gave up initiative to have Greg reroll that 11 he drew…and he promptly drew a 10.
The squad was fine, but the weapons team and Smith broke.
This was where the luck took a major swing, though.
Hubbard was still broken, Smith and the team were broken, and the one squad wouldn’t rally to save its life.
And I no longer could draw a Recover card either!
Meanwhile, Greg had finally drawn one, rallying Esser before I could kill him.
He then proceeded to fire on Smith and rolled high, killing the team and Smith, breaking the squad.
My southern flank was leaderless!
With Smith gone, Blankenship decided to get off the board for points and to also reappear on the US side during the next Time trigger and take over the southern group.
I also Advanced the mortar squad out of harm’s way from the minefield. It didn’t survive that, unfortunately, but I did have a Light Wounds action so it just broke down to a team instead of being eliminated.
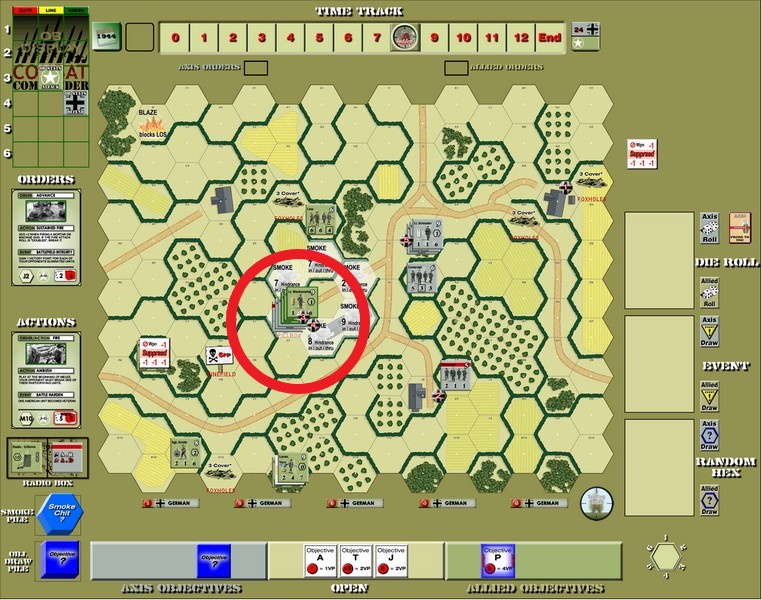
It’s been a while since a picture, so let’s give you a status report.

Schrader had run over to take Objective 1 back since Blankenship was gone and also moved a squad into Esser’s hex to beef up that objective.
Without any targets in the south, and with Hubbard still broken, Esser turned north and fired.
And the German deck ran out. Time advance again, but Blankenship was back!
Good thing too, because Hubbard and his squad died an ignoble death.
Blankenship was the only leader left.
But he’s the only leader you need.
Of course, as is my usual timing, I had just drawn a Recover card. One turn too late for Hubbard.
Greg also successfully routed the American squad that was refusing to rally, getting even more points.
He was at 20, and we were half-way to Sudden Death.
The American forces in the north were in tatters, the south wasn’t much better.
I very briefly thought about conceding with only one leader left, but this is Combat Commander. So I persevered.
First, Blankenship moved to bring the mortar team back into the fight.
Then he called down some artillery, hoping for it to drift down on Esser.
And it did!

However, it turns out that Esser’s building was really a pillbox, dulling the effects of the artillery.
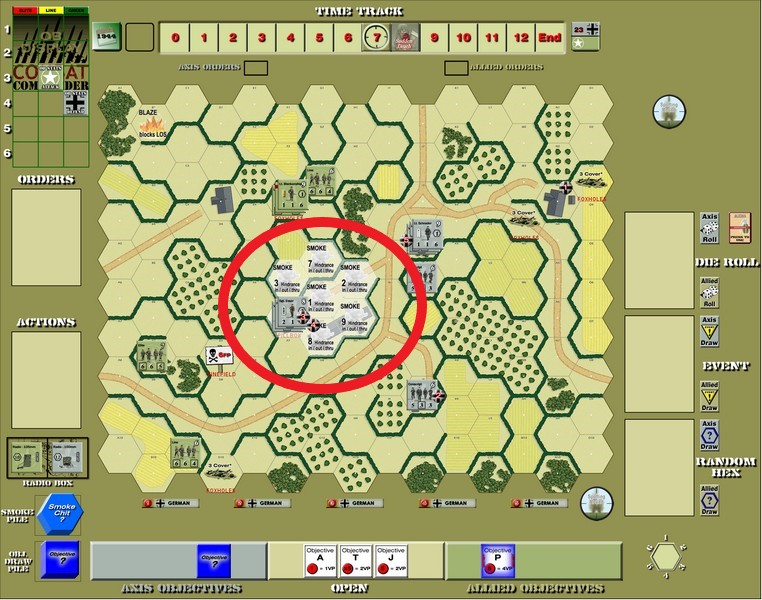
Not only that, but a US Cower event suppressed every US unit not in command range.
Look at that sea of white markers!
Blankenship then called down some artillery on Biermann in the south, but the US deck ran out for another Time trigger.
Some other stuff happened, including Esser transferring the HMG to the squad that was with him so he could actually lead them rather than firing it himself.
Blankenship moved the mortar team to the north to try and move around Esser.

Meanwhile, more German artillery broke the two US squads in the south, leaving them vulnerable.
In trying to Recover those guys, the ones in the road were suppressed, and the other ones drew a Time trigger (51 cards in my deck).
Biermann got that greedy look in his eyes and advanced forward, seeing the Americans trying to find what little cover they could in the road.

Blankenship joined the Americans in the foxholes in the north and the squads in south tried again to Recover.
The ones in the road failed again but the one behind the bocage succeeded.
Then Biermann jumped on the Americans in the road!
I had two Ambush cards, so both Biermann and the squad broke, but Greg also had an Ambush so the Americans died without a roll.
But both Germans were broken.
I figured Greg had a Recover card ready…but nope!
So on my turn, the American squad behind the bocage laid down withering fire with hand grenades that killed both of them.
(actually, it wasn’t that withering, but Greg just drew his dice cards very poorly).
Here’s the situation.
The Americans are 3 losses away from Surrender, but the Germans are only 2 losses away. Time is at 6 (8 is Sudden Death).
The Germans have 22 points.
No way I was going to get a points victory, so it was time to go hunting Germans.
Esser sent some artillery Blankenship’s way, but he eats artillery shells for breakfast so that was no problem.
But I did draw a Time trigger on a morale check! (I had 56 cards remaining in my deck).
One away, and the weapons team panicked too.
Blankenship called down some artillery of his own, though it was smoke.
And it hit!
Blessed smoke.
Esser tried to call down another barrage on Blankenship, but Blankenship used his heroic powers to send the shells back down on Esser, panicking him.
Meanwhile, Blankenship called down some more artillery on Esser, but it missed due to the smoke. However, Blankenship being who he is, ended up drifting the errant artillery shells right on top of the Germans in Objective 2 in the south, breaking them.
Because Blankenship can do no wrong. Even when he’s wrong, he’s right.
I decided to see if I could rout them out of their building, but I am not Blankenship and thus could not get that lucky.
I drew a 12 Time trigger when checking Esser’s rout (68 cards remaining in my deck).
I didn’t have the initiative, so it was time to draw.
A 9 meant the game would continue, but Greg gave me the initiative to reroll.
Another 9 meant we continued.
The squad’s rout drew a US Walking Wounded event.
Turns out Sgt. Smith was only mostly dead!
Blankenship hit with some more artillery, but sadly the pillbox protected Esser and nothing happened.
Some subsequent fire brought the US Hero Lucas onto the board, but he was totally unnecessary.
Blankenship was here!
And it was time to move.
The Germans had 7 cards left in their deck. I didn’t think there was much of a chance to have the game go past the next Time trigger, so it was time for some desperation.
I had a Move, an Advance, and an Ambush card in my hand, so I thought I had a chance, though I was fearful of more German Ambushes.
But I didn’t have time to wait.
I was also worried a bit that Greg would fire a couple of times, depleting his hand even more and making his deck would run out.
But apparently he didn’t have any.
Greg did manage to recover Esser, though, which made things a bit hairier.
Blankenship advanced, and Greg didn’t have any Ambushes!
With the US Ambush, the strength total was 13-6 for the Americans.
My eyes bugged out when Greg drew an 11! That gave him 17, and very possible for me to lose this one. We’re in a pillbox, so ties go to the defender, meaning I had to roll a 5 or higher.
Likely, but not a guarantee.
I drew a 9, and then a 6 after Greg passed the initiative.
He had 2 cards left in his deck, but Esser’s death and his squad’s meant that the Germans surrendered.
Here’s the final board.

The Germans had 20 points but since they surrendered, I still won.
This was a back and forth affair. I thought I was going to have a cakewalk early when Greg couldn’t draw a Recover card and I was getting some high shots. Blankenship was a beast!
Then I couldn’t draw a Recover card and two of my leaders were gone. The Americans were disorganized and couldn’t really do a lot.
Then the tide turned at the end and I managed to pull it out.
Rolling two 9’s for the first Sudden Death was very lucky.
Greg is a great opponent, and both of our games have gone down to the wire.
I really enjoyed playing against him and I hope to again.
That puts me at 21-16 in my ladder career, and I think that’s a 4-game winning streak!
I’m sure next month can end that, though.
If you enjoyed this, why not join us on the ladder?
We might be able to play against each other, and even if not, there are always people looking for a game.
I don’t think Tony sleeps.
My tip for the month?
Always bet on Blankenship.
Always.
See you next month!
Combat Commander Ladder – After Action Reports
To see all of my Ladder After Action Reports since May 2021, go here!

That is such a good scenario! We had a blast with it too! And it has so many tactical options and decisions – seems like you had great fun in this ladder game!
LikeLiked by 1 person
This one was epic! 🙂
LikeLiked by 1 person
Congratulations!
As for Blankenship, when he comes home and people ask him about his war experiences, nobody will believe his stories!
LikeLiked by 1 person
They’ll make movies
LikeLiked by 2 people
Starring, no doubt, John Wayne.
LikeLiked by 2 people
Of course! Who else?
LikeLiked by 2 people