Dude! Take Your Turn!
A Gaming Life
Combat Commander – After Action Report – Scenario M5 – Blind Man’s Bluff
I have been having a horrible streak of luck and bad play in my monthly Combat Commander ladder games, with a three-month losing streak going into my October game!
That is not good, and shall not stand!
Or maybe it did. I guess you’ll find out at the end of this post.
Let’s start at the beginning, though.
The Combat Commander ladder is the monthly tournament of one of the greatest wargames of all time, administered by the impressive Patrick Pence, he of Patrick’s Tactics & Tutorials fame on Youtube.
And it really is fame. Youtube fame is almost as much celebrity as those Hollywood starlets!
Though I don’t know anything about his fashion sense.
In September and October, we leave the cozy confines of Europe to go to the Pacific, where a bunch of the rules change and you have to remember not to do things the way you are used to.
The October scenario is from the Combat Commander Pacific: New Guinea battle pack and is a scenario I’ve never played before.
It’s basically a cage match between the Japanese and Australian forces!
That’s because nobody can gain points by exiting the map.
My opponent this month was John L. We are both in the same time zone, so setting up our match was a breeze.
The Blind Man’s Bluff scenario has a meeting of Japanese and Australian patrols, which then resulted in an Australian attack on the Japanese screening force.
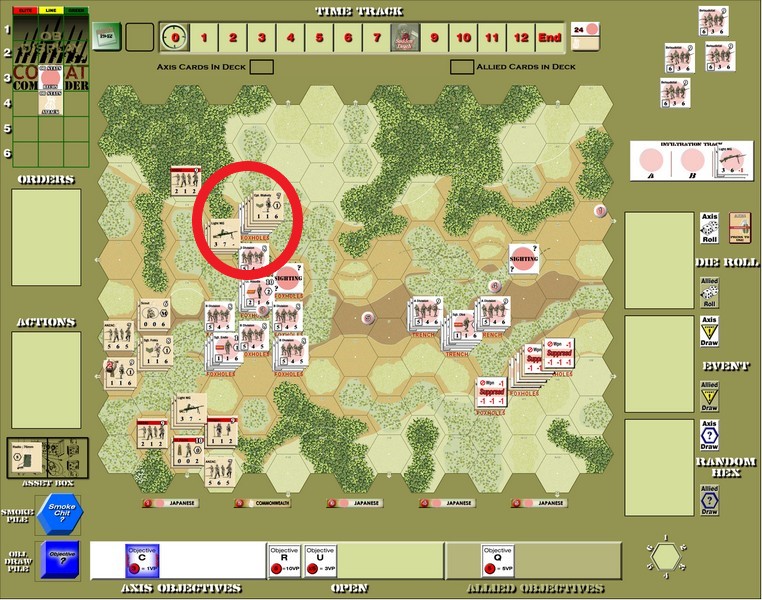
Here’s the setup.

(Don’t forget that you can click on a picture to blow it up)
The setup is weird in that the Australian Company B sets up first, then the Japanese Pinning Force and Screening force sets up next, and finally the Australian assault force.
The Japanese (white – me) are trying to destroy Company B and hold off the Australian (tan – John) assault force as well.
There are a couple of special rules too.
First, nobody can gain points from exiting the board.
As Patrick has pointed out on Discord, though, the scenario does not say that units exiting the map are eliminated, like many scenarios like this do.
No, it just says that you don’t get any points.
So Company B could exit and then reappear on the Australian board edge after the next Time Trigger.
Nobody really realized that before.
Anyway, the second special rule is that the Australians can only call in the artillery (mortars) with a leader on a Level 2 hill hex.
Finally, in addition to the weird setup sequence, Company B sets up with all units suppressed.
Considering that it takes Revive orders to remove Suppression markers, that can be big!
Would my losing streak finally end?
Let’s take a look!
The Japanese move first and I was really hoping to have some Fire cards to rain hell down on the exposed Australians.
Sadly, I only had one.
So I began with a Reconnoiter order to see what the top card of my deck was.
With it being an Asset Denied, it seemed prudent to use that card to deny John’s radio!
John quickly fixed it, though.
I did fire down on Company B with my pinning force, trying to destroy one unit.
Which is when I realized that I had misread my Medium Mortars that was with the group, and all of the Australians were too close to use it!
It has a minimum range of 3 (I thought it was 2) and they were 2 hexes away from me.
But between the Battalion Gun and then massive infantry fire, one of the squads quickly died.
John used his first Move to bring the northern force under Corporal Blakely up near the Japanese positions.

While he paid dearly for it (almost everybody broke), it did get John a reinforcement leader!
John did have a Revive 2 card, which rallied two of the four broken units and then a Revive 1 which rallied another.
This was a rare occurrence, as you will see.
Now that they were right next to the Japanese positions, they let loose with a bunch of sustained machine gun fire on Sgt. Konburo and his men.
Under that withering fire, they broke (of course).
Thankfully, I had two Revive cards so was able to bring them back into the battle quickly.
I also used the opportunity of an Infiltrate card to bring on the possibility of a Weapons Team and LMG.
They never actually entered the board, though.
John then tried to move in the south with Lt. Payne.

And paid for it as well.
Lots of bullets came down from the Level 2 heights.
Blakely, up north, fired at the Japanese next to him again, and managed to break the squad.
With the Australians that close, I couldn’t afford to leave them broken, so I had to waste a Revive 5 card to rally one unit.
That’s when Blakely and his men decided to just advance and try to overwhelm Konburo.
Not knowing what John had, and me with no Ambush or Bayonets cards, I thankfully had a Move card and left the hex before they could engage in melee.
John made them pay, though at least they were out of the hex.
I was able to use another Reconnoiter card to bring a Japanese radio into the game, but on the next turn, John played two Asset Denied cards to eliminate it immediately.
Oh well.

Without an Advance card, Blakely moved around Konburo and his men, but they weren’t expecting all the fire from the heights, which broke almost everybody.
I was able to Revive my guys and move them out of harm’s way.
Then came the biggest calamity for John, one I haven’t seen in quite a while.
The Australian Scout called in some artillery to try and break up that huge Japanese fire group on the heights.
It did not end well for them.
For a to-hit roll, he just needed to roll a 6 or higher (multiplying the two numbers, so a 2 & 4 would be 8).
And he drew a 4 and a 1 (so 4).
That means the artillery missed, so he had to roll a major drift.
The major drift ended up landing directly on Foley and his men.

So many broken Australians.
John then Advanced Company B onto the heights on the right next to my Pinning force.
Sgt. Oba’s eyes lit up.
A fortuitous Fire card had everybody over there open up on the hapless Australians.
This included a stack in range of the Medium Mortar!
The mortar hit and Cpl Weaver’s entire stack broke.

Then all of the Japanese units opened up, killing everybody but Weaver (who seemed pretty stalwart overall!)
I then opened up again (one of the only times that I actually had two Fire cards) from the heights onto Payne’s group in the south (and some residuals firing on Blakely in the north).
The north attack killed a squad, but the south attack was devastating.
In addition to the fire, one of my attacks actually caused a KIA event which let me eliminate another of John’s units.
At that point, with so many broken and suppressed units on the board, John realized that he wasn’t going to be able overcome the 29 point differential and he conceded.
Funnily enough, my “secret” objective turned out to be the open objective of #5 being worth 10 points, and he had a secret objective of #5 being 5 points (that was revealed earlier in the game by a Japanese event).
So taking Objective 5 would be a 30 point swing!
But John saw the writing on the wall that he wasn’t going to be able to break through the Japanese forces with all of those broken units.
That’s one difference between Europe and Pacific.
In Europe, one Recover card has the possibility of rallying everybody and also removes all Suppression.
In Pacific, you have to play Revive cards and for each point of Revive the card gives you, you can rally or unsuppress one unit.
John wasn’t seeing any Revive cards and it would take a bunch of them to bring everybody back.
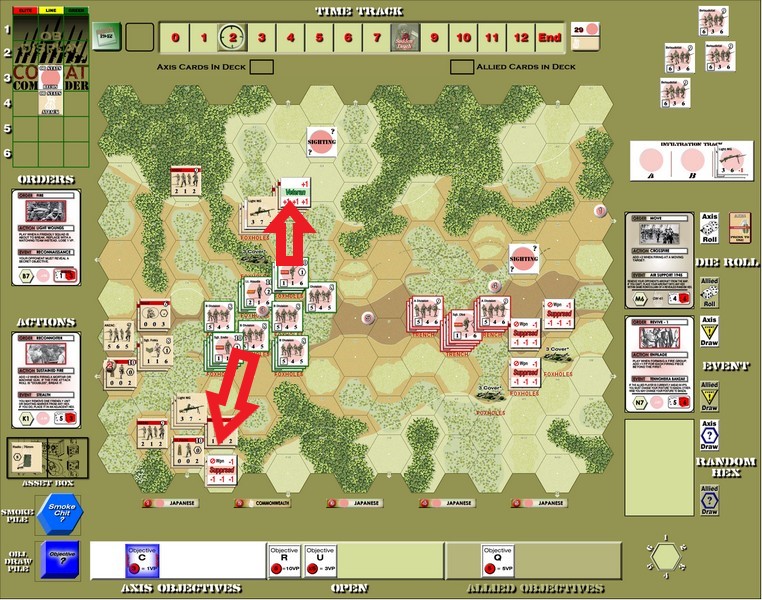
Here’s the final map.

Objective 5 is the open hex right between my two forces.
Anything can happen in Combat Commander, but sometimes it’s just better to call it a day and get ready for the next one.
John was a great and fun opponent. He was really bit hard by the “bad cards” demon, and having the artillery (from really close range!) drift back onto his own guys was just icing on the cake.
I was actually worried about how few Fire cards I was drawing, but I always seemed to have just one when John decided to move.
Then the coup de grace when I actually had two in hand, that was the nail in the coffin.
This month ended my losing streak! And it left me at 22-19 in my ladder career.
Next month, we’re back in Europe with a scenario from Stalingrad battle pack, so the Russians will be facing off against the Germans.
Should be fun!
If this interested you at all, why not join us on the ladder?
You’ll get to play one of the best wargames out there with a ready opponent, any time you want (Tony will play you any time, day or night).
Not to mention a regular monthly game even if you don’t partake!
Until next month, my advice to you is to not roll low when you’re calling down artillery. Especially when your guys are near the enemy!
See you next month.
Combat Commander Ladder – After Action Reports
To see all of my Ladder After Action Reports since May 2021, go here!

Congratulations!
And I’m sure that with this heroic victory, Lt. Payne will soon be promoted to Major!
LikeLiked by 1 person
I was thinking more a demotion 🙂
LikeLiked by 1 person
Private Payne?
LikeLiked by 1 person
That’s more like it. 🙂
LikeLiked by 1 person