Dude! Take Your Turn!
A Gaming Life
Combat Commander After Action Report – Scenario #91 – The Battle of Trafalgar
After being early last month (it was almost like time travel!), this month’s game from the Combat Commander ladder came in just in the nick of time.
We played our game on Monday, March 27, mainly due to life stuff happening.
Combined with the early February, that was a long time away from one of my favourite games!
But it was worth it.
What an incredible game.
Oh yeah, I suppose I should introduce things in case this is your first visit (and really, does anybody read these anyway? I’m not so sure…)

Welcome to another tale from the Combat Commander ladder, that monthly tournament of one of my favourite games of all time.
The ladder is run by the well-mannered Patrick Pence, he of Patrick’s Tactics & Tutorials fame (you really need to go check that Youtube channel out).
This month’s scenario is from the alternate history battle pack Sea Lion, where the Germans actually did invade Great Britain.
The scenario is called The Battle of Trafalgar and it basically involves the German wave washing over Trafalgar Square where Admiral Nelson’s statue is. Taking over the square and the statue would have beaucoup status effects for Hitler’s minions (Editor: “Look at you, trying to use the big words).
My opponent this month was Bill D, he from that faraway and exotic place called “The Eastern Time Zone,” and coordinating was a bit more of a challenge than usual.
But we persevered and got it done.

(Don’t forget that you can click on a picture to make it bigger)
Bill’s Brits (Tan) set up in the square with Wire on both sides and a token blocking force in the side buildings. The majority of his forces were in the square, considering Objective 5 (right where Lt. Forbes is standing) is worth 5 VP.
The Brits can set up 5 hexes deep (except they can also set up within 2 hexes of the statue in G6, because they’re that inspired by Nelson).
Note that some of the Wire is illegally placed, something that neither of us noted until it was pointed out by Patrick later in the game.

Yes, it might have.
Anyway, I set my Germans (Grey) up with a leader, machine gun, and a couple of squads in the center to possibly take potshots toward the column, along with forces on both sides to take the flanks.
A couple of other special rules.
First, the Germans can destroy a satchel charge to remove an adjacent Wire “at any time.”
Secondly, nobody can earn exit points.
It’s a cage match!
Finally, both sides get a heavy machine gun and weapons team at Time Marker 4 (so half way to the first Sudden Death check.
With all of that out of the way, let’s begin!
The German hand actually started out pretty good for an attacker.
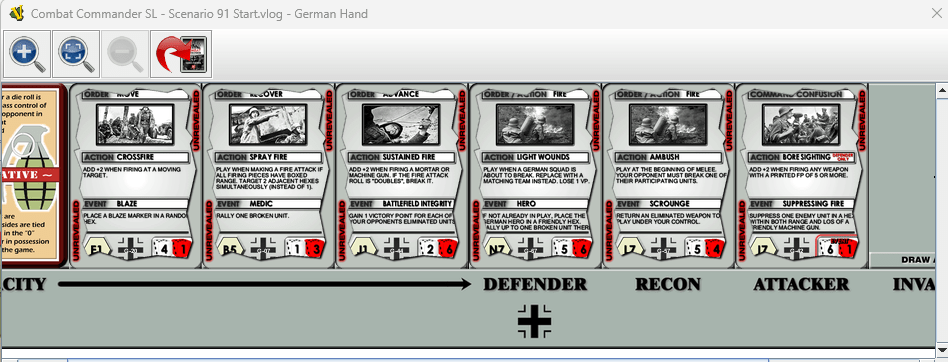
A Move card, an Advance card, a couple of Fire cards, and a Recover card!
I did some ineffective fire towards the middle (hell, why not?) and then started moving on the left.
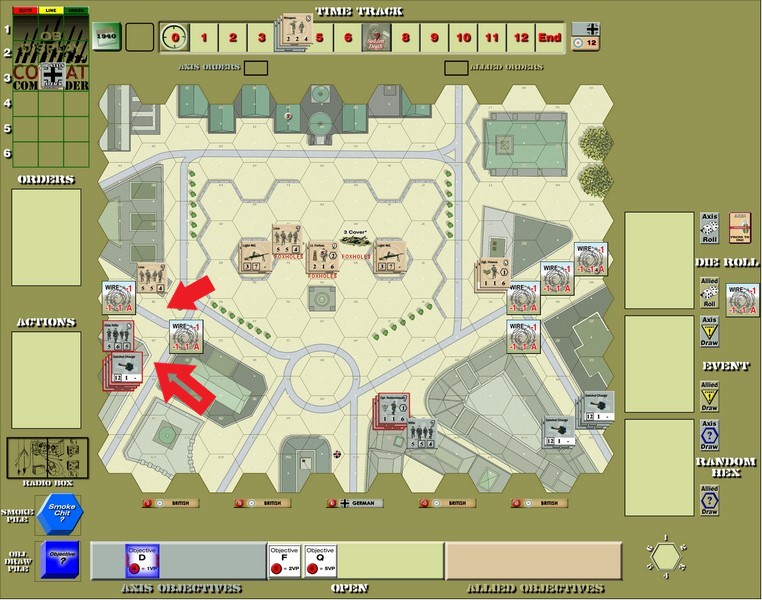
With my first move (which Bill didn’t fire on), I got close enough to destroy the first illegally-placed Wire in the middle.
Of course, you know what the other satchel charge was being saved for.
The German right just advanced one hex and I called it a turn.
After a couple of rounds of discards, the left went charging forward!

Sadly for the Brits, not only did the opportunity fire not actually result in any casualties, but it brought a German Infantry Gun as reinforcements!
And then the Satchel Charge was thrown through the window and the Brits didn’t like that.
Next turn, the Germans made short work of that broken squad in melee.
One side gone!
That would not be the last we hear from Sgt. Pfeiffer!
On the same turn, the Infantry Gun (IG) opened up because hell, it’s here? Why not use it?
It did not do anything, though, which turned out to be a common refrain for the night.
It worked so well on the left, why not do it on the right?
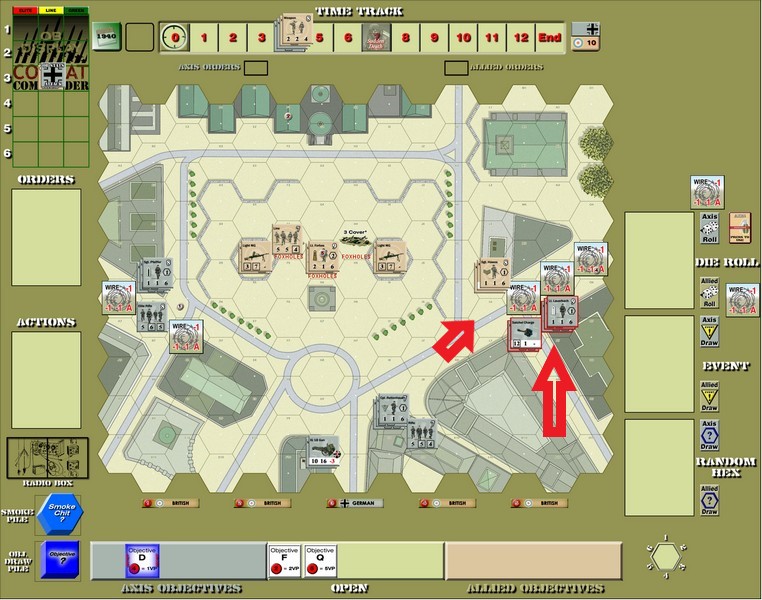
The Germans moved, the Brits didn’t have a Fire card (or elected not to use it), and another illegally-placed wire went away.
Funnily enough, I had actually questioned the placement of the squad on the German left, because I can’t count, and of course it was not illegally-placed. Why I didn’t catch on to the “oh, the squad is barely within range, so the Wire that’s even further is probably not legal”? I definitely don’t know.
But it was my fault for not noticing, especially since I had questioned something else earlier.
Anyway…
After more Brit discards (Bill ended up discarding a lot in this game…), and more German movement on the left (too bad there were no Exit VP!), Bill laid some mortar smoke on the IG (the only thing the mortar really did in this game…sensing a pattern?).
Then the ballad of Sgt Pfeiffer began…

Objective 2, all the way on the British map edge, is worth 2 VP in this game. Since my units on the left were now unimpeded, I figured why not go for it.
The right flank needed a Recover card before it charged in to throw the satchel charge (you don’t Move without a Recover card if you can help it) and the center wasn’t moving, so why not the left?
I moved so that I was out of line of sight from the guys in the center, until the hex where the picture shows them.
Even then, they were protected by a wall. It’s only a squad, an LMG and a Crossfire order, so 8 firepower.
What could go wrong?
The Elite Rifle squad broke! So everybody had to stop.
That’s when the classic “Dave luck” hit.
I had a Recover card. No problem!
I play the Recover card, as one does.
Draw the dice…a 7! Recovers!
Wait, an event…that shouldn’t matter, but it does happen before the recovery.

Oh shit…there’s only one broken unit…and it’s this one!
So instead of recovering, the Elite Rifles go away, leaving poor Sgt Pfeiffer all alone.
It was going to be one of those nights.
Surprisingly, though, the luck went bad for both of us at various times, evening out for the most part.
More British fire on the British turn broke Pfeiffer.
And so it continued…the sad ballad of Sgt Pfeiffer.
Pfeiffer quickly rallied, but the German hand was full of Fire cards (with Ambushes, so I wasn’t going to waste them on potshots), Rout cards, and one Artillery Denied card.
No way to get Pfeiffer out of harm’s way!
So the Brits promptly broke Pfeiffer again.
After some discarding, the German right moved finally.

Hawes knew something was coming.
And he watched it fly through the window, exploding and breaking both him and his team.
Meanwhile, Lt. Lauerbach had his men advance onto the Wire.
Pfeiffer also took this opportunity to move out from just behind the wall, getting the wall between him and the enemy, out of line of sight.
But he was sitting in the open on a road…which isn’t a good thing to do when you’re broken.
Hawes and his men quickly rallied, unfortunately.
Bill discarded and I got to use an action that I don’t know if I’ve ever used.
Demolitions!
When your opponent discards, you can destroy one fortification from a friendly hex. Lauerbach’s Wire was now gone.
Pfeiffer’s other squad, who were mainly just sitting there laughing at him cowering in the road, decided to be useful and go get Objective 2.

This was probably the one major error (instead of just some minor ones) I made. While it was good to get the objective, I then proceeded later in the game to move the squad around to the other side, leaving the building. That left it undefended.
But that was later…
Bill then proceeded to rout poor Pfeiffer away from his safe street…and right into the arms of the enemy!

That was too close, but now they had free shots at him.
And they did! A huge British roll got them initiative from the Germans. A really small roll returned it to the Germans. The resulting roll, a 7, was probably the best the Germans could hope for.
And Pfeiffer survived! It’s amazing how much easier that is to do when you’re not sitting in the street.
Now that the pesky wire was gone, Lauerbach formed a fire group and broke Dawes and team again. They promptly recovered, however.
The German deck ran out, causing the first Time Event, just as a sniper’s shot rang out.
Nothing happened with that, though.
The Infantry Gun opened up on Dawes again, igniting the drapes and causing a huge blaze to break out. This forced Dawes to move out of the hex, but he still remained close to Lauerbach.
Pfeiffer had recovered, but a massive lack of Move cards kept him from getting the hell out of Dodge Trafalgar Square, so the Brits managed to break him again.

Finally a Move card! Pfeiffer figured it would be better to be in the line of sight of only one hex instead of three, and also to give himself a better Rout route (say that 5 times fast), so attempted to move.
The Brits opened up, causing their deck to run out, but Pfeiffer survived!
Lots of discarding, as well as me trying to rout Pfeiffer out of danger, ensued.
The Brits opened up again…and he still survived!
Would he come out of this alive?
Finally, the Germans drew an Advance card and Lauerbach pounced with his men.

There’d been a reason that I’d been saving all of these Ambushes!

I knew Bill had at least one of his own, though. Thankfully he didn’t have more than one.
Hawes died, Lauerbach broke, and the Brit mortar team broke as well. However, they were Veteran, so the firepower was still only 5-2 in the German favour.
Things could go very badly.
Bill’s roll brought out the British hero Smythe, who he briefly thought about putting in the melee hex, but then he realized that would be pointless.
I needed at least a 5 to win…and I drew a 6!
Lauerbach and his men had the building.
It was time to start preparing to storm the square, into the meat of the British defense.
The German IG managed to actually break Smythe and his men who were terrorizing poor Pfeiffer! Too bad I couldn’t draw a Recover card to save my life (or Pfeiffer’s, I guess).
The Brits rallied, though, and we discovered Vicki Lawrence was actually singing Pfeiffer’s ballad as he finally went down in a hail of bullets.
Bill then did what I mentioned earlier, running a squad up north, through withering firepower, to take Objective 2 back.

That was stupid of me. It’s not like the German squad was going to be helping much on the German right.
Nothing much happened for a while after that, though I did send one squad to get Objective 4 since my secret objective made it worth 1 VP. Gotta make sure you get as much as possible!
Lauerbach also finally rallied.
The northern German squad, realizing their error, stormed back to try and retake the objective.

This is when our leader (not in-game leader, but the ladder’s), Patrick, stopped by to watch the game and pointed out the illegal wires.
Bill, very graciously, allowed me to reclaim one of my satchel charges that I had used to remove the wire and since it had been the squad on the German left who had used one, I said I’d give it to the squad up north (the only survivor from those units)
Bill may have regretted that decision…spoilers!
After a bunch of discarding and ineffective fire, Lauerbach made his move!
While the squad made it to the wall, Lauerbach stumbled into some wire in the building!

Which was sad because my deck was about to run out and I had two Dig In actions ready, so both stacks would be able to dig foxholes behind the wall.
My deck still hadn’t run out and I had a Move card! So I moved off the Wire…into more Wire.
Curses! And that also meant no fire group against the Brits two hexes away.
I did dig in the other squad, though.
Change of plans…
Not a whole lot happened for a while, except Smythe making a run to the south, perhaps going to try and take out the IG gun crew? I’m not sure.
Lauerbach and his men moved over the wall, popping some smoke grenades…and it was a 10 factor smoke!
And the smoke covered a minefield…which promptly made Lauerbach panic again.

He seems a skittish type. Not sure how he made Lieutenant.
He rallied quickly, though.
Then Lauerbach jumped out of the minefield and into the foxholes with the Brits!
The minefield attack caused the Initiative to go back and forth like it was Sudden Death, but finally it had no effect.
The Brits had an Ambush, and so did the Germans!
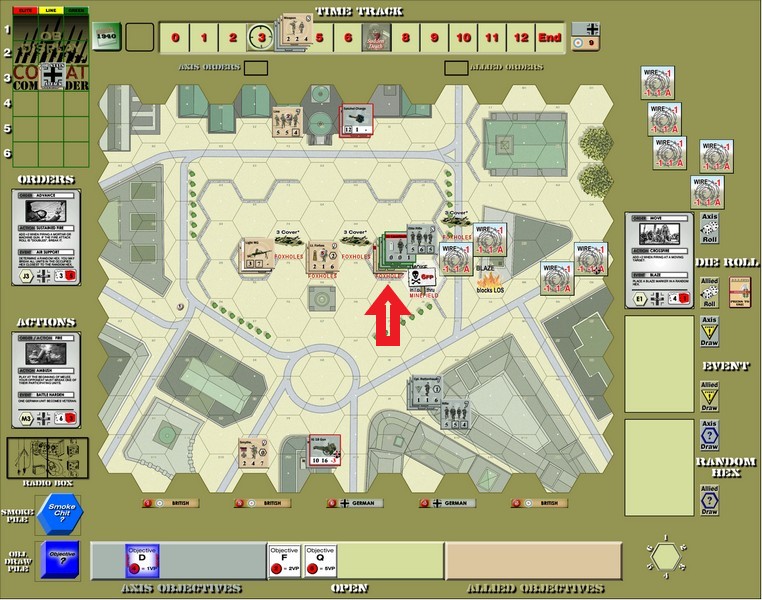
Lauerbach broke again, so did the lone British squad. We were once again at a German 5-2 advantage, very possibly ending the German attack.
After passing the Initiative back to me, Bill rolled a 7, meaning I needed a 5 to win.
I drew a 7 and all was right with the world.
The squad even became Veteran!
In wasting a Rout card to rout Lauerbach, the Germans drew a sniper that ended up breaking the evil squad that killed poor Pfeiffer!
Of course they quickly rallied.
After that, there was a bunch of discarding that emptied the British deck and brought the two heavy machine guns onto the board.
And we shall never mention them again because they ended up not doing anything (except the British one denied me Objective 2 just by existing).
Lauerbach eventually rallied and his group started raining fire on Lt. Forbes, who had been sitting in his foxhole right behind Nelson’s statue, sipping tea and having crumpets.
With some maneuvering, the scene was getting set for a decisive battle behind the column.

I wasn’t sure how I was going to get things done, but hopefully I’d be able to take Objective 5 and win the game that way.
But Forbes’ guys were too strong, especially once everybody consolidated.
In the north, my squad was making every effort to make Bill regret his graciousness.
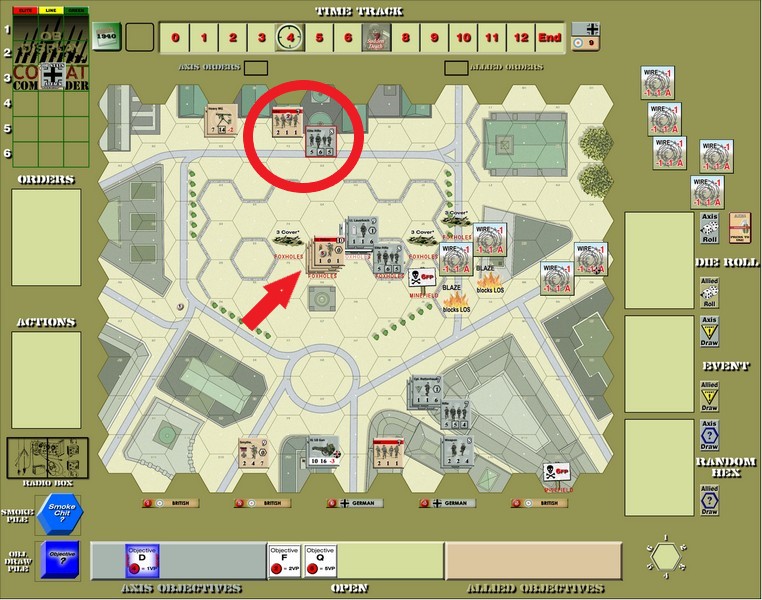
The satchel charge not only broke the British squad but a subsequent sniper broke Forbes!
Of course he promptly rallied (Bill never seemed to lack for Recover cards).
And he rallied with the first (and only!) Time Event that happened in this game (thankfully for Bill, Forbes’ morale was 13 in the foxhole so he still recovered with that roll).
Lauerbach moved up next to Forbes, just waiting for the right hand of cards before advancing. One ambush would not be enough.
And then I realized, two turns later, that it would be enough to eliminate the British squad on Objective 2!
So I jumped on them and took care of them.
I promptly gave myself 4 VP until Patrick pointed out that Bill’s newly-arrived HMG was in the same building, which meant I needed to clear them out too. Four VP were promptly given back.
With that squad’s death, though, the Brits were one elimination away from surrendering. I had two Ambushes but I wanted a third before advancing into Forbes’ hex.
That way, all of the units would have to break with the Ambushes because Bill couldn’t just eliminate the leader. That would cause him to lose.
Sadly, all I could draw were Recover cards! Where were those when poor Pfeiffer was crying there in the street?
Meanwhile, the German deck ran out. One round away from Sudden Death. Yes, rolling under a 7 is no guarantee, but I didn’t want to risk it.
I needed to destroy a British unit!
I tried some desperation fire (mainly because that’s all I kept drawing, but sadly no Fire cards with Ambushes) to see if I could break somebody. I was conscious that Bill only had 45 cards left, so I didn’t want him drawing 3 cards each time I fired.
So I fired on the HMG.
Maybe I might have broken somebody in Forbes’ hex? It was possible, but it was also possible for him to draw another Time.
Bill was discarding like mad too. It was almost like he sensed that this wasn’t going to go another round.
And finally I drew that third Ambush.
And an Advance!
Forbes then fired into Lauerbach’s hex and he did what he does best: broke.
But I had been saving one Recover from all those discards, just in case!
I promptly recovered him and then Lauerbach and his men jumped into the foxholes, with another squad trailing behind.

All three British units broke…but Bill had three Ambushes too!
Lauerbach finally met his maker and the German squad was broken too.
The Brits had a 4-3 advantage, and this time the German luck ran out. The squad died, but left a huge pile of British broken units behind them.
That’s when I made my second bonehead move that could have cost me the game.
I had one Advance card left in my hand…and used it put a leader in the hex with the HMG.
You idiot! All you need is another Ambush and you have a squad waiting there to jump on all of those broken units. The Ambush would kill one and the game would be over.
I think I was mesmerized by all of the Recover cards Bill had had, figuring that they wouldn’t stay broken long.
But they did!
For once in this game, Bill couldn’t find a Recover card, and I had luckily drawn an Advance card in my draw (I was out of cards so drew 6 of them).
At this point I still didn’t realize that I was one Ambush away from winning, but since I didn’t have one anyway, it didn’t matter. I was resigned to either losing or having Sudden Death not trigger and we’d get one more round. And I knew I needed at least one Ambush to have any chance of winning the melee.
My assault force was spent.
Maybe I’d get a lucky sniper or something?
Massive discarding ensued, with me worried about the British deck running out.
And then I drew the Ambush…and jumped into Forbes’ hex.
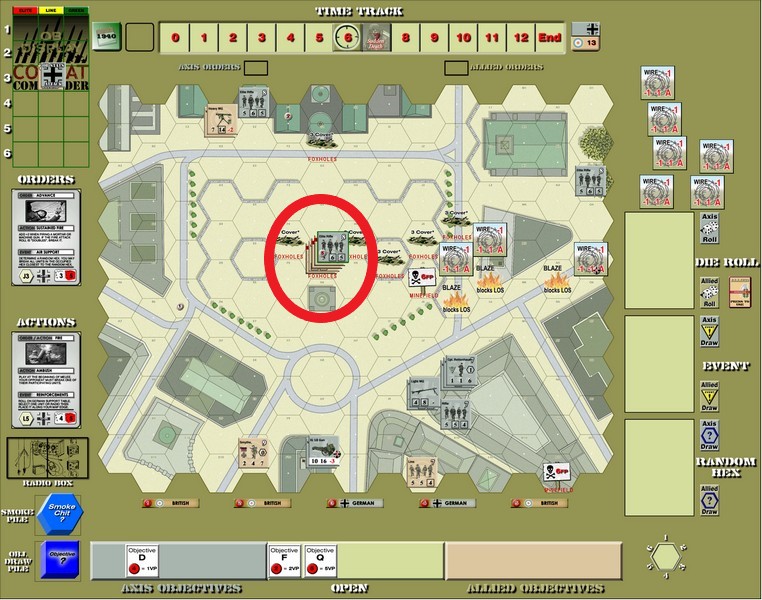
I wish I could say that at this point I realized the Ambush would win the game, but even when I chose to do it, I figured I was just going to have to win the melee, but at least one of Bill’s units would be gone.
And then it hit me…and the game ended!
We didn’t even do the final melee just to see what would have happened. With a 5-3 German advantage, anything could have!
Here’s the casualty track.

And here’s the final layout of the board.

This game was a nailbiter, and I still can’t believe that we only had one Time Event happen. All the rest were from decks running out.
Bill was an awesome opponent. Very skilled, gracious (he really didn’t need to give me that satchel charge back that may have cost him the game) and a fun guy to play against.
I hope to play him again sometime and wish him all the best in future scenarios.
The win puts me at 12-10 in my ladder career. We’re on an upswing!
Next month’s scenario is from the Leader of Men scenario pack, tournament scenarios that are perfect for something like this.
If this sounded fun, why not join us on the Combat Commander ladder? We’re a great group of guys and you’ll always have a willing opponent if you want to play.
Until next month, stay frosty!
Combat Commander Ladder – After Action Reports
To see all of my Ladder After Action Reports since May 2021, go here!
What a tense game with a spectacular finish! It is good to win, even unconsciously 🙂
LikeLiked by 1 person
I know, right? My first two-game win streak in a while. It felt good. 🙂 And it felt good to be playing again!
LikeLiked by 1 person
Pingback: Combat Commander After Action Report – Scenario #82 – Hidden Guns Lash Out – Dude! Take Your Turn!
Pingback: Combat Commander After Action Report – Scenario #67 – The Orient Express – Dude! Take Your Turn!
Pingback: Combat Commander After Action Report – Scenario #53 – Deeds Not Words – Dude! Take Your Turn!
Pingback: Combat Commander Europe – After Action Report – Scenario #41 – The Commissar House – Dude! Take Your Turn!
Pingback: COMBAT COMMANDER PACIFIC – AFTER ACTION REPORT – SCENARIO M4 – TEMPLETON’S CROSSING – Dude! Take Your Turn!
Pingback: Combat Commander Pacific – After Action Report – Scenario E – West Tank Barrier – Dude! Take Your Turn!
Pingback: Combat Commander Europe – After Action Report – Scenario #30 – Red Skies at Night – Dude! Take Your Turn!
Pingback: Combat Commander Europe – After Action Report – Scenario #14 – At the Crossroads – Dude! Take Your Turn!
Pingback: Combat Commander Europe – After Action Report – Scenario #9 – Rush to Contact – Dude! Take Your Turn!
Pingback: Combat Commander Europe – After Action Report – Scenario #119 – Sky Fall – Dude! Take Your Turn!
Pingback: Combat Commander Europe – After Action Report – Scenario 90 – The Man Who Would Be King – Dude! Take Your Turn!
Pingback: Combat Commander Europe – After Action Report – Scenario 75 – Sturmgruppe Beton – Dude! Take Your Turn!
Pingback: Combat Commander Europe – After Action Report – Scenario 65 – Road Trip – Dude! Take Your Turn!
Pingback: Combat Commander Europe – After Action Report – Scenario 51 – The Uneasy Wait – Dude! Take Your Turn!
Pingback: Combat Commander Europe – After Action Report – Scenario 35 – Spartakovka Salient – Dude! Take Your Turn!
Pingback: Combat Commander Pacific – After Action Report – Scenario M6 – Breakout – Dude! Take Your Turn!
Pingback: Combat Commander Pacific – After Action Report – Scenario A – Grassy Knoll – Dude! Take Your Turn!
Pingback: Combat Commander – After Action Report – Scenario #34 – Encircled at Hill 30 – Dude! Take Your Turn!
Pingback: Combat Commander – After Action Report – Scenario #23 – No-Man’s Land – Dude! Take Your Turn!
Pingback: Combat Commander – After Action Report – Scenario #112 – Sonnenwende – Dude! Take Your Turn!
Oh wow! Very exciting. Congratulations on your victory!
LikeLiked by 1 person
Thank you!
LikeLiked by 1 person
Pingback: Combat Commander After Action Report – Scenario LoM #8 – Codes in the Sunrise – Dude! Take Your Turn!
Pingback: Combat Commander Europe – After Action Report – Scenario LoM9 – Operation Mercury – Dude! Take Your Turn!
Pingback: Combat Commander After Action Report – Scenario #105 – La Fiere Counterattack – Dude! Take Your Turn!
Pingback: Combat Commander After Action Report Supplemental – Scenario #28 – No Ingouf Around – Dude! Take Your Turn!
Pingback: Combat Commander After Action Report – Scenario #10 – Commando School – Dude! Take Your Turn!
Pingback: Combat Commander After Action Report Supplemental No. 2 – Scenario #92 – Let England Shake – Dude! Take Your Turn!
Pingback: Combat Commander After Action Report – Scenario #20 – A March in December – Dude! Take Your Turn!
Pingback: Combat Commander After Action Report – Scenario #33 – We Go! – Dude! Take Your Turn!
Pingback: Combat Commander – After Action Report – Scenario L – Slopes of Hell – Dude! Take Your Turn!
Pingback: Combat Commander – After Action Report – Scenario M10 – Bulolo River Bridge – Dude! Take Your Turn!
Pingback: Combat Commander – After Action Report – Scenario 44 – Stalingrad of the North – Dude! Take Your Turn!