Dude! Take Your Turn!
A Gaming Life
Combat Commander After Action Report Supplemental – Scenario #28 – No Ingouf Around
Last month’s Combat Commander ladder game against Ted W was a barn-burner, very intense and exciting.
After the game, we agreed that we would play again at some point, and we arranged to play a scenario of my choosing on Monday night.
After looking through the Battle Packs I own, I chose scenario #28 from the Paratrooper Battle Pack, a scenario weirdly-called “No Ingouf Around”.
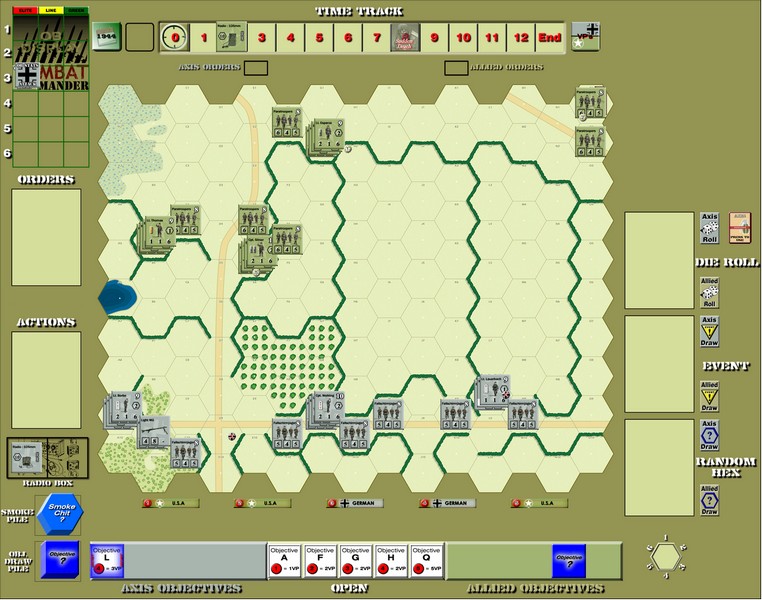
In the scenario, American paratroopers (Ted, green) on June 10, 1944 (4 days after D-Day) are holding an abandoned farmhouse in the Carentan area. They were going to be facing a counterattack by some elite German paratroopers (me, grey).
(Don’t forget that you can click on a picture to make it bigger)
Both sides have a radio, but the American radio won’t come into play until at least Round 2. It starts on the “2” space of the Time Track and each Time trigger, the American has to roll. If they roll less than or equal to the Time Track number, they get the radio. Otherwise, it bumps to the next space for the next trigger.
The German radio is available from the beginning.
Both sides have a random objective and five open objectives are already out. Basically all of the objectives hexes are worth points, with the farmhouse (Objective 5) worth 5 points.
The other special rule is that there are no exit VP. Any unit that exits the board is eliminated, no matter where from.
It’s a cage match!
The Americans set up first, 7 hexes deep. The Germans then set up, 2 hexes deep except they can also set up in Objective 4.
Germans move first.
After chatting a bit (and our leader Patrick joining us for a little while), we began!
I ended up getting Ted to give me the Initiative twice during the game, so I would consider it a win no matter who ended up ahead.
I started out with a great hand for this scenario: an Artillery Request, two Move orders and three Fire orders.
Of course, with all of that open ground covered by American machine guns (high firepower MGs), you know I needed to smoke things out.
So I did!

That didn’t work so well because my artillery spotter sucked for the most part.
How can you run up to MGs without smoke!
I had some Smoke Grenades, so I moved Captain Welling and his men in front of the hedge facing the massive stack in the Farmhouse.
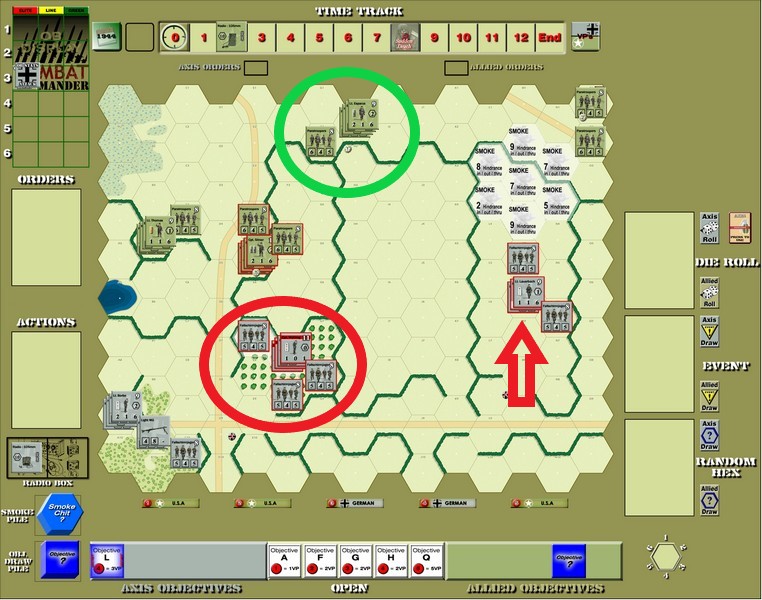
Even with the smoke, Welling’s entire stack broke under the withering firepower.
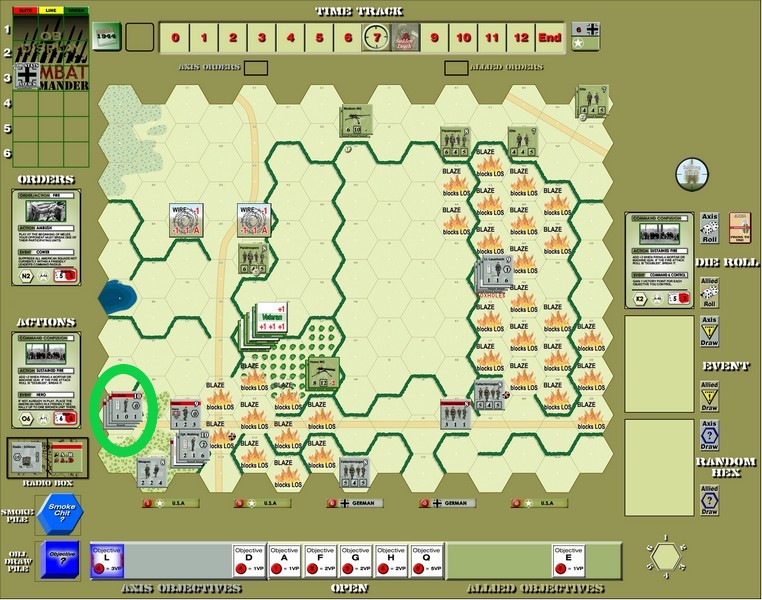
Previously, Ted had repositioned some of his men in the north (green circle).
I had also moved Lauerbach and his men up through the open but out of line of sight of anybody.
I wanted to get my mortar into position to actually do something.
Maybe lay some smoke!
I then Recovered everybody except the one weapons team with Welling who just managed to suppress themselves instead.
Ted let loose from the Farmhouse again and broke another squad, but with a Time trigger!
Things were moving fast.
They broke, of course.
Subsequent American fire killed that German squad, with a sniper breaking my mortar crew but then a helpful American Medic rallied them. Thanks, Ted! (That was a Medic event which rallies a broken unit and no American units were broken).
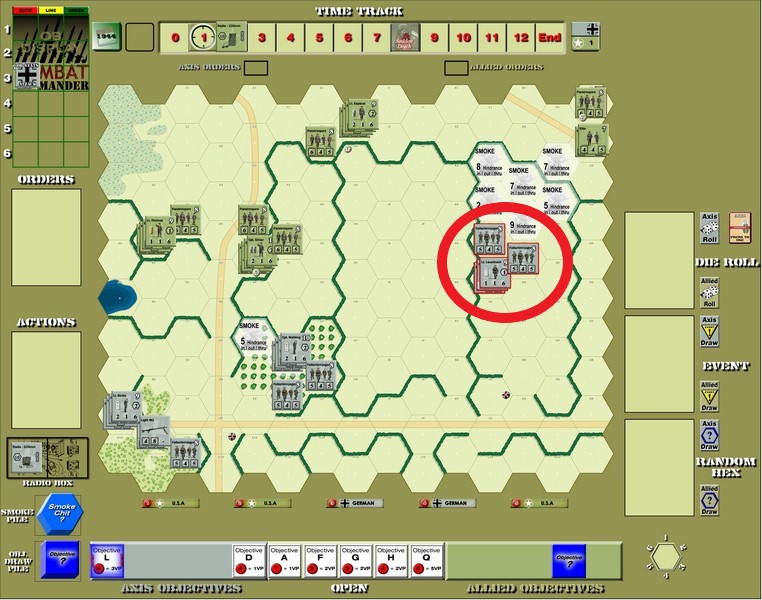
Then, with an Advance card, Lauerbach moved into position for the mortar to do something.
And that’s when I realized I never stacked a squad with him.
Oops!
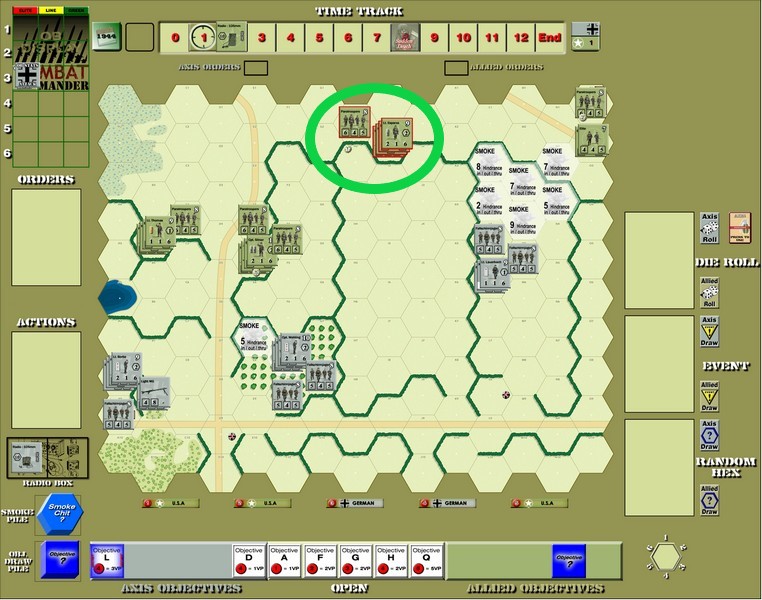
Ted advanced his northern MG stack into position to fire on the Germans now that the mortar was visible.
He said after the game that he figured a Heavy Machine Gun against a mortar, he would definitely take that any day.
Let’s test that theory.
After some decent smoke artillery from Lt. Borbe, the mortar let loose on the American MG position.
It ended up only suppressing a squad, which gave me horror visions of my totally ineffective mortar from last month’s scenario.

Then a bunch of stuff happened the next time Ted fired with them.
Lauerbach broke under the intense fire.
That morale check caused a blaze.
Then the second attack caused a Breeze event, blowing all of the smoke away and spreading the blaze.
The attack would have killed him. I gave Ted the Initiative because I rolled a 2 (needed at least a 4). Second roll was a 4 which only suppressed him.
The 4 was a Sniper, which ended up breaking Lt. Esparza.
Combat Commander can be chaotic!
Then the German mortar fired back.

The fire attack produced another blaze!
The first American morale check allowed Ted to scrounge my eliminated LMG.
But the squad broke, and then the American Hero Lucas appeared!
He stopped by Esparza’s hex, gave him an attaboy that rallied him, and then slunk off into the darkness (being in that hex, he would be overstacked and somebody would have to be eliminated).
Which was good, because he rolled a 2 on his morale check and would have died without Lucas.
A subsequent German Rout order got a Time trigger!
More importantly, it was a 12 which would have routed Esparza off the board.
So Ted gave the Initiative back to me.
A win! He never does that.
I then used a Move order to get Welling out of the way of all that American firepower, now that the smoke was gone.
And the mortar fired again a couple of turns later.
A small roll (14 firepower in total), but Ted drew a 3 on Esparza’s morale check, killing him.
There would be no Walking Wounded event this time to bring him back.
It also killed the team that was with them, though sadly they didn’t have the HMG.
The German deck ran out, and it was Time 2, time for Ted to draw to see if he gets his radio.
He didn’t.

Ted moved another leader (Thomas) along with a Medium Machine Gun, to cover the north.
Lauerbach called in some artillery but the targeting people were a little bit drunk and even though most drifting would hit somebody, this one didn’t.
But the mortar crew could do no wrong! (they must not have trained at the same school as my mortar crew from last month).
They fired at the broken American squad (now covered in smoke) and killed it!
Thomas let loose to get revenge, but only succeeded in bringing a German reinforcement squad out onto the board.
The mortar opened up on Thomas, saying “get that weak shit out of here…” and ended up breaking both him and the team with him.

They were on fire! (almost literally, as that blaze was getting close).
I moved a squad into Lauerbach’s hex and all hell broke loose.
Thomas’ guys let loose with the MMG, depleting his deck and causing a Time trigger.
I had a Dig In, so I put Foxholes in Lauerbach’s hex to protect him.
(Ted managed to roll a 3 and get his radio, though)
One of the German morale checks caused a sniper…that hit Thomas!
Bang! Two American leaders dead.
Another morale check in the same sequence caused a German Time trigger.
We were now half-way done (maybe) and I had a 7-point lead.
Another German artillery request suppressed an American unit (I have to say that the artillery didn’t do a lot…even though I ended up with a ton of Artillery Request cards).
Also at some point I gave the Initiative back.

A bunch of unimportant stuff happened, and then a German Recover attempt brought out another blaze!
With me not giving Ted any targets (I had the lead, why tempt fate?), he advanced his huge kill stack to engage Welling and his men.

I knew an Advance was coming, so I quickly hightailed it out of there.
American opportunity fire brought Lucas out again; this time he stuck around!
My one good Artillery Request attack landed perfectly on the American kill stack, breaking everybody.
But I couldn’t follow up on it.
And the Americans scrounged their destroyed HMG, which made my life harder.
I did manage to eliminate a broken American squad with another artillery, so I guess it did do something.
But an American sniper broke Borbe, who had called in the artillery.
Serves him right.
And another sniper broke a German squad!
Snipers were quite effective this game.
And then began what was later known as The Time of Fire.

A breeze!
With three separate blaze areas, there was a lot of spreading.
More German reinforcements brought on another German mortar! Which did nothing before breaking and being eliminated.
German repositioning in the southwest ended up causing two Time triggers! We were getting close.

Lucas decided to run toward the Germans and take the open Objective 3. He was fired on, which didn’t do much except cause a German sniper that broke an American squad.
And 4 points to the Americans!
It was getting closer.
I was starting to sweat.
I did end up breaking him, but he advanced out of the hex.
Knowing Lucas is an asshole, I advanced a squad out to kill him, hoping Ted didn’t have two Ambush cards.
He did have one, but decided not to use it.
Too bad. I rolled so badly that if my squad had been broken, I would have lost.
Instead, Lucas died an ignoble death. But mission accomplished. He had taken the objective.
(Lucas gets me no points, so Ted didn’t think it was worth using the Ambush).
Another way that Combat Commander toys with you.
American fire killed a broken German squad for 2 more points.
He fired again at another squad. Drew a KIA event (eliminate one broken unit).
The fire would have broken a German unit, then the KIA would have killed it.
Since Events happen first, the KIA had to kill the only broken unit on the map – an American team.
And then another breeze…

That’s a lot of fire!
I think the farmer was growing marijuana.
A German artillery attack went badly awry and blew up a German squad sitting on the road minding its own business!
And said artillery attack caused another breeze!

This was getting untenable, and I knew I had to take Objective 3 back in case fire came onto it.
Which is what the German Hero Dietel did (thanks, Patrick, for reminding me last month what the Hero is for!)
Some more fire was exchanged, and two more German squads died, but a German event gave me some points so it was currently at 6 German VP.

And then another breeze!
The circled German units were all broken by American artillery.
But a German sniper did break the last remaining American leader, so that was good.
Except he rallied immediately.
I recovered almost everybody, causing a Time trigger with my deck running out.
The Americans had 9 cards left in their deck.
The next Time would cause Sudden Death and the game might end.
Ted was desperately trying to get some points, just in case, and unleashed a blistering attack against Borbe’s hex. And rolled a 3.
He gave me the Initiative even though that meant he couldn’t reroll the Sudden Death dice.
Twice in one game!
All of the Germans broke.
I knew that the round would end soon, but I didn’t have a Recover card!
Thankfully, the second American fire only suppressed two of the units, not killing them.
I tried a desperate artillery request, hoping the drift would take out his kill stack.
And it didn’t.
(I should have used it from Welling’s hex to lay smoke in front of the kill stack, but I didn’t think of it until afterward).
My mortar tried to cause him to use a card, but it missed.
It all came down to this (which would be anticlimactic if Sudden Death didn’t happen, but still…)
Ted had one card left in his deck.
The next attack would trigger Sudden Death, but it would most likely kill everybody in the stack (6 points) if Sudden Death didn’t happen.
I only had 6 points! And that stack dying would be brutal.
Ted drew a 7, ending the game.
Out of interest, we rolled my morale checks and one of my events would have given me 6 points (1 point per eliminated American unit) so it may not have been so bad.
But the game was over.
My hidden objective gave me 3 more points, so I finished with a 9 point win!

That was such a nailbiter. It went back and forth, with me thinking I had no shot to me thinking I had it won easily, then me thinking that I had a good chance to me thinking I was barely hanging on.
It would have been interesting to see it go one more round, but I certainly was glad it didn’t.
I have never seen that much fire in a scenario I’ve played before.
Ted is a hell of an opponent, a wonderfully nice guy, and we are going to be playing again at some point.
In the meantime, my June opponent and I will hopefully be playing next week, so watch out for that AAR.
I hope you enjoyed this, and keep an eye out for more!
Or check some of the ladder games below.
Combat Commander Ladder – After Action Reports
To see all of my Ladder After Action Reports since May 2021, go here!

Pingback: Combat Commander After Action Report – Scenario #105 – La Fiere Counterattack – Dude! Take Your Turn!
Pingback: Combat Commander After Action Report – Scenario LoM #8 – Codes in the Sunrise – Dude! Take Your Turn!
Pingback: Combat Commander After Action Report – Scenario #91 – The Battle of Trafalgar – Dude! Take Your Turn!
Pingback: Combat Commander After Action Report – Scenario #82 – Hidden Guns Lash Out – Dude! Take Your Turn!
Pingback: Combat Commander After Action Report – Scenario #67 – The Orient Express – Dude! Take Your Turn!
Pingback: Combat Commander After Action Report – Scenario #53 – Deeds Not Words – Dude! Take Your Turn!
Pingback: Combat Commander – After Action Report – Scenario #41 – The Commissar House – Dude! Take Your Turn!
Pingback: Combat Commander – After Action Report – Scenario M4 – Templeton’s Crossing – Dude! Take Your Turn!
Pingback: Combat Commander – After Action Report – Scenario E – West Tank Barrier – Dude! Take Your Turn!
Pingback: Combat Commander – After Action Report – Scenario #30 – Red Skies at Night – Dude! Take Your Turn!
Pingback: Combat Commander – After Action Report – Scenario #14 – At the Crossroads – Dude! Take Your Turn!
Pingback: Combat Commander – After Action Report – Scenario #9 – Rush to Contact – Dude! Take Your Turn!
Pingback: Combat Commander – After Action Report – Scenario #119 – Sky Fall – Dude! Take Your Turn!
Pingback: Combat Commander – After Action Report – Scenario LoM9 – Operation Mercury – Dude! Take Your Turn!
Pingback: Combat Commander – After Action Report – Scenario 90 – The Man Who Would Be King – Dude! Take Your Turn!
Pingback: Combat Commander – After Action Report – Scenario 75 – Sturmgruppe Beton – Dude! Take Your Turn!
Pingback: Combat Commander – After Action Report – Scenario 65 – Road Trip – Dude! Take Your Turn!
Pingback: Combat Commander – After Action Report – Scenario 51 – The Uneasy Wait – Dude! Take Your Turn!
Pingback: Combat Commander – After Action Report – Scenario 35 – Spartakovka Salient – Dude! Take Your Turn!
Pingback: Combat Commander – After Action Report – Scenario M6 – Breakout – Dude! Take Your Turn!
Pingback: Combat Commander – After Action Report – Scenario A – Grassy Knoll – Dude! Take Your Turn!
Pingback: Combat Commander – After Action Report – Scenario #34 – Encircled at Hill 30 – Dude! Take Your Turn!
Pingback: Combat Commander – After Action Report – Scenario #23 – No-Man’s Land – Dude! Take Your Turn!
Pingback: Combat Commander – After Action Report – Scenario #112 – Sonnenwende – Dude! Take Your Turn!
Pingback: Combat Commander After Action Report – Scenario #10 – Commando School – Dude! Take Your Turn!
Pingback: June 2023 Gaming – Dude! Take Your Turn!
Pingback: Combat Commander After Action Report Supplemental No. 2 – Scenario #92 – Let England Shake – Dude! Take Your Turn!
Pingback: Combat Commander After Action Report – Scenario #20 – A March in December – Dude! Take Your Turn!
Pingback: Combat Commander After Action Report – Scenario #33 – We Go! – Dude! Take Your Turn!
Pingback: Combat Commander – After Action Report – Scenario L – Slopes of Hell – Dude! Take Your Turn!
Pingback: Combat Commander – After Action Report – Scenario M10 – Bulolo River Bridge – Dude! Take Your Turn!
Pingback: Combat Commander – After Action Report – Scenario 44 – Stalingrad of the North – Dude! Take Your Turn!