Dude! Take Your Turn!
A Gaming Life
Combat Commander – After Action Report – Scenario 51 – The Uneasy Wait
Another month, another game of Combat Commander.
This is my monthly game played as part of the Combat Commander ladder run by the funny and witty Patrick Pence (of the awesome Youtube Channel Patrick’s Tactics & Tutorials).
How do I know he’s funny and witty?
I actually saw him!
This was done in April 2021 but I just saw it yesterday.
Anyway, my time on the Ladder has been a lot of fun. I’ve been on it since May (with a break in June due to…issues). I was 5-1 going into December’s match.
I was also #4 on the Ladder! Whoever won our game would be taking on the top guy next month!
Would that happen for me?
Maybe, maybe not.
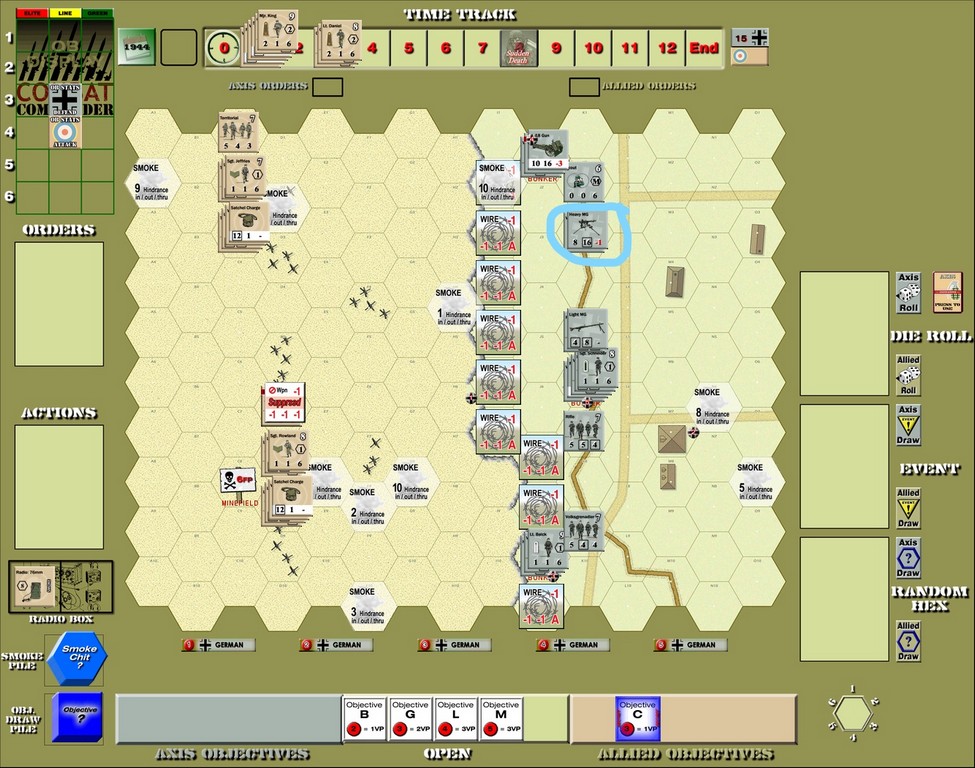
Scenario #51 is out of the Normandy Battle Pack and it has a bunch of brave British soldiers (on the left) hitting the beach in Normandy trying to root out an entrenched German position (on the right).
Mark Jefferson was the Germans and I was the attacking British.
After setting up our units and before drawing cards, I was able to draw 10 random hexes and place a smoke counter in them.
And it didn’t work out too badly for me.
(Note: You can click on the picture to make it larger)

A lot of other games have had a lot of the smoke going behind German lines, but it worked out pretty well for me.
I got a huge smoke to land right in front of the big artillery gun!
So now we were ready to start. In my 5-1 record, my one loss was the only time I was the Attacker. I’m attacking this time.
Gulp.
The beach hexes make movement more difficult, costing 1.5 movement points instead of 1. However, the Hedgehogs (the little black crosses) do provide some cover if you can get to them. The British have to move fast and avoid using much firepower since almost all of their attacks would be very ineffective against the bunkers/trenches and would just burn cards instead (something the Attacker does not want to happen)
So that was what I planned on doing.
It didn’t help that my first hand of 6 cards had exactly one Advance card and no Movement cards.
Hard to move up the beach when you don’t have the cards!

On the first German turn that Mark was able to play a Fire card, one of my defense rolls was a Time Event! It would have made the unit pass their morale check but as the Attacker, I needed time to go slower. I gave up the Initiative (and never got it back). Funnily enough, the new roll ended up suppressing the unit.
I had drawn two Move cards (they were few and far between this scenario, sadly) and moved both sides forward.
The first Move on the British right resulted in two broken units (the Germans never seemed to lack a Fire card when I was moving). It also resulted in an unknown German minefield which thankfully didn’t have any negative effects as Sgt. Rowland moved into it and out of it.
The British left moved up with no problems due to the heavy smoke in between them and the German Heavy Machine Gun on the German left.
Thankfully, the British had a Recover card! One of many I would draw throughout the game. In fact, there were a couple of times where my 6-card Attacker hand actually had 4 Recover cards in it. Useful after moving, but not good when you can’t move!

Still, the British were slowly advancing up the beach and weren’t too much the worst for wear.
Eventually the British had to discard because they didn’t have any good cards.
Cue the German Hidden Unit event! And Mark managed to roll another Heavy Machine Gun (HMG)!
This was not looking good for the brave Brits.
The British left moved again and faced some withering HMG fire from the new guys.
However, the British sniper seemed very good at his job this game, and after having broken the team manning the German Infantry Gun earlier, they managed to break the team manning the new HMG. Bonus!

It could have better, could have gone worse.
Especially because the British had (*trumpets blare*) a Rally card!
Sadly, Sgt. Jeffries didn’t manage to rally during the Recover, which would have repercussions.
The German kill stacks in the middle of the board targeted him and they rolled a 12 (Time Event), which brought the first British reinforcements out but was certain to kill him.
Funnily enough, a German Walking Wounded event brought him back very shortly afterward (they have to bring somebody out from the Casualty Track and he was the only dead unit)! And he appeared on the German board edge, ready to exit for victory points.

Fortuitous for the British, but not really that meaningful. Still, 2 VP is 2 VP.
The British had yet another Recover card and were able to rally all the other units (except one, that became Suppressed).
Really, many British players would kill to have half of the Recover cards I got in this scenario.
Sadly, the Germans recovered all of their broken units, meaning the weapons were ready to fire again.
And Fire they did, at the one remaining broken British unit, and rolled a 12 again! Another Time Event and time was marching on faster than the British would like.
That killed the British unit, but not before the British drew an Event that gave them another secret objective. Which just happened to be “Eliminated units are worth double VP.” So the squad that just died gave Mark 4 points instead of 2!
That was a bummer.
The thing about Time events is that one Smoke counter is removed each time too. My beginning barrage of smoke was starting to disappear!
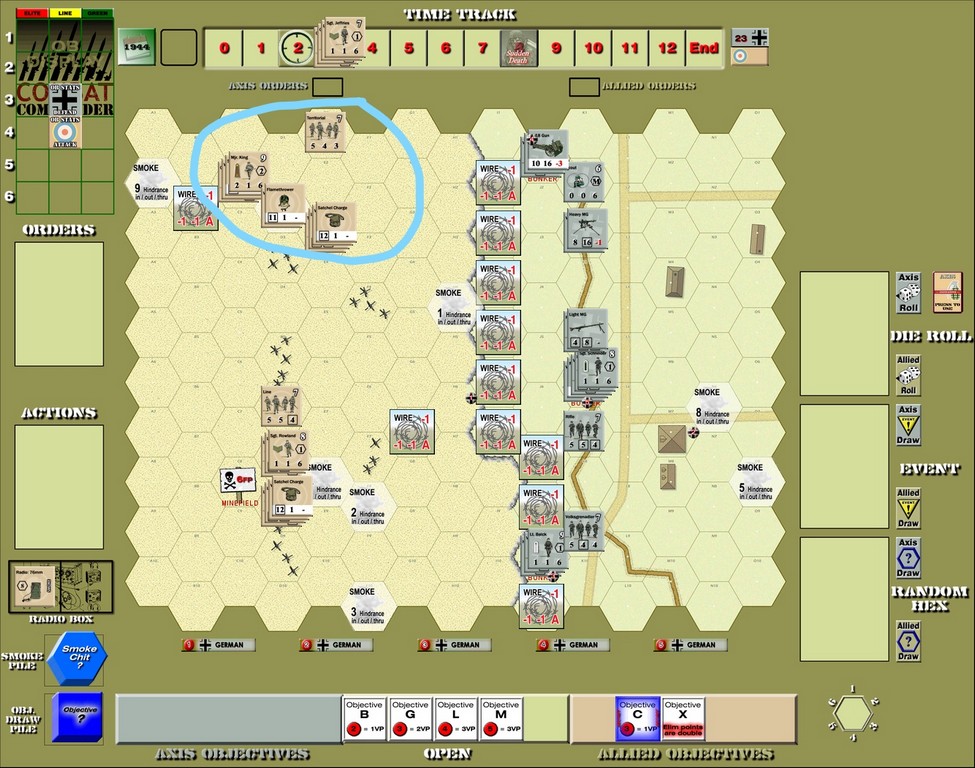
Next turn, just before the British deck ran out (which would trigger yet another Time event), Jeffries Advanced off the board, meaning he would come back with the Turn 3 reinforcements.
The British Turn 1 reinforcements finally were able to move off of the board edge where they came in, but Major King and his troops blundered into some hidden Wire on the beach (how can you hide wire on the beach?) and had to stop moving.
Another Move card brought King and company into range of the original British units (the remaining ones after Jeffries and his squad died).
Things weren’t looking good but they weren’t looking too bad for me.
I’d made some headway against the German defenses and only lost a squad (and LMG) and leader, and the leader was back!
I did probably spend too many Artillery Requests trying to destroy bunkers (if I draw a “12” then it would be destroyed but there are only two 12 cards in the deck and they are Time events). The main reason I did this instead of raining Smoke down is because the unique Normandy rules where if Artillery delivers Smoke, the radio is automatically broken and you have to do another Artillery Request to make it active. The Germans, meanwhile, can use an Artillery Denied to destroy the radio completely at that point.
I never had two Artillery Requests in my hand at the same time, so I ended up not using it for Smoke.
Maybe I should have.
Anyway, I also didn’t want to pass and discard because Mark had accidentally played a Hidden Unit when he shouldn’t have, so I knew he had it. I didn’t want another HMG showing up!
Once or twice I used a card just because I didn’t want to discard.
Anyway, the British deck ran out again, bringing on the Turn 3 reinforcements as well as the returning Sgt. Jeffries.

After almost doing a low-power Fire attack that would do no damage (and run through cards), I decided to just discard and see what Mark drew. But he had discarded the Hidden Unit thinking I wouldn’t discard anymore!
At this point, I was drawing nothing but Recover cards, Fire cards (useless right now) and trash cards, so we both began discarding like mad.
But I finally drew two Advance cards! Not movement, so they can’t go far, but they also can’t be fired on.

They’re creeping up on the Germans. Things didn’t look too bad but Time was moving faster than I would have liked.
Some more German fire broke and then killed another LMG squad on the British right. They weren’t doing much good anyway.
The British remaining broken unit quickly recovered (I had 3 Recover cards at this point!)
More British movement on the right and everybody broke. But of course I had a Recover card. More German fire on Mark’s turn broke both units that successfully rallied after the move.
Of course I had another Recover card!
Lots of discarding ensued. Thankfully the Germans had run out of Hidden Units. Meanwhile, the German deck ran out and more Time elapsed.
The British were finally able to Move again.
And of course the Germans had a Fire card.
And the British left moved.
And of course the Germans had a Fire card.
But during the Morale checks, the British drew a “Suppressing Fire” event, which suppressed the team firing that HMG! The rest of the British left could move unimpeded (you can’t fire a weapon when you’re Suppressed).

And the British had a Recover card (of course!)
All British units quickly recovered.
But the British deck ran out, causing another Time!
Now just 3 turns away from Sudden Death and I hadn’t even broken through anywhere yet.
The German central kill stacks fired again and caused a British sniper to break Sgt. Schneider! That would make the kill stacks impossible in the future.
Until he rallied, anyway.
This is where Mark started doing a bunch of low-firepower attacks that had no hope of doing damage, just to run through cards in both of our decks.
It’s a valid defender strategy, but it can also cause some snipers and other events that aren’t good.
Speaking of which, during that fire another British sniper broke the team manning the HMG on the German left! Subsequent British artillery fire brought about an event that would break the weapon nearest to a random hex. Which turned out to be the fully-manned HMG!
Things were looking good.
Except the British had no movement cards.
The Germans quickly recovered their broken units, with one of the rolls causing a German sniper. While the sniper didn’t do anything, the random hex fixed the broken HMG!
Which promptly fired again…and got another Time!
Suddenly things weren’t looking so good.
The British then got another Move card.
The British team with the Satchel Charge was ready to assault the bunker with the HMG on the German left if he could just get close!
The first German fire caused a morale check…and the British drew a Time event! Passed the morale check but time was winding down.
The second move resulted in the team breaking. No Assault, sadly.

Rowland’s stack moved, and broke, but drew a Sapper event that removed the Wire in front of the Infantry Gun.
Subsequent morale checks sadly drew another British Time, and I rolled for Sudden Death. An 8 or higher would continue the game (though Mark had Initiative so could force me to reroll).
Unfortunately I drew a 7, and that was all she wrote.
This scenario is insanely skewed against the British, but I’m not blaming that for how it turned out. Some things went my way, some things didn’t, and Mark did exactly what he had to do as the Defender.
I didn’t manage to kill a single unit, but if it had gone another round, I may have started doing it. The Satchel Charges and Flamethrowers can be deadly against Bunkers (the units inside don’t get the Bunker bonus against flamethrowers and the Satchel Charges have 12 Firepower) and they were finally getting into position.
Really, my snipers kept me in this game as they broke a number of units just in time to be useful. Not to mention the Sappers event that removed the Wire in front of the Infantry gun. If I had had another round, I may have done some serious damage because of that. Getting a flamethrower right into their faces would have been very bad for the Germans.
But it wasn’t to be.
Mark was a great opponent, willing to play the game on my lunch break to make it easier for me.
Many thanks also to Noel, who came in and offered rules advice and prompts (like when I almost forgot to reset my deck after a Time event).
Both are great guys and I loved playing against Mark.
I’m now 5-2 and have fallen to (probably, barring somebody ahead of me or just behind me not actually completing their game this month) #8 on the Ladder.
Mark’s going to be playing the top dog next month for all the marbles and top spot!
Good luck to him, and maybe I’ll work my way up to that again next month.
As long as I’m not the Attacker.
Combat Commander Ladder – After Action Reports
To see all of my Ladder After Action Reports since May 2021, go here!

Pingback: Combat Commander Europe – After Action Report – Scenario 35 – Spartakovka Salient – Dude! Take Your Turn!
Pingback: Combat Commander Pacific – After Action Report – Scenario M6 – Breakout – Dude! Take Your Turn!
Pingback: Combat Commander Pacific – After Action Report – Scenario A – Grassy Knoll – Dude! Take Your Turn!
Pingback: Combat Commander – After Action Report – Scenario #34 – Encircled at Hill 30 – Dude! Take Your Turn!
Pingback: Combat Commander – After Action Report – Scenario #23 – No-Man’s Land – Dude! Take Your Turn!
Pingback: Combat Commander – After Action Report – Scenario #112 – Sonnenwende – Dude! Take Your Turn!
Phenomenal AAR, as always, David!
LikeLiked by 2 people
Thank you, Patrick! Too bad the result was never in doubt (I was attacking, right? :P)
But it was still a lot of fun.
LikeLike
Great report and extremely difficult scenarios for Brits.
LikeLiked by 2 people
I have no idea how the 4 wins came about! (Last I heard, the record was 21-4 Germans, but I’ve seen a couple more German victories added since then, so it could be higher if those weren’t already accounted for)
LikeLiked by 1 person
Pingback: December 2021 Monthly Update From GMT Games – Dude! Take Your Turn!
Pingback: Blog in Review – 2021 – Dude! Take Your Turn!
Pingback: Combat Commander Europe – After Action Report – Scenario 65 – Road Trip – Dude! Take Your Turn!
Pingback: Combat Commander Europe – After Action Report – Scenario 75 – Sturmgruppe Beton – Dude! Take Your Turn!
Pingback: Combat Commander Europe – After Action Report – Scenario 90 – The Man Who Would Be King – Dude! Take Your Turn!
Pingback: Combat Commander Europe – After Action Report – Scenario LoM9 – Operation Mercury – Dude! Take Your Turn!
Pingback: Combat Commander Europe – After Action Report – Scenario #119 – Sky Fall – Dude! Take Your Turn!
Pingback: Combat Commander Europe – After Action Report – Scenario #9 – Rush to Contact – Dude! Take Your Turn!
Pingback: Combat Commander Europe – After Action Report – Scenario #14 – At the Crossroads – Dude! Take Your Turn!
Pingback: Combat Commander Europe – After Action Report – Scenario #30 – Red Skies at Night – Dude! Take Your Turn!
Pingback: Combat Commander Pacific – After Action Report – Scenario E – West Tank Barrier – Dude! Take Your Turn!
Pingback: COMBAT COMMANDER PACIFIC – AFTER ACTION REPORT – SCENARIO M4 – TEMPLETON’S CROSSING – Dude! Take Your Turn!
Pingback: Combat Commander Europe – After Action Report – Scenario #41 – The Commissar House – Dude! Take Your Turn!
Pingback: Combat Commander After Action Report – Scenario #53 – Deeds Not Words – Dude! Take Your Turn!
Pingback: Combat Commander After Action Report – Scenario #67 – The Orient Express – Dude! Take Your Turn!
Pingback: Combat Commander After Action Report – Scenario #82 – Hidden Guns Lash Out – Dude! Take Your Turn!
Pingback: Combat Commander After Action Report – Scenario #91 – The Battle of Trafalgar – Dude! Take Your Turn!
Pingback: Combat Commander After Action Report – Scenario LoM #8 – Codes in the Sunrise – Dude! Take Your Turn!
Pingback: Combat Commander After Action Report – Scenario #105 – La Fiere Counterattack – Dude! Take Your Turn!
Pingback: Combat Commander After Action Report Supplemental – Scenario #28 – No Ingouf Around – Dude! Take Your Turn!
Pingback: Combat Commander After Action Report – Scenario #10 – Commando School – Dude! Take Your Turn!
Pingback: Combat Commander After Action Report Supplemental No. 2 – Scenario #92 – Let England Shake – Dude! Take Your Turn!
Pingback: Combat Commander After Action Report – Scenario #20 – A March in December – Dude! Take Your Turn!
Pingback: Combat Commander After Action Report – Scenario #33 – We Go! – Dude! Take Your Turn!
Pingback: Combat Commander – After Action Report – Scenario L – Slopes of Hell – Dude! Take Your Turn!
Pingback: Combat Commander – After Action Report – Scenario M10 – Bulolo River Bridge – Dude! Take Your Turn!
Pingback: Combat Commander – After Action Report – Scenario 44 – Stalingrad of the North – Dude! Take Your Turn!