Dude! Take Your Turn!
A Gaming Life
Combat Commander – After Action Report – Scenario #119 – Sky Fall
It’s my one year anniversary on the Combat Commander ladder!
Yes, in May 2021, I played my first game on the ladder tournament where you play against another ladder participant and try to increase your ranking to the top spot.
The ladder tournament, led by the perspicacious Patrick Pence of the Patrick’s Tactics & Tutorials Youtube channel, is my conduit to actually getting a monthly game of one of my favourite games.
Since this is my first anniversary, this is the first “repeat” month in my time on the ladder. All that means is that each month, the scenario is taken from one of the many games, expansions, battle packs, or tournament scenarios that are out there.
In this month’s case, it’s a series of scenarios from the C3i magazines from various issues.
This month’s scenario is Sky Fall, from the #27 C3i listing on Boardgame Geek.
My May opponent was Andrei F, who happens to live in my neck of the woods (the Lower Mainland up here in British Columbia) so it was relatively easy to get a time set up for it.
Thankfully, I didn’t have COVID so I was actually fully aware of what I was doing in the game.
Would that make a difference?
Maybe!
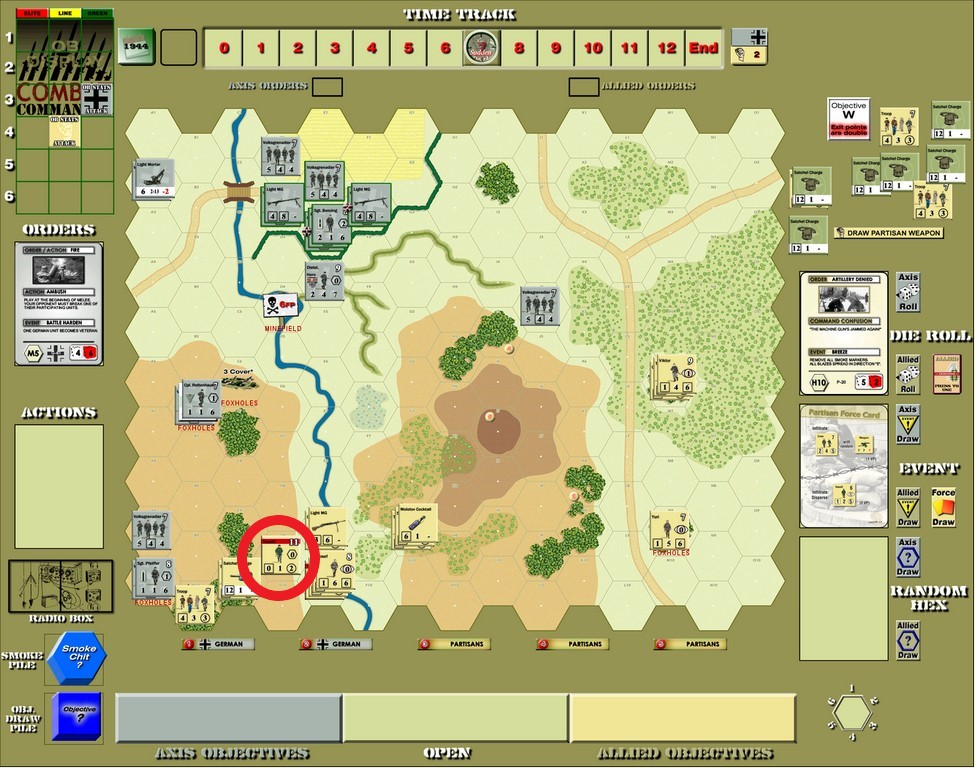
In Sky Fall, the Allied forces are air-dropping containers of equipment to the French Partisans in July, 1944. The Germans (Andrei) are trying to prevent the Partisans from collecting the equipment containers while the Partisans (me) are trying to get them off the map.
Both sides are in “Attack” mode, which means all Defense cards are useless for both sides.
The Partisans set up in any Woods hex, then the Germans set up but they are constricted to pretty much the spaces shown on this map.
Once the pieces are set up, the containers (we used American Satchel Charges for them) are randomly placed on the map by drawing random hexes from both sides.

Here’s how everything ended up.
(Keep in mind that you can click on the images to expand them)
The Partisans are trying to get the containers off of the right side of the board while the Germans are trying to just destroy them. Thus, the containers cannot start in the rightmost three columns (that would be too easy).
The stream is a gully and there are no hills on this map, so everything is flat. The hill hexes are considered non-hills.
Let’s see how things went!
(I actually started using a better photo editor so the arrows and stuff aren’t hand-drawn anymore. Yay!)
There are a couple of special rules for this scenario.
First, for the first three rounds (until Time Track 3, where the German reinforcements come in), it’s early morning so there is a hindrance to all fire equal to the range between firer and target.
Secondly, the Partisans can’t use their special movement (1 movement point per hex if movement is circled) until Time Track 3. As well, Partisan leaders can only activate units within their Line of Sight within 5 hexes rather than anywhere on the board.
Finally, each hex moved into costs 1 extra movement point.
As far as the containers go, the Partisans counters that are three or more figures (so not crews/teams) can equip a container and move it off the board on the right (the German side of the board is on the left). That unit is gone completely once it moves off the board, though it is not eliminated for German VP. They are just…gone.

As the Partisans, after seeing some AARs from other players, I decided to ignore the Woods circled because that is just a kill zone for the German Heavy Machine Gun.
One of the Partisans rules is that they don’t get specific weapons in a scenario. Instead, they get a number of random weapons draws prior to set up.
In this scenario, I had 5 weapons and actually drew a heavy machine gun of my own! I kept that back, out of range of the German kill group (at least during twilight). I also drew a Light Machine Gun, two Molotov Cocktails and a Satchel Charge.
With that, we began!
The Partisans started with a couple of Advance orders and a Move order, which allowed them to move toward the equipment containers that landed among them.

Partisan points, here we come! Some ineffective fire from the HMG happened as well, mainly to keep the Germans honest.
Then the Germans started to advance out of their starting positions, to maybe destroy some of those containers that landed nearer to them?

Sadly, the Partisans did not have a Fire card to harass them.
Since most of them were going into a gully, the Partisans couldn’t do much to them.
The Germans kept slowly advancing while the Partisans suffered from a complete lack of Move or Advance cards to keep trying to get the containers off the map.
DAVE’S SETUP MISTAKE
I definitely should have added the Partisan equipment to the Partisan troops (the most powerful of the Partisan units) and not to the Crews/Teams and Sections, as that made it so the Troops had to leave the board with the containers, depriving me of their firepower.

So the Partisans weren’t doing much and the Germans were slowly but surely advancing forward to engage in the pre-dawn darkness. They had already destroyed one container, for 4 VP!
The German HMG had actually broken the Troop with the HMG, and the Partisan broken morale made it so that it was tough to recover them.
Multiple attempts to do so failed, meaning the HMG was out of action.

As the Germans kept moving along the gully, Corporal Rettenhaus and his men stumbled into a minefield! While the squad was fine, Rettenhaus decided that things were too tough for him and he broke. Also, the Partisans did finally get a Move card to keep moving the equipment containers toward the edge of the board. Sadly, due to the 5-hex range of leader activation for the Partisans, not all of the units moving toward containers could actually be activated at the same time.
Rettenhaus refused to rally, even in the safety of the gully, but the Recover attempt brought a sniper that broke a Partisan section heading toward another container! That wasn’t good.
(Can I just say that the Partisan requirement of having to discard their entire hand if they have to discard is really annoying? Thank you).

The lone German squad was moving closer and closer to the equipment container next to the Partisan HMG, but the squad couldn’t rally!

The Partisans still tried to fire at the squad getting too close to the HMG, but the resulting morale check brought the German hero in! Dietel managed to rally Rettenhaus when nobody else could.
A subsequent German Fire order let the squad destroy another container, giving the Germans 4 more VP.
Things weren’t looking good for the Partisans.

Every time the Partisans tried to fire at that squad, something bad happened! In this case, it became battle hardened (probably because of all the bullets heading its way).
However, the Partisans were able to advance two of the containers toward the map edge.
Funnily enough, Rettenhaus tried to move out of the gully and it didn’t go well for him as he’s still afraid of mines!

He and the squad broke. And couldn’t rally after that either.
Maria (the Partisan leader 2 hexes away from them) couldn’t help but laugh.
The Partisans then played a Rout order which made the broken and suppressed Volksgrenadier squad rout off of the board (2 VP for the Partisans!) and made Rettenhaus rout right to the edge (but not off).
The Partisans did manage to move one container off the board (4 more VP, bringing it back down to 4 German VP).
And then another! And the broken Partisan units managed to rally as wel.
We’re back to even (0 VP for either side) and who knows what will happen?

Subsequent German fire (after Rettenhaus actually moved to be in a good position) not only caused Maria to break but also a Time trigger which brought on the German reinforcements!
This also removed the pre-dawn fire hindrance.
The mortar in the north never actually did anything, but the Germans in the south were heavily involved from the get-go.
Maria and the Partisan troop with the HMG kept breaking but finally rallied and advanced into the new German foxholes to try and take on a German squad.

And it worked! Unfortunately, multiple German ambushes killed Maria, but a Partisan ambush broke the squad and the Troop won the subsequent melee.
That’s 2 more VP for the Partisans, putting them at 2! However, Maria dying brought that back to 1 VP.
The Partisans tried to get another container toward the edge of the map, but with the pre-dawn darkness gone, that German HMG was deadly, even through the Brush!

The Troop broke and decided to just hunker down.
The Germans tried to rout them, but thankfully it was unsuccessful (they would have had to drop the container). And also thankfully, they rallied quickly.
The Partisans then tried to Rout the Germans (mainly to get rid of the card because they didn’t want to discard their entire hand) and ended up getting a Battlefield Integrity event!

This meant the Partisans received 1 VP per eliminated German unit (so 2 VP in total).
This would become important.
The Partisans were then able to move the container even closer to the edge and the Germans didn’t have another Fire card.
No need for a picture on this, but one funny thing is that when the Partisan Troop finally got to use the HMG on the Germans adjacent, it jammed! But on the German morale check, they drew a sniper which ended up fixing the HMG. Those Partisan weapons are sturdy!
Some ineffective firing happened but things had settled into a bit of a stalemate. A couple of Time advances and we were one round away from Sudden Death with the Partisans up by 3 points. Two containers remained: one in possession of a Partisan unit trying to get off the board and another sitting in the middle of nowhere with a German squad approaching it.

The current Time event brought a new Partisan leader on the board, Yuri. With Maria’s death, we needed another one.
On the next German turn, Rettenhaus advanced into the HMG’s hex for a melee.
But on the Partisan turn, they advanced right into the foxholes that the Germans had abandoned!

That’s one of the cool Partisan rules (and the Japanese in Combat Commander: Pacific): melee doesn’t happen until the beginning of the German turn, so the Partisans can just get out of there if they have the cards.
On the next order, the Partisans finally moved the container off the board, getting 4 more VP! Yuri started moving towards the fight.
The Germans moved back into melee with the Partisans and another squad went to the final container’s hex. Sadly, the Partisans had no Fire card.

This time, the Partisans didn’t have a Move/Advance card to get out of melee, so it was time to fight or die!
First, however, the Partisans discarded their hand, triggering another time check. The game could be over!
Unfortunately, I drew a 10 (needed a 7 or less) so the game continued.
The Partisans did draw an Ambush card, though, breaking Cpl Rettenhaus (he doesn’t seem very brave). The Germans didn’t have any Ambushes. The Partisans drew knives as the Germans rushed into the foxholes.
The Partisans drew high (3 strength + 9 roll for 12) and the Germans drew low! (6 strength + 3 roll for 9) but the Germans had the Initiative and did a reroll.
The second roll was a 7, giving the Germans 13 to the Partisans’ 12. The Troop and the HMG died!
One VP to the Germans, bringing the total back down to 6.

The first German order was a Fire order, destroying the final container! That was 4 more VP, bringing the Partisan lead down to 2 VP.
The Partisans kept moving toward the German reinforcements, perhaps to try and pad their lead. But maybe they should have played keep-away instead? That being said, the German HMG was dominating the line down the gully (the stream on the map) so it would be murderous to try and cross it in retreat.

The Troop that just came out of the gully paid for it the next turn, though thankfully not in a way that gave the Germans VP. Instead, the Troop took two successive hits and was reduced…to a new leader! Vassili was the last remaining remnant of the Troop but he continued forward.
(Another neat rule for the Partisans is that if they break for a second time, they’re not necessarily eliminated. They instead draw a Force card and if the unit is smaller than the broken one, they’re reduced to that unit instead of being eliminated).
The Germans did try to kill Vassili but failed.
And Sgt. Pfeiffer and his men came out of their foxholes to try and take down the Partisan troop in the southeast corner!

But the Partisans once again had a Move card and jumped into the German foxholes, where the extra German squad had gone! Instead of a melee with Pfeiffer, it would be a melee with just a regular Volksgrenadier squad.
The other Partisan troop, with the Satchel Charge, made Pfeiffer pay for his hubris by flinging it at them and breaking both him and the squad with him. Sadly, follow-up fire didn’t actually kill them.
The Partisans finished their turn and on their card draw, Time was triggered again.
Before the melee happened, a Sudden Death roll of 4 ended the game.
The Partisans had a 2-VP victory!
This was another nail-biter scenario that could have gone either way. It’s hard to say what would have happened if the game had continued for another round, though I have a feeling Pfeiffer and his squad might have died (just for fun, we did the melee that would have happened at the start of Andrei’s turn and he would have won it, getting one more VP).
I honestly was starting to worry as the game went on, but I managed to stay out of range (for the most part) of Andrei’s HMG so it didn’t have a lot of targets.
He was quite aggressive with Rettenhaus and his men, though the rest of the Germans stayed in their buildings and tried to just interdict the Partisans.
That might have worked too, though I had many units in the gully that probably would have just stayed their to avoid giving the HMG any more targets.
Thanks, Andrei, for the great game and as always, Noel for observing and helping with rules questions. The Partisans can be difficult to keep straight! It’s even more noble of Noel to do so because we finished at Midnight his time.
That puts me at 8-4 on the Ladder, and I finally won as an Attacker! Though that could have been because we were both Attackers.
So I probably won’t count this one for that.
Looking forward to June’s scenario. I didn’t play last June, but the scenario will be from the base Combat Commander game. I’ve played all of those scenarios with Michal, so it should be a fun time.
If you find these AARs interesting or the game itself sounds interesting, I encourage you to check out the Ladder. There are a bunch of great guys on it and there are so many spread out all over the world that Patrick has been able to set up two divisions. This means that (unless you want to) you don’t have to worry about playing somebody with a 12-hour time difference.
Stay tuned for more exciting AARs in the future.
It was certainly nice not being sick during this scenario.
Combat Commander Ladder – After Action Reports
To see all of my Ladder After Action Reports since May 2021, go here!

Fantastic result and congrats on your anniversary!
LikeLiked by 2 people
Thank you!
LikeLike
Pingback: Combat Commander Europe – After Action Report – Scenario #9 – Rush to Contact – Dude! Take Your Turn!
Pingback: Combat Commander Europe – After Action Report – Scenario LoM9 – Operation Mercury – Dude! Take Your Turn!
Pingback: Combat Commander Europe – After Action Report – Scenario 90 – The Man Who Would Be King – Dude! Take Your Turn!
Pingback: Combat Commander Europe – After Action Report – Scenario 75 – Sturmgruppe Beton – Dude! Take Your Turn!
Pingback: Combat Commander Europe – After Action Report – Scenario 65 – Road Trip – Dude! Take Your Turn!
Pingback: Combat Commander Europe – After Action Report – Scenario 51 – The Uneasy Wait – Dude! Take Your Turn!
Pingback: Combat Commander Europe – After Action Report – Scenario 35 – Spartakovka Salient – Dude! Take Your Turn!
Pingback: Combat Commander Pacific – After Action Report – Scenario M6 – Breakout – Dude! Take Your Turn!
Pingback: Combat Commander Pacific – After Action Report – Scenario A – Grassy Knoll – Dude! Take Your Turn!
Pingback: Combat Commander – After Action Report – Scenario #34 – Encircled at Hill 30 – Dude! Take Your Turn!
Pingback: Combat Commander – After Action Report – Scenario #23 – No-Man’s Land – Dude! Take Your Turn!
Pingback: Combat Commander – After Action Report – Scenario #112 – Sonnenwende – Dude! Take Your Turn!
Pingback: Combat Commander Europe – After Action Report – Scenario #14 – At the Crossroads – Dude! Take Your Turn!
Pingback: Combat Commander Europe – After Action Report – Scenario #30 – Red Skies at Night – Dude! Take Your Turn!
Pingback: Combat Commander Pacific – After Action Report – Scenario E – West Tank Barrier – Dude! Take Your Turn!
Pingback: COMBAT COMMANDER PACIFIC – AFTER ACTION REPORT – SCENARIO M4 – TEMPLETON’S CROSSING – Dude! Take Your Turn!
Pingback: Combat Commander Europe – After Action Report – Scenario #41 – The Commissar House – Dude! Take Your Turn!
Pingback: Combat Commander After Action Report – Scenario #53 – Deeds Not Words – Dude! Take Your Turn!
Pingback: Combat Commander After Action Report – Scenario #67 – The Orient Express – Dude! Take Your Turn!
Pingback: Combat Commander After Action Report – Scenario #82 – Hidden Guns Lash Out – Dude! Take Your Turn!
Pingback: Combat Commander After Action Report – Scenario #91 – The Battle of Trafalgar – Dude! Take Your Turn!
Pingback: Combat Commander After Action Report – Scenario LoM #8 – Codes in the Sunrise – Dude! Take Your Turn!
Pingback: Combat Commander After Action Report – Scenario #105 – La Fiere Counterattack – Dude! Take Your Turn!
Pingback: Combat Commander After Action Report Supplemental – Scenario #28 – No Ingouf Around – Dude! Take Your Turn!
Pingback: Combat Commander After Action Report – Scenario #10 – Commando School – Dude! Take Your Turn!
Pingback: Combat Commander After Action Report Supplemental No. 2 – Scenario #92 – Let England Shake – Dude! Take Your Turn!
Pingback: Combat Commander After Action Report – Scenario #20 – A March in December – Dude! Take Your Turn!
Pingback: Combat Commander After Action Report – Scenario #33 – We Go! – Dude! Take Your Turn!
Pingback: Combat Commander – After Action Report – Scenario L – Slopes of Hell – Dude! Take Your Turn!
Pingback: Combat Commander – After Action Report – Scenario M10 – Bulolo River Bridge – Dude! Take Your Turn!
Pingback: Combat Commander – After Action Report – Scenario 44 – Stalingrad of the North – Dude! Take Your Turn!